I still can't sleep, so I might as well write up what I figured out while lying awake.
Just before going to bed I reviewed Pat Erny's sleeve-vent tutorial. This is a quick and easy finish when installed in a slit, but quite impossible to set into a seam — let alone a flat-felled seam.
The underlap is comparatively easy, and not all that different from the way Erny does it. Start out with a rectangle, as she does, but fold a quarter inch of the top edge to the wrong side. Might could also fold the corners in, to make mitered corners when the sewing is done.
Unfold the crease in the underlapping seam (I'm thinking of retrofitting an existing shirt, to work out the kinks before designing a new one), match raw edges with the right side of the lap against the wrong side of the shirt, stitch along the crease, press the seam open — that will fold the crease back the way it was.
Fold a quarter inch of the remaining raw edge to the wrong side, fold the rectangle so that the folded-in raw edge touches the raw edge of the pressed-open seam, like the flat-felled seam that was opened. Edge-stitch along this fold and the top.
I spent a lot of thought on how to make the peak at the top of the overlap when the overlap can't simply be appliquéd on top, but must also cover the raw edge that must be folded to the inside to continue the felled seam. Finally I thought of folding the point of the peak down, to make a hexagon instead of a pentagon. Then the triangles folded down need not meet in the middle, and the triangles folded down in the fold won't stop one from putting the shirt inside the fold of the overlap.
One would mark a line across the inside of the overlap, fold the vertical edges a quarter inch to the inside, then fold the corners so that the folds lie on the horizontal line. Then fold the overlap in half and use a ruler or long needle to reverse the fold at the top until it, too, lies along the horizontal line. If that line is in the right place, this fold won't quite reach the middle of the overlap, and the overlap can be slipped over the shirt centered over the visible edge of the flat-felled seam.
I think that we will also need vertical lines dividing the rectangle into quarters.
Baste carefully so that the fold underneath is a thread-width beyond the fold on top, edge-stitch the vertical fold to a stitch or two above the proposed opening.
Ah, yes, before opening the seam, we must draw horizontal lines showing where the top of the opening will be.
Now arrange everything the way it should lie when finished and stitch around the hexagon, using the lines proposed in the previous paragraph to show where the bottom of the hexagon is.
Then restore the flat-felled seam by sewing it as a lap seam. Since the fabric of the shirt I intend to retrofit is black and fuzzy, I don't think hand work will be required except for hiding the ends of the threads.
Now I'm wondering at what stage to install the vent in a new shirt, and how much of the side seam to sew before installing the vent.
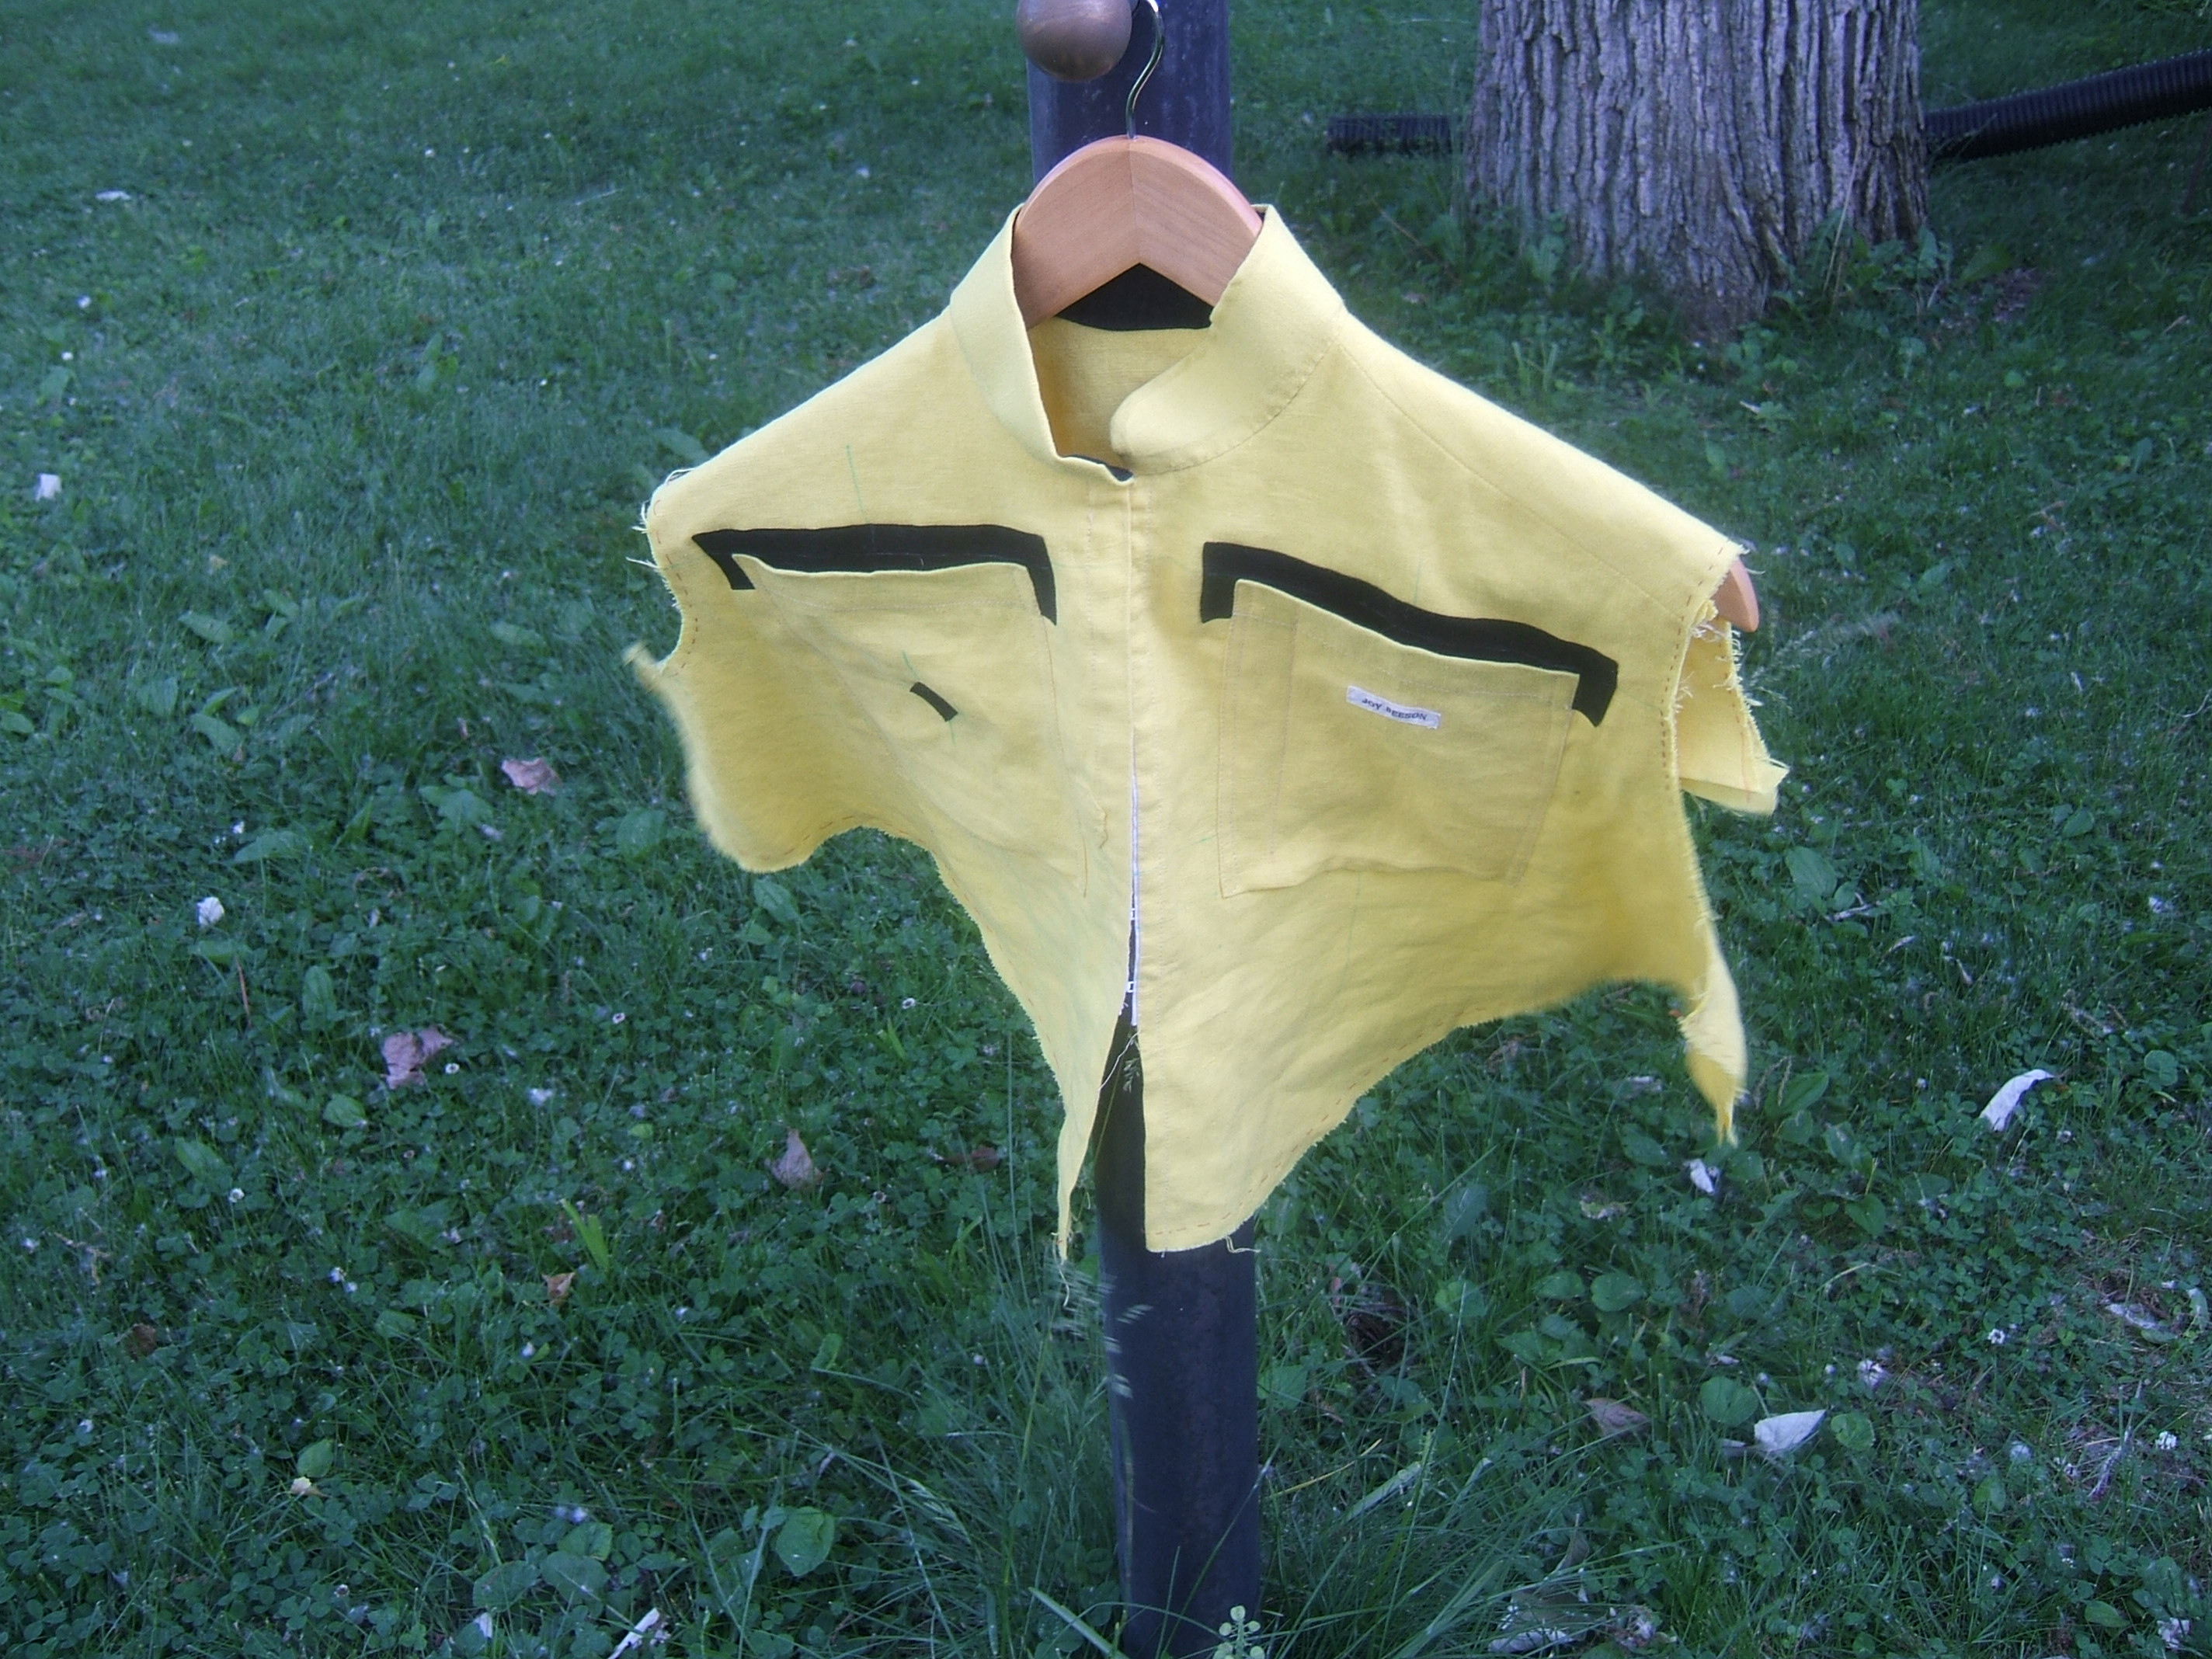
I pinned the pockets ready for the final stitching, then got performance anxiety: When that stitching is done, I'm well on the way to adding back, front, and sleeves and having a shirt!
So I set it aside to sew tomorrow when I was more alert and tomorrow never came — I never even found time to bring this diary up to date. I thought sure I'd do it between loads of wash on Monday, but there were other things to do and we went to a party in the evening. Tuesday was shopping; I got back in time for supper, but I'd skipped my nap.
Today, I sew! But somehow there was always one more tiny little job that had to be done right now, and suddenly it was lunch time. Then I got up from my nap just soon enough to make chili and cornbread.
I hesitate to sew in the evening, but this is pre-planned and pinned; I'll just work very slowly and pay close attention and turn the handwheel a lot. And Lo and Behold, It Is Done. And enough light left that I could photograph at a short enough exposure to freeze the wind-whipping, save at the extreme edge.
I looked up the width of a pencil pocket and was pleasantly surprised to find that I had discussed it. I should add some disclaimers (heavy fabric, fat pencils, etc.), and finally get around to mentioning the clever way Carhart makes pencil pockets.
I was pleased to see that my seam gauge had a five-eighths notch in it; I'd entirely forgotten five-eighths-inch seam allowances. After drawing a line with self-removing pen, I pinned the line and stuck a pencil in just to be sure.
I left the needle thread long enough to thread into a hand-sewing needle at both ends. I suspect that not simply tying the threads together at the bottom was a mistake; I was beguiled into bar tacking by the presence of a seam to bar tack into. Which made the end of the stitching uncomfortably close to the bottom of the pocket, but I'll wear the shirt for a while before judging.
I think the snap should have been a tad higher on the pocket. The presence of the pencil pocket makes the name tag look off center.
Not today, either. It being Thursday, I had to clean a catbox, and before I could do that I had to cultivate the asparagus, because I have to finish mulching it by the first of August so that there will be a full month of heat and sunlight to bake out infectious organisms. While out there I noticed a lot of work that must be done in the adjacent garden. When I returned to the sewing room, I was annoyed again by the hand-sewing needles that have been lying on the briefs box ever since I stopped using the curtains as a filing system, and realized that what I needed was a little bitty bulletin board to pin the packets to. As I was turning around to head for my shopping list, I remembered that we have a lot of corrugated cardboard in the recycling bin, and I could cut three rectangles of that, stack them, nail them to the wall with old machine needles, and get those needles filed today. While I was cutting, DH mentioned that his latest attempt to extract information from a totally-ignorant help-desk had left him convinced that the simplest way to deal with Comcast would be to discontinue the service, so I need to activate my G-mail address. We spent the rest of the morning utterly failing to make Thunderbird connect to Google.
I did pin the back to the yoke and stitch it today. Next I need to press the seam, pin the yoke lining, and make two rows of top-stitching.
Shortly after midnight, I visualized that my scheme for the overlap of my shirt vent was overly complicated.
Start with a rectangle. Draw a line across it above the top of the opening and about a quarter inch below where the corner of the peak is wanted. Turn the corners down so that the raw edges lie along this line. Sew one edge to the shirt and press it toward the opening, so that the shirt lies flat and the overlap is creased. Press under the other edge to match. Baste the fold to just barely cover the stitching on the wrong side. Press, if needed. Push in the corner of the folded edge to match the other bias fold. The reversed fold will be about a quarter inch above the line. Turn under the raw edge still showing at the peak. Top-stitch from the right side, catching the edges on the wrong side.
⁂
And that is also too complicated. The folded-in dart keeps the overlap from sliding onto the shirt beyond the middle — but the middle is exactly where one wants the edge of the shirt.
Fold a quarter of the width to the wrong side at both ends of the rectangle, fold the top corners down to match the edge of the folded-in bit — or make the fold-down all the way to the top of the opening and draw a line across it to show where the corners go. Match the bottom of the rectangle to the bottom of the hem, sew it, fold to back and push in the dart. Baste as required. Repair flat-felled seam by sewing as a lap seam. Arrange vent to final configuration and edge-stitch, ending by stitching across the bottom of the pentagon.
By george, I think I've got it. Must draw some pictures before I forget.
And now I'm late for a bike-ride to the farmers' markets. [One of the markets was gone when I got there.]
No, mend the flat-felled seam, then do the top-stitching.
This morning I finally cleared off the ironing board, heated up the iron, and pressed the seam I sewed last Friday. Then I had to press the crease out of a hem I picked out of a very voluminous nightshirt a while back — the hem doesn't look that wide when the shirt is on him or on a hanger, but it goes round and round when draped over an ironing board. But it shouldn't take long to put it back into service once I figure out how much to shorten it; I'm simply making the hem wider.
Then I really needed to press a white-linen poncho shirt that I put away un-ironed last fall. My everyday jeans need patching, so I've been wearing the pants from a suit that turned out to be too loud to wear, and I have only one other plain white shirt. They are good, comfortable linen pants, but the first time I wore them, Dave accused me of leaving the house in my pajamas. I hope the poncho shirt covers a bit more than my collared T-shirt. I do have two knee-length shirts, but one is plaid and the other matches the pants.
Poncho shirts are supposed to be easy to iron, but stout linen needs to be ironed on both sides and more than once.
And I needed to iron a sports shirt of Dave's that I had washed on Monday. No surprises this time; I've been ironing sports shirts for sixty years.
⁂
I pinned and top-stitched the seam just before suppertime. Now I'm too stuffed to proceed.
The curry jersey was top-stitched once, the taxicab jersey twice. I think once is sufficient.
Another first: I brought the kitchen's working-at-the-counter stool into the sewing room. I want to sit down while I'm marking the hem on the nightshirt, and I also want plenty of room under the ironing board for the rest of the skirt to dangle.
Another thing I did yesterday was to clear all my shirt parts off the piano. I put the small scraps into the linen box — and replaced the widthwise scrap on the ravellings pincushion with a lengthwise scrap. Pity I didn't think of that before sewing the patch on. I was reminded of it by reading back entries to get oriented before writing yesterday's entry.
The rest had already been folded to the shape of the small cutting mat and neatly stacked, so I just lifted it and transferred it to the ironing board, then put the mat and its plywood back into the bag in the laundry room. I forgot the ruler, pencil, tape measure, and card of twill tape that had been precariously balanced on top, but they were exactly where I wanted to put the dirty cat box this morning, so they are back with the pile.
I should use the tape this evening, if it's fit to sit on the porch and sew. That will be the last bit to check off my list of notions; then I can reformat the list as an HTML list, which will erase all the checkmarks. There's probably a way to combine checkmarks with <ul>, but it would involve styles and presentational mark-up.
I'm looking forward to cluttering up the parlor with card tables so I can cut out the bra and scarf.
Time to get back to work — and I realize that the "table" for the mouse of the other computer is a kitchen stool.
⁂
The hem is 100 inches around. According to my solar calculator, that's 2.777777777777777… yards. Felt like more when I was pinning it.
⁂
The chairs on the porch hadn't been rained on, but it was too cold to sit outside, so I dragged the rocking chair to the patio window.
The warp threads aren't a bit better than the weft threads, so I overhanded the fronts together with ecru 100/6, from the inside. You need a good light and 3.5 glasses to see the stitches. Then I hemmed twill tape over the raw ends of the hook-and-eye tape, with white 100/6 because I didn't intend for any of the stitches to come through to the right side.
⁂
Oops, there's another unchecked item: elastic for sleeves. I think I'll continue unchecking everything else, and mark that one with arrows or something.
First chore was to make a couple of little pouches for a magnet and a washer, and pin them to the curtains. I'm not only out of bent pins, I had to move a few from the box to the Grabbit. I didn't take many, as there are a lot in the wide, wide hem of the nightshirt that hasn't been tried on yet.
When we turn in our leased car in a couple of years, a whole bunch of bent pins and several good pins will be returned to circulation. But with any luck healthwise, we'll lease another car and it will probably have a part we want to wrap in an old sheet and stash in the loft.
I found a strip just the right width among the "binding strips from roll muslin", tore it in half, folded each piece and stitched around two sides, and pinned it to the curtain.
Right place first time! But the higher magnet separated by itself when the curtains were opened, so I thought we needed to move the magnet in the hem up, so it could pull open too. There were two more strips in the pile, so I cut them to twice as long as their width.
Then I had a terrible time persuading the three rolls of cloth to go back onto the shelf. They are on top of the folded bolt of wide muslin, which slants down where it hangs over the edge. I finally had to use an upholstery pin to chock the roll of agricultural burlap.
I should make another sheet just to lower the muslin level. The surviving linen sheet isn't going to wear forever.
I see the empty Grabbit and think it's upside-down. I don't know why this gives me a jolt; it's supposed to be upside down when not in use, to protect the cat.
I'll have to take a few more pins out of the box today; I'm finally going to attach the front to the front yoke.
The magnets appear to be working well in the higher positions, but I'm going to wait a week before I sew them in place.
I was given a nifty ball-point pen a few days ago and thought I'd carry it in my pencil pocket. Pens aren't 100% reliable the way #2 pencils are, but I have a pencil in my notebook and a back-up pencil in my wallet.
The pen (which includes a flashlight) won't go into the pencil pocket. I thought I'd pick out the stitching, but this morning I tried my notebook in the notebook pocket, and it can't spare any fabric to widen the pencil pocket.
But the pen has a pocket clip and is blunt (and very secure) on the end. I can carry it in the cell-phone pocket.
⁂
Before naptime, I trimmed a quarter inch off the bottom of the yoke (tapering to full width at the seam), basted a quarter inch of the yoke lining to the right side, and pinned the front in place.
⁂
And after supper (and after writing some important e-mails) I sewed the front to the yoke and picked out the basting that had been holding the yoke in register with the yoke lining. I had been careful to baste the turn-under with a different color of thread for this purpose.
Now I want to press as it lies before top-stitching. I could do the first line just fine un-pressed, and I could smooth and flatten as I stitch for the second, but I've spent too much time on this project to start cutting corners now.
I'm going to go riding in my old ragged jersey tomorrow. Might have energy to press when I get back.
While putting my wallet in my jersey pocket, I was annoyed again by the curl at the edge of the flap, reflected that I meant to make the coin-catcher wider when I make the new one, realized that I could pick out two short seams and try out the idea.
The new wallet is getting on toward desperate.
Today was washday. I had planned to iron the two summer dresses I put away wrinkled last fall, and get some sewing in while the iron was hot, but I got only five hours of sleep last night, so I caught up on Facebook instead.
I felt better after my nap, but had other things to do in the afternoon. After supper (and after a bit of weeding and planting), desperation moved me to iron a patch on the jersey I want to wear tomorrow, and while the iron was hot, I pressed the seam between the front and the yoke of the new jersey. I finished sewing it, but ran out of steam before pinning the sleeves in.
The seam is rippled, but it's flat at center front where it counts. I'd count this as a failure of patience, but I doubt that a second try would be any better.
Yesterday I set the treadle's foot on the sleeve seam that I pinned sometime or the other, then had to deal with something. The treadle is still open, since I can't fold it with a sleeve-seam attached.
I had managed to ease the seam with the basting thread, but I think I'll run machine basting from notch to notch for the others.
The notches for dividing the ease between the two point-of-inflection notches didn't line up worth a nickel. I think I'll totally ignore them and ease by eyeball when pinning the other seam.
coin catcher in wallet
I also found time to pick out the stitches holding the coin catcher on my wallet, and this morning I sewed it back two and a half inches wide. I'd better add a note to that effect to my to-do list. Much thinking and pondering over the years wandered around to making the wallet just like the one that has worn out, except for color-coded ornamental stitches on the bill pockets.
And a wider coin-catcher pocket, and maybe a pencil sleeve.
I threw out an obsolete appointment card and a handful of expired coupons while putting stuff back into the wallet. Well, I don't throw out old appointment cards, but put them into a snack bag of available small bits of cardboard for measuring hems.
Sigh. Seems like just last century that medical-appointment cards were not a plentiful sewing tool.
pocket in taxicab jersey
When my magnifying glasses tore their way out of the pocket in my curry jersey, it became urgent to mend the hole under the keychain pocket in my taxicab jersey, so a day or two before my Wednesday ride, I ironed a piece of loosely-woven interfacing — the interfacing I keep on hand for mending patterns — to the back. It seems to be holding the edges and shreds. I put a small piece of baking parchment under the hole, and it perfectly prevented sticking.
I stitched the seam that I'd pinned, but while sewing it I could no longer deny that the White badly needed oil. So I spent at least half an hour walking back and forth between the pictures on the computer in the sewing room and the sewing machine in the bedroom.
I left the machine set up for stitching a gathering thread — 100/6 on top and nylon in the bobbin. Probably won't have time to do it tomorrow, since I'm throwing a party at sunset.
Had to switch the thread back so I could sew the hem in Dave's muslin nightshirt today.
I think I started the job yesterday. Time's fragmented when you're having festivities.
I changed the thread back, easing-basted the right sleeve, easing-basted the gap in the left sleeve seam where I'd released pleats, re-sewed the gap, turned and sewed the crease of the flat-fell in (turning the hand wheel and feeling for puckers all the way), and pinned the right sleeve.
Then I felt the need of a break, so I tore a couple of sweat rags off an old pillow case and tore the rest of it into skillet wipes. I paused that procedure to clean up cat vomit and spot-clean the carpet.
I'm running low on worn-out pillow cases. That's what I get for making pillowcases out of new fabric instead of old sheets. I have two worn-out sheets, but the pillow case that I made of left-over linen didn't last any time at all; I don't think that a pillow case made from worn linen would be worth the effort.
The other two linen sheets are hanging in there; I think the first two failed at flaws in the goods, and I can cut around those, but it's better to keep them for wrapping things and maybe some day tear sweat rags directly, which would make a lot more sweat rags. One of the worn-out sheets is in the barn attic wrapped around an unwanted view-blocker that came with our leased car, keeping it clean for when we turn the car in.
I appear to have used up all the worn-out muslin sheets. Probably making pillow cases.
My lunch must be hot by now.
After my nap, I sewed on the right sleeve, then sewed the crease in — and found that I'd run out of bobbin thread five inches from the end. The new bobbin slips on the winder; a toothpick I tried to use as a shim was too thick, and so was a scrap of muslin. Finally I picked up a speck of thread that was lying on the machine, and that was just right.
I wonder how I filled the bobbin in the first place? It's possible that I used the electric screwdriver.
This morning, I pressed the seam. I'm going to have to stitch as carefully while securing the edge as when I sewed the crease in, and be careful to keep the seam flat on the bed of the machine and curved just enough.
Then it was imperative that I iron a dress designed for hot weather. I chose to iron the linen print mounted on crinkle gauze first. Linen on gauze is NOT a substitute for striped chambray mounted on unbleached batiste!
When I was finished, I was too tired to tackle my other dress even though it's easier to iron. One will get me through Sunday.
I finished the armscye seams in the afternoon, and basted creases into the side seam in the evening. In the process, I discovered that on one end of one seam I had trimmed away excess seam allowance on the wrong side, so I'll have to darn a bit in one armpit.
I have pressed the crease that I basted, and am now pinning the side seams.
⁂
So I sewed them and pressed them and let them cool, and just as I was about to turn the shirt right-side out so I could make the second of the three rows of stitching that it takes to make a flat-felled seam, I realized: "Hey! The side seams are sewn! I can try this thing on!"
It felt very heavy putting it on. (And warm over a T-shirt.) With the shirt inside out, I couldn't hook hooks by feel, but it seems to fit, and I think that the sleeves are just right. They will blouse up a bit when the elastic is in, and that will allow for holding the handlebars and reaching up.
⁂
And then I remembered that when I stitch a sleeve on the right side, I want it inside-out so that when I put it behind the foot and pull it forward, the part I don't want caught in the stitches can be held back by the needle bar. Suspense: how far back into the sleeve can I put the foot before I start stitching? It would be nice if I can do the entire armpit.
⁂
I put the foot well into the body, as it turned out. When I was starting the second seam, I got confused and put it below the bottom of the yoke. This was, shall we say, a bit excessive.
Note: gathering the sleeve up on the needle bar is NOT a shortcut. One must patiently follow the seam back, occasionally tugging at the fabric that tries to follow the seam under the foot.
I don't think a free arm would help much with this operation. At the moment, I'm blanking on how I use a free arm. It involves stitching the sleeve off the arm, not onto it, but I would have to put my hands on to remember how I accomplish that.
A tighter sleeve that tapers would be easier with a free arm.
One last stitching and the side seams are done!
I don't think I'll start the sleeve facing tonight. Might fiddle with the hem.
⁂
I felt like sitting outside in the evening, so I hand-basted a quarter-inch turn-under around the hem of the shirt.
It wasn't easy to turn a quarter inch along the edge of black linen by light that comes from dead overhead, but I managed pretty well by feel.
Then I did the same for the ends of the facings, because I plan to press the seam open and then sew the allowances down, to make it easier to insert the elastic. With the edges hemmed, the elastic won't fray up the edges inside, and I won't need to slip-stitch where I open the seams to let the elastic in.
I also pressed the crease that I hand-basted yesterday evening. That makes the shirt look nicer on the hanger, and should make it easier to turn the hem.
Then I folded a facing in half and compared it to a sleeve. The cut length of the facing equals the finished width of the sleeve. I took the facing pattern down and compared it to the sleeve pattern — they started out exactly the same. The sleeve must have stretched.
I made the side seam a tad narrower than the pattern says, but that should only have called for a narrower facing allowance.
I pressed out the end creases — the iron had been unplugged, but was still hot. I plan to hand-baste eighth-inch turns, stitch just missing the raw edges, and ease in a half inch. Since the sleeve has stretched more than half an inch, this ought to work.
⁂
I finger-pressed the seams open; the seam was so narrow that the toe of the presser foot ran right down the middle while I was stitching the edges down, so it came out as flat as if I'd used the iron.
The allowances of the seams holding the facing to the sleeves need to be hot pressed before I wrap the facings to the inside, leaving a narrow stripe of black on the right side like a hong-kong binding. I had time to do that before we went out to dinner, but I didn't want to start such a job with a deadline.
I *could* finish the job tonight, but I'm sleepy and what is one more day of riding in rags?
Before I pinned the facings to the sleeves, I divided each into eight parts by repeatedly folding in half, pinching a crease, and setting a pin. This divided the half inch of extra fabric into sixteenths of an inch, about a millimeter and a half. This little was easy to ease in, even with the longer fabric on top. I had absent-mindedly pinned with the shirt right-side out, and needed to stitch inside the teacup. The sleeves are wide, but not wide enough to stitch with the outside of the cylinder next to the presser foot.
Spent all morning doing wash; I expect to spend all afternoon making chili and putting up bread-and-butter giardiniera.
A post in Creative Machine links to https://www.nationalsewingcircle.com/article/oilcloth-wallet-pattern/ , which is a wallet that appears to be similar to mine, made of oilcloth. It says oilcloth is "strong", but I haven't seen any lately that had anything better than fuzzy non-woven embroidery stabilizer as backing. And I'm pretty sure it doesn't come in black. Not to mention that the oil would wear off the corners almost at once, and that would look terrible.
But I should check Lowery's for heavy synthetic fabric before I cut the black duck. (I still think I have some black Cordura around here somewhere.)
The wallet at the link folds in half and fastens with a strap and snap instead of folding in thirds, and I didn't notice any coin pocket when reading the tutorial. But I was insufficiently interested to find out what the zipper gave access to. Ah, in the description, it says "a zippered coin section".
The instructions say "oilcloth is tough to pin through", but fails to mention that pinholes in oilcloth don't close up.
⁂
Set the chili to simmering (I put in way too much carrot and made it taste sweet — which my spouse didn't mind at all), reflected that the deadline for getting the pickles made and in the jars was much too tight for comfort, and realized that here was a golden opportunity to get some sewing done.
So I pressed the facings away from the sleeves, rubbed some glycerin on my fingertips, and folded the facings to the inside and pinned in the ditch to hold them. This left a neat black binding a quarter inch wide on the right side. Then I turned the shirt inside out and stitched "inside the teacup" just as close to the black as I could without catching it. I thought that I'd come too close at one point in sewing the second facing, but it turned out that the stitching is quite invisible all the way around on both facings. Well, invisible if I don't look too close. Then there was only five minutes left, so I took down some of the laundry.
After marking and pinning the stitching lines for the elastic casings, I plan to re-thread the Necchi with ecru thread and stitch on the wrong side. Stitching around a sleeve cuff is what salesmen do when they want to make you think that free-arm machines are the best thing since the eyed needle.
I found some broken stitches while sorting the laundry, and added them to my to-do list. Also the elastic in second-best underpants #2 had come untied. I decided that it would be quicker to re-tie than to add to the to-do list. I used a yarn needle to draw the elastic back into the casing.
I dropped my Grabbit onto the concrete while going outside to pin in a marked line. It doesn't appear to have taken harm, but I'm pretty sure that it didn't rattle when shaken before.
Then my water bottle fell out of my pocket when I stood up to come in, but that is shatterproof — and disposable.
The line being pinned was the inner seam of the inside casing. Umm … upper? Proximal!
I might could have this shirt to wear tomorrow.
⁂
There's an inch and three quarters between the proximal casing and the stitching holding down the edge of the facing. I wondered what I was thinking to make it so wide, then I realized that there is just enough space to add one more casing if I want it to fit closely farther up the arm. If I do add it, the middle casing won't be centered as well as it should be.
I made the bottom hem an inch and a half wide.
Now to see whether I made a note of how long to cut the wrist elastics.
⁂
No mention in LINJERSY.HTM, except that I cut quarter-inch elastic to fit my wrists.
Left wrist at bone: 6 1/2 inch.
Left wrist 1" up: 7"
Right wrist at bone: 6 3/4
Right wrist 1" up: 7"
I cut both distals seven inches and both proximals seven and a half. The left wrist seems a bit tight, but I overlapped the elastic a bit more than a quarter inch. I shall be more careful when sewing the right elastic.
⁂
repair red bra
Yesterday, I replaced some missing stitches in a leisure bra that I washed last Monday. Today I mailed a letter that I wrote last Saturday.
With the jersey finally off my plate and on my back, I can't decide which extremely-urgent project to undertake next.
I came back from today's ride sweaty enough that I thought I ought to soak my jersey in a bucket, spin it out, and soak it again. I was surprised at how yellow the water of the first soaking was.
The do rag, which had already been soaked several times, was noticeably lighter in color.
I must get on with making the matching bra and scarf. Or my wallet is worn into holes, or …
While dressing for church, I made it my goal to have my linen knickers to wear next Sunday.
⁂
I felt like sitting on the porch this evening, so I picked the stitches out of the waist casing of my linen knickers. To my surprise, much of the thread could be simply pulled out. It seemed smooth and strong, but was broken about every six inches.
If I cut along the lowest row of stitch holes, I'll get off all the worn fabric. Then I can press the cut-off strip and cut the new casing half an inch wider.
As I was cutting off the worn fabric, I realized: the line I'm cutting through is where the folded edge of the casing was; I need to make it wider to come down farther.
Then I reflected that I'm leaving out the ruffle, and that makes the casing strip half an inch wider. So allowing just for the seam will be just right. I'll sew the casing to the wrong side of the drawers, then fold so that the casing just covers the stitches, and stitch around twice.
Now how to let the elastic in? I think I'll hem one of the piecing seams, so that I can open it and just leave it open, and stitch the other seams open so that they don't rumple when the elastic slides back and forth.
I found some white linen left from making bras that has a lot of true-bias edges. The scraps from the knickers are probably around somewhere, but they wouldn't match the worn fabric any better than the bra scraps will. I seriously considered making the new casing from the blue-plaid linen-cotton.
Addendum: I want to wear the knickers under the floral-basket gown, which can't be worn until it's ironed.
I ironed the gown yesterday. Also laid out the linen scraps and found a bias edge long enough that two strips would suffice.
Today is Roomba day in the parlor, and the card table on which I'd laid out the scraps had to go. So before breakfast I measured the cut-off strip, sorted the scraps, cut a four-inch strip off the edge I found yesterday, folded up the scraps, put the scrap box back on the shelf, and folded the card table.
I was thinking that I'd fold the scrap in half and mark a crease with a hot iron, but it will be easier to cut if I mark the center line with my shaku stick. It's cloudy today, and all my artificial lights come from dead overhead, which makes a crease hard to see.
⁂
I fingernail-pressed a crease, which was much more accurate than hot-ironing one, then I pulled the dining table out from under its light. I didn't even need my needle-threading glasses to cut along the crease. I found cutting on the mountain side easier than cutting on the valley side.
⁂
I finished sewing the casing to the drawers about half an inch before the end of the thread would have entered the tension device. I hope the electric screwdriver is charged — but I do have another spool of white 100/6 on the Necchi.
⁂
Well, it was ecru on the Necchi and the full spool of white was on the shelf. I swapped, and will refill the empty spool at my leisure.
I left the basting in the seam that joined the ends after pinning, because I felt that it was a better seam to open than the piecing seam. Then I sewed it up inside where I couldn't see it.
I guessed right, and picked the basting out through the slit I opened to let the elastic in.
My waist measures 39". The elastic that I measured around my waist measures 39 3/4. Say What?
I trimmed it to 39" even. I'll overlap a quarter inch when I sew it together.
I bought ten yards of quarter-inch elastic last Saturday, but I cut this off the old reel and there is still a lot left.
I'm quite pleased with Walmart's square snack bags for storing elastic. I may go through the elastic box and throw out some of the sandwich bags.
⁂
elastic casing in linen drawers
I tried them on and they stay up, but another inch shorter wouldn't have hurt any.
So I'm all set to make a good impression when the Free Methodist Church attends services at the Church of the Good Shepherd next Sunday.
I wish I had opaque stockings. Rayon undersocks were a pain to put on new, and now they have been washed all out of shape.
⁂
The elastic I took out of the muslin drawers measures 14", which makes it 28" around.
I thought all I needed was to take off and replace the bias facing, but the muslin part of the casing is also badly worn, so I'll have to cut it off and sew on a casing as I did for the linen drawers. I think that there is enough binding strip left from the cat quilts to do the job.
There's only one round of stitching left to take off, but I think I'll leave back-up drawers on the back burner and start my new wallet tomorrow.
The time I spent picking stitches out of the muslin drawers could have been spent getting two pairs of underpants off my ironing board. And I would have had time left over to pick at the drawers.
Today I'm roomba-ing the bedroom (with stuff off the closet floor piled on the treadle), re-building my cooler for the Tour des Lakes, and buying frozen food. I should work a little weeding and water hauling into the schedule.
⁂
I can't find any black synthetic except ripstop and windowscreen, but I have a big piece and a small piece of cotton-and-linen duck, and yards of black twill. I think I could make a pair of pairs of nice dress pants out of the twill; it seems to be as heavy as the linen print I'm wearing for everyday.
I should move "patch everyday pants" up on my priority list. The linen-print pants look like pajamas.
And postponing the wallet until I have a look around Lowery's is a good idea.
⁂
I got some porch time this evening. Dave showed me a loose belt loop and asked whether I could take a tuck in it. The elastic had stretched and a tuck wouldn't do a lot of good, so I opened my box of elastic.
I thought that I had a plethora of odd scraps of black elastic, but all I had in black were the kinds that I buy more of when I run low — aaaand a piece of half-inch elastic exactly long enough to make two belt loops.
So I cut it in half, sewed the ends of one piece together, he put it on his belt, it worked, I sewed the other piece and put it on his other belt.
I don't think I've ever spliced elastic that wasn't to be covered by a casing before. I hope my thread-securing methods are adequate on elastic that is exposed.
But if they are not, I'm pretty sure that Lowery sells black half-inch elastic. And three-quarter would do nicely.
I put the old belt loops into the snack bag the half-inch elastic had been in, just in case.
New goal: cut an inch out of the linen-drawers elastic before Sunday.
Today: laundry and pickles.
Laundry, but no pickles.
I tore my gray knickers in two places Saturday, so I must either patch those or put new elastic in my black knickers before I ride again.
I thought I had some patch donors in the closet, but all I could find was a pair of pants that appear to be repairable. This led me to wonder where I got the patches that are on it, but they are darker than the fabric, so I suppose I used new fabric. There isn't much matching fabric in the "pants linen" box; that suggests that I used it up.
I tried them on, and they are really comfortable, so I'll patch them one more time. I have three good pairs of grubbies, so this job is way down on the priority list. I'll use scraps from the knickers, as they are thinner and lighter in color than the scraps from the slacks.
So there's nothing but new fabric to patch the knickers with. I'll soak my chosen scrap in bleach in the hope of softening and fading it.
There's rather a lot of raw linen left from the knickers. Not quite two yards, I estimate, but it's fifty-eight inches wide. Clever cutting and a bit of piecing might get another pair of knickers out of it.
⁂
I selected a scrap, laid it on the bottom of a stainless-steel pot, saturated it with peroxide, and set a timer for one hour. I mean to rub it with bar soap, then if that hasn't made a change, put it back into the pot and pour in some sodium hypochlorite — for a much shorter soak.
⁂
After about half an hour, two white arrows had appeared on the fabric. Must have been some chemical reaction between the peroxide and whatever I'd drawn the arrows with. I hadn't noticed them before, but I'm sure I wouldn't have used air-erasable markers to make arrows. Perhaps I simply didn't look at the other side.
I rubbed them with bar soap, then poured out the discolored peroxide the soap had squeezed out of the fabric, and added enough hot water to float the scrap. The water looks very soapy. It's nap time, and soap can soak for an indefinite amount of time. I didn't rinse out the peroxide, but it's diluted, and it reacts with soap.
When I woke up, I brought it to a boil with a chip of soap in it, notice scum forming and added some washing soda, brought it back to a boil, set it aside, and forgot about it until this evening. Then I drained and rinsed it, poured straight bleach on the wet fabric, and came back in five minutes to find it entirely white.
But no thinner, so after rinsing I left diluted vinegar on it for ten minutes, then rinsed some more and left it in plain water for a while. Now it's dripping on the dish drainer.
Then I thought I'd scope out the elastic on the black knickers, discovered that it had been fastened with a tiny brass safety pin, opened the hem, cut out a couple of inches, and re-pinned it. I still have to mend the gap. I think I'll sew the turn-under with red thread first, in case I want to open the casing again.
elastic in black knickers
This morning I gathered up the linen drawers, a bobbin box containing a threaded needle, a pair of magnifying glasses, and a pair of scissors, went out to the chairs in front of the house, squinted in the eastern sun, and went back through the house to the picnic table. I cut a bit more than an inch out of the elastic, congratulating myself on leaving a finished opening for the elastic. Then I went back into the house for my thimble, started to secure the thread between the elastic ends, and realized that the needle was threaded with ecru 100/6, not white 100/6. I said "nobody will see it, not even me", and continued.
I don't use either knots or back stitches when joining elastic. I skim the thread through the surface of one of the ends to keep it from wandering, sandwich it between the ends, and overcast my way to the edge of the elastic. Then I overhand the edges, overcast to the other side, overhand back up, overcast until I've overlapped the beginning, and force the needle between the two ends to hide the end of the thread. The needle got stuck this time and I had to wrap a rubber band around my finger to pull it out.
There's a fiddle that's hard to put into words at each place where I turn a corner, but with needle in hand, it seems obvious. And it doesn't really matter.
In the afternoon, I went to the front of the house to back-stitch the turn-under of the opening in the elastic casing of the black knickers with bright red thread. Then I found the Necchi threaded with white 100/6, looked around for a spool of black thread with a matching bobbin, noticed a needle threaded with black stuck into the cone of basting thread. Two back stitches, a few running stitches, three back stitches. Quicker and easier than changing thread.
#7 side seam
I think what I did was called "rantering"; I put the needle through as if intending to overcast, then took the next stitch from the opposite direction, so that most of the thread was inside the fabric and only tiny loops show. Nothing at all shows on the inside, so if I do this on a seam meant to be seen, I'll work from the inside. If I remember.
broken stitch #6 blue
Narrow seam allowance tucked between two layers. I overcast one layer to the back, stuck the needle through to the other side and worked back. On the second pass I made a point of catching the under side, on the first pass I was careful not to.
#5 green
Sun had moved, so I took my thread, needle, thimble, ball of thread, wax, magnifiers, and scissors to the front of the house. (There was a short delay between blue and green.)
#4 yellow
#3 orange
On #3, the seam was broken in three places. The breaks seemed to line up properly when I pulled on the seam, which suckered me into spaced-back-stitching across on the right side, catching all five layers. Worked great until I got to the central break, which wasn't having any. So I cut the thread, picked out a few stitches, turned to the inside, overcast the lining to the back until I got to where I'd left off, pushed the needle through to the right side, and resumed back stitching. (Angst, puzzlement, and false starts omitted.)
I'm pretty sure that I mended #1 and #2 a while back, so #7 is the only one that missed having a broken stitch in that exact spot. There must be something wrong with my assembly technique.
⁂
After my nap, I trimmed the patch for the knickers and turned the edges under. (The holes are close enough together to cover with one patch.) The patch is bright white, but I expect it to dingy up pretty soon.
There is so little wear left in the knickers that machine darning would do, but I think that patching is easier.
Then I was out of thinkum, so I finished ripping the blue plaid bias off my muslin drawers. The outside of the casing has also worn through in spots, so instead of replacing the bias facing, I'm going to have to apply a casing as I did for the linen drawers. There's one full-width-of-the-fabric strip left from binding the cat quilts, and that will be more than enough. It's a tad wider than is needed to replace what I'm going to cut off, but I think I'll sew it on as-is. If it needs to be hitched up, I can sew around to make a ruffle above the casing.
I think I'll hem down the allowances of the joining seam and join the elastic with a little safety pin, which will make it easy to pull the elastic out, narrow the casing, and put the elastic back in. And I'll put "replace safety pin with stitches" on my list of things to do so that I won't forget the pin is there before it's time to take it out. Since these are my emergency back-up drawers, it may take some time before I've worn them enough to be sure they are finished.
Off to the farmer's markets with the pocket of my new jersey pinned. I must add "raise snap" to my to-do list.
And I must get around to repairing the sandals with loose buckles — they can be tightened enough to wear with thin socks, and the soles appear to be thick enough to wear on the bike. I've not had a lot of luck with finding new sandals with those properties.
Looking for something to do while mentally impaired, I cut the worn casing off my muslin drawers. But they are still lying on the treadle sewing machine with the last binding strip left over from the cat quilts. As I was about to stitch, I realized that I needed to press the edge under first. I don't handle hot irons while mentally impaired.
After Saturday's ride, I put Tandil on the fresh melon stain on my do-rag and the mystery stain on the shoulder of my jersey, and soaked them overnight. The melon stain came out, the mystery stain didn't.
I think alternating soap and Tandil will gradually fade it. It isn't terribly conspicuous.
I've gotten really tired of wearing thick socks with my stretched-out riding sandals, and I haven't been able to find new sandals that have thick soles, no high heels, fasten on securely, and adjust at both toes and ankle.
Then I noticed an old, beat-up pair I've been wearing only in the garden because the buckles are going to break off any minute: it has thick soles that are probably stiff enough to wear on a bike.
This morning I finally got around to repairing them. I cut the buckle off one, then put the bar between the ends of the cut-off ribbon loop, folded the ends together, and stitched back and forth with secure, never-gonna-come-out stitches.
Then I tried to buckle it: the end-holding bar of the buckle was under the strap, not on top of it.
The stitches came out, eventually, but the ribbon frayed so badly that there was no way I could sew it the way I did the first time, so I cut the bottom flap flush, wrapped the other flap around the bar, and overcast the buckle on. This worked out neater, and I think I'll do the other sandal the same way — with a trial buckling before I start stitching!
Sewed the right sandal this morning. The ribbon stub wasn't as long as the left one, but there was enough to anchor the stitches. Then I tried them on and thought my toes were not protected, so I went for a ride around the block. Though my toes stick out past the sole when I'm in the clips, they don't come near the clips. But the soles aren't quite stiff enough; my left corn was feeling a little pushed on before I got back. I intend to wear them tomorrow anyway; I'll ride all the longer stretches in cycling shoes, and I'm really tired of wearing thick socks.
In the evening, I removed the proximal elastics from the sleeves of my yellow linen jersey. Two layers of linen, closely gathered, have been a bit warm around the wrists.
The sleeves were quite comfortable both Friday and yesterday.
re-attach buckles on sandals
I started feeling scratchy at the back of the throat Monday evening. I think I'm coming back on line now.
Yesterday, I sat on the porch and basted one needleful of black 100+ silk into the wool blanket I need to hem, then it was too dark to re-thread the needle.
Today I fired up the iron and pressed the hat I washed on Tuesday, the patch for my gray cycling knickers, and the binding strip I mean to replace the elastic casing of my muslin drawers with.
Might even sew the patch on and wear the knickers tomorrow.
⁂
patch gray knickers
(I commented out the to-do list a while back because it was cluttering up the page and I always read it in source code anyway. If you want to see what I'm striking list items off of, click "view source". Expect clutter.)
When I pinned the patch to the knickers after pressing both, I intended to hand-baste before sewing, so I stuck all the pins in the easiest way which led to most of them being at right angles to the seam, and one being head-first to the needle. When I was ready to sew, I saw that basting wasn't necessary and might even be counterproductive, but I didn't move any of the pins. The patch was stiff and flat and clung to the pants, so there was no problem with pulling the pins out well before I got to them.
I used the electric machine, partly because it was already set up with ecru thread and partly because it has a free arm. After sewing the patch on, I turned the pants inside out and sewed down a fell that had come loose, then stitched around the holes.
And now it's hanging in the closet, and I think I'm well enough to wear it tomorrow.
No appointments! I have the whole day for sewing and gardening and I don't know what to do first.
bar tack on yellow jersey
So I'm easing into it. Most of the time was spent assembling thread, needle, thimble, and scissors.
I have realized that there is no penalty for picking off the snap that needs to be raised when I'm already using a safety pin to restrain my flip phone, so I think I'll do that next. I'm very glad that I put the patch that's between layers under the entire pocket instead of trying to precisely place a smaller patch.
I'm still coughing all the time, and I'm frequently a little fuzzy in the head.
⁂
Well, a little penalty. Now I have to keep track of the black diamond and the snap. At the moment they are attached to the pocket with the safety pin.
The black diamond was easy to get off because I sewed it on by machine. The retrofit will have to be done by hand — unless I want to pick the whole pocket off! Not sure how I'll get the halves of the snap lined up. First time around, I snapped them together, then sewed the pocket.
Since the snap was almost high enough, placement is purely a matter of appearance. I think I'll sew the black diamond with its top corner just touching the stitching of the hem, which will put it about its own diameter from the top.
After my nap, I decided to tackle the hem on the gray blanket. That's the least-urgent item on my list of things to do, but I'm tired of having a king-size blanket in the sewing room. I took it out onto the porch, but before I could thread the needle, the wind changed and I started getting wet.
So I dumped it on the rocking chair. After supper the storm had gone and the light was passable inside. Sorta; 100+ thread is mostly invisible. And unsuited to being used directly off the spool, and even cut into needle lengths got a couple of snarls in it, one of which had to be cut out. Luckily, I cut the correct thread. The second needleful ended a handsbreadth from the end of the hem, and I put it aside to finish in better light. Clothespinned the bag of 100+ thread to it to mark the place where I left off.
Tomorrow, I need to go shopping, we are going to a party on Saturday, and Monday is washday.
All I ironed was the shirt I'm wearing tomorrow, but the sewing room is neater.
I also basted around the hole in the sheet I put a toe through a week or three back, and put it into the wash.
Pity I don't have any hand sewing ready for sitting around in a waiting room.
I loved poncho shirts when I first copied a souvenir shirt, but I've gone this whole summer without so much as trying one on. And I've been desperate for shirts on some days.
revise ROUGH009.HTM - make Table of
Contents
That wasn't the only page I fiddled with today. I felt dueless and dilatory, and decided that instead of unscrambling virtual playing cards and virtual Ma Jong tiles, I'd unscramble HTML.
I did, on a whim, bake a batch of bread.
start a glossary page
I finally got around to the ironing — I've no idea when I washed that shirt.
I also rubbed a dry iron over the lower side seams and the front of the skirt of the gauze-lined linen dress, in case I get around to adding patch pockets. I've been doing without for years because it's impossible to match the print, but I've decided that I need those pockets, let the print fall where it may. I have until April to finish the job.
Flattened the seam attaching the casing to my muslin back-up drawers, so finishing that job won't amount to much more than opening up the treadle sewing machine.
Getting all that stuff off the to-do hook exposed the downgraded tights I want to add knife pockets to. I'll be wanting tights to slop around in pretty soon.
I think I'll put the Arachne T-shirt back into the closet; the Capitaland Nautilus shirt has holes in it, but is still hanging in there.
⁂
The drawers are pinned, but I think I'll leave stitching them until after my nap.
I stitched the casing this morning. Now all I need to do is to put the elastic in.
Went looking for the villa-olive scraps to make neckbands for my villa-olive dresses. If the pile I found is villa-olive (the wrong side is folded out), there might be enough to make another shirt.
Perhaps I'll get it down this evening. I think I need to bring the ladder in; the Kik-Step isn't quite high enough for a secure grip.
⁂
div Bags, ROUGH023.HTM. repair
broken link to edge finishes — use two
zippers if you can't find a long one
Must have been some other file that didn't have <div>s. This file has lots of vestiges from its text-file incarnation. I made no effort to change them. There were several links to .txt that I changed to .htm.
Now to upload and validate it.
Major cleaning project. My husband has a pregnant friend, so I hunted out my stash of baby booties. Almost all pink, but there were a couple of pairs of white booties with no ties. I have a ball of blue Aunt Lydia thread I bought for just such an emergency, but thought that I ought to check first to make sure there weren't any opened balls of blue thread. There was nothing suitable in the box marked "DMC Cordonnette/Knit-Cro-Sheen/Speed-Cro-Sheen/Tatting Cotton." (Yes, I mis-spelled "cordonnet" on the label.)
So I decided to get down the suit box of thread someone entrusted to my care a few years ago. At the time, I thought I could hand it on to students, but I haven't taught needlework since.
I brought the Kik-Step over, climbed up, touched the box, realized that I had to get under it, moved some boxes to make space for the Kik-Step, climbed up again, set down the things that had been on top of the box, and pulled it off the shelf. The shelf tipped up and spilled the stack of fabric that had been on the outer end of the shelf. I set the suit box on the printer stand, started to puzzle over how to get down without stepping on the clutter, and the shelf hit me on the head. I grabbed the shelf, started to look around for a place to put it down, and a bunch of books fell off the shelf below the shelf that had fallen.
The cascade ended at that point. The picking-up may continue for days.
And there wasn't any suitable blue thread in the box.
A few balls of Aunt Lydia and other threads that I couldn't fit into the "Cordonette" box were scattered about the floor. I realized that the Roomba box would hold the contents of the "Cordonette" box and these balls with room to spare, so I did some moving and label-ripping, and sorted out some stuff that belongs in the tatting box and the plastic-spool box.
I printed out four labels that read "Bedspread Cotton/Booties/Knit-Cro-Sheen/Speed-Cro-Sheen/DMC Cordonnet/Linen thread/Crochet Thread/Tatting Cotton", then realized that my glue sticks are probably buried in my backpack, shoved the labels inside the Roomba box, and sat down to type this.
At which point I remembered that I also have a box labeled "String-Weight Thread/Carpet Warp", and that box contained a ball of blue Cebelia. Moreover, everything but the carpet warp could be squeezed into the Roomba box, and the carpet warp is in its original box, which I can shelve separately — and be able to remember that I've got carpet warp when I need some.
But I'm not sure where I'll put the Aunt Lydia and the Cebelia when I've crocheted the bootie strings. There's plenty of space in the suit box.
All this hasn't made a dent in the mess, but it's well past time for my nap.
⁂
I put the suit box back shoved as far to the right as it would go (the curtain stopped it an inch from the end of the shelf), and put my foreign-language dictionaries next to the wall. They are too close to the off-center shelf bracket to lift the shelf when the suit box is removed.
But I have to sort all the books on all four shelves to restore order. I found a notebook that belongs in the walk-in closet with my diaries. There are only a few books left on the second shelf from the top. I think I'll dust that shelf tonight, and put the fallen fabric on it. I was thinking of putting it below where it had been, but I think I'll put it next to the wall!
This morning I took down the shelf, dusted it, scrubbed off some mysterious specks, and put it back. Then I laid a neatly-folded osnaburg curtain on the thread box on the top shelf and went out to work in the garden.
I can put more of the osnaburg on the thread box, but not all of it.
I found more bilingual dictionaries, and there is no more room on the top shelf. Perhaps I should put another category on the top shelf and put the dictionaries where I can read the spines — it's dark in the upper left corner.
"Word Menu" won't go back where I got it; it was supporting the top shelf, and I had to lift the shelf to get it out. I suppose it can go into the stack I will use as a bookend at the open end.
I found two un-marked pairs of stockings when putting away the laundry. This morning, I wanted to mark both with one needle of thread, the other black pair was marked with white, and the other gray pair was marked with red or brown- orange, so I cut off a piece of yellow thread and took thread, needle, scissors, and the sock out onto the porch. In better light I could see that the black pair had already been marked with green, so I worked bar tacks at center back on the gray pair.
To bar tack soft wool, I don't need a thimble.
⁂
I took 28" of elastic out of the muslin drawers, I put 33" of elastic in my underpants, and I put 39" of elastic into my linen drawers.
Marked 33", tried it around my waist, it squished. I ended up cutting 34 1/2". To the porch!
⁂
elastic casing in muslin drawers
I'm really, really tired of choosing between wearing "pajamas" and wearing out my better pair of jeans (which don't require much wear to stop being dressy). Time to get serious about patching my everyday jeans. (And way past time to find a dressmaker to make me new jeans, but I haven't the slightest hint of an idea of how to go about doing that.)
I saved pieces of worn-out bull-denim jeans, but in addition to being a different shade, they have a striking pattern from fading more at the tops of the woven-in wrinkles. Heavy crepe, come to think of it, isn't a bad idea for work pants. I wonder where I got that batch of bull denim? I don't even remember wearing out the pants. Might have been Alfred's in New York.
The scraps from making the jeans are the best I can do. I won't try bleaching the patches.
I have cut out the patches, and I remembered to cut mirror images.
I tore the hanging hole in the front pattern of "my pants" while finding the patch pattern — which was last used, according to the note, in 2005. The "my pants" pattern says the pants I'm patching were made in 2013, and the pattern was used to make pedal pushers in 2014.
I draped the front pattern over the printer stand, intending to iron some flimsy interfacing over the tear when I next heat up the iron. The patch pattern is back on the nail.
patch everyday jeans
Inspired by rain on the window, which made me reluctant to go to my appointment by bike, I set out to have black pants to wear.
So I sewed the patch together, checked several times that I was turning the allowances in the correct direction, and top-stitched.
Then I basted the fold-under — it's easier to baste than to press on a curve, unless one has a template to press over. In the process, I emptied every threaded needle stuck into the base of the cone of basting thread hanging in the window.
After tearing off an inch square of the loosely-woven interfacing I keep for such jobs and repairing the pattern I had torn, I pressed the basted turn-under and pinned the patch to the pants.
I needed to put something under the patch to keep from pinning the ironing-board cover, and no small pieces of plywood in sight except the one I needed under the still-hot iron. My leg board is too long to put in through the waist. Duh! This job is what a leg board is for! I shoved it in through one ankle and into the other leg, then pinning and basting the patch was as easy as pinning and basting a saddle- shaped surface can be.
I asked myself how I'd baste the patch to the pants with a thread that contrasted with all of the turn-under threads I found a pale-blue Subsilk cotton that hadn't participated previously, but I needn't have bothered. I took both rounds of basting out at the same time, in short pieces as I made the second round of top-stitching.
Then cut away the worn fabric from under the patch, fill all the pockets, and I'm ready for tomorrow. I used my "straight operating scissors" for the trimming because the blunt point on one blade made it easy to avoid cutting the patch. The fabric was so worn that I didn't need the sharp point on the other blade to get the cut started.
broken seam underpants brown/one
After getting the pants out of the drawer, I found my path to the needle impaired by the clutter that fell off the shelf, so I took down the English/Furrin dictionaries, put the osnaburg curtains up, and tucked the computer manuals into the space that was left. I think that when I bring the ladder in, I can also fit in all the old disks. Then I dusted the next shelf down and turned it over. All the shelves droop slightly for the same reason that the collapse happened: the placement of the studs forced the supports to leave a long bit unsupported on the right. Now they curve up slightly, and it should take a couple more decades for them to droop again.
That shelf now holds the dictionaries, thesauruses, and stylebooks. The bookend is a copy of Shakespeare and an old one-volume encyclopedia.
Oops, I just added Word Menu to the bookend, then noticed some more dictionaries and stylebooks on the floor. This category will have to be continued on next shelf.
I suspect that much of the pile at the left end of the bottom shelf can be thrown away. The pile of computer manuals yielded only a couple of catalogs and a sheet of scratch paper.
While mending HCJ* One, I realized that my stitches were closer to hemming than overcasting. I poked the needle down into the back close to where it had come up through the crotch, then pushed it diagonally through the layers to come up in the crotch again. Then I pushed the needle through to the other side and hemmed the other side down.
(*"hemp-cotton jersey")
Today was as close to a good drying day as we'll get for a while, so I emptied the hot-with-bleach bin of the laundry hamper. When I was putting clothes into the machine, I found a pillowcase and wondered what it was doing there until I noticed that it was torn. Of course: after it's sanitized, I will tear it into sweat rags and skillet wipes.
But later on, when I was looking it over to see where to tear, I noticed that it was worn only at the bottom, and was too long, so I tore off a couple of inches (and put the strip on the skillet-wipe pile) and sewed across. I must have matched the grain really well when I made the case — I snipped across the seam and ripped both layers at once, and when the tears met at the fold, they met perfectly, as if I'd torn from one end only.
Before I could put my chair in front of the Necchi, I had to pick up some of the stuff that had fallen off the shelf, and move back the boxes that I'd moved so I could put the KickStep under the shelf. There is black thread on the White, and moving boxes was less trouble than changing thread — particularly since the books got a bit more sorted as I shoveled them off the floor.
I had sewn halfway across before I realized that the thread on the Necchi wasn't white either — it's ecru. But it *is* 100/6, and you can't see the thread anyway. Black might shine through the cloth, but not ecru.
And I finally got around to taking the photograph to illustrate 3 March 2019. The picture doesn't look anything like what I'd had in mind, but I'm not dissatisfied enough to do it over. When you photograph one hand with the camera held in the other, in focus and un-shaken is enough to ask for. If you click to view the larger image, you can see individual threads!
Link from casings to bags
Now I need to correct the link from bags to casings.
I crocheted a pair of blue strings for a pair of white booties, stuffed the booties with deep green tissue paper — my only alternative to white — and put them in a sandwich bag for Dave to give to a pregnant bartender.
Then I re-tied the broken elastic in HCJ 7/violet.
Finally got around to sewing the black diamond back onto the pocket of my yellow linen jersey.
It should have been a five-minute job, but because I needed to wear the jersey, I pinned the diamond and the snap to the pillow sham that covers the White when it isn't in use. (It's used more often as a folding table than as a sewing machine.)
The sham had been flopped around frequently, and the diamond was unfolded. I finger-pressed it back into shape, and then criss-crossed the diamond with basting stitches trying to keep the raw bits tucked under, then pulled the basting stitches and tucked with my needle while back-stitching it on.
The sky is overcast, so it was impossible to see black on black even with magnifying glasses. I managed by pulling the thread straight before every stitch, so that it showed up against the yellow jersey and pointed at the place where it had come up.
Now I don't feel up to sewing the snap on, and it's almost nap time.
When I get into snap-sewing mode, I should repair my black raw-silk overshirt.
check ed.dir of pictures of tools against
the links.
On Saturday, I cut two rectangles from jersey print to be knife/cellphone pockets on my demoted tights. Of the two prints that are tulips and green vines on black, I chose the one with pink tulips and soft-orange tulips because it was the smaller scrap. (The other print is purple and clear orange.)
I intended, when I cut them, to round the bottom corners with a template, but why bother? Square bottoms will fit my cell phone better anyway.
Not that I expect to carry a cell phone in winter grubbies very often. I won't be gardening much.
⁂
Hemmed and basted and pinned to the tights. Tights don't take kindly to patch pockets; I had to put them down nearly to my knees to get them flat, and they are more to the front than on the sides.
Tights also don't take kindly to being taken off without disturbing the pins.
This morning, I accidentally read the introduction on the table-of-contents page. The bra in the illustration of the essay on patience is on the floor under my bed. It's still around only because I decided to relegate it to sleepwear instead of replacing the weak elastic. It's a rare occasion when I think my nap might be rudely interrupted, but sometimes I wear it in the evening on hot days when my bra has become damp and itchy.
Goal for today: finish patch pockets, sew snaps on yellow jersey and black shirt. Think about new wallet.
Go back to bed. I woke up at six this morning, which is three hours early.
⁂
Somehow, I attached the pockets way too low — they hardly clear my knees. They looked fine when I tried the pants on with the pockets pinned; after sewing they were their own height lower. I don't know how it happened, and
timer pockets on newly-demoted
tights
I'm not going to correct it. The tights are already worn through in spots along one of the inseams, and not worth fussing over.
⁂
After nap, darning silk tights was first on my agenda. I'm pretty sure that I started drawing darning thread from one of the patch-donors' waistbands, but of the three rags in the silk box, two had untouched waistbands and the third had no waistband. It had been one of my first two pair, which were painfully tight in the waist. I picked the tight elastic out and put in quarter-inch elastic. The thread from unravelling four multi-thread seams kept me in mending silk for years.
One of the ankle bands had been removed from the no-waistband rag, perhaps that was where I got the darning silk? I picked at the other ankle seam for quite a while without finding out which end to pull, then decided that the inseam looked simpler and started picking at the seam on the leg that had no ankle band. I don't think this three-thread seam unzips at all, but I got enough thread per pluck to make it worth undoing — leastways, worth undoing when I'm sitting there with it in my hands and don't feel very bright.
I noticed that the sharp point on my seam ripper was damaging the thread and looked around for another tool. A chopstick that I'd stuck into an electric pencil sharpener when I had a jammed knot to untie proved perfect, and before the afternoon was over, I got quite good at using it. I plucked out the undulating thread on one side, and the other two threads fell off.
I wound the threads on appointment cards and put them into a snack bag.
darn hole in other silk tights
It was easy to hide my thread ends inside the overlocked seams: if I got my needle between the layers of fabric, it would just glide right along. Of course, the thread can pull out as easily as it slid in, but all my stitches were half hitches, so that should not arise.
I used interlocking rows of buttonhole stitch on the fabric, then began putting my needle through the loop of the row below as well as the loop of the newest row, which made the darn rather thick.
The hole kept changing shape on me, and I changed strategy several times. Then when I thought I was about half done, it suddenly closed up to a slit and I finished off with baseball stitch. I hope that that hasn't made a weak place; if one baseball stitch breaks, they can all pull out.
There were a couple of loops of ravelled stitches that I intended to work over, instead of double-stitching the darn, but they were so kinked and springy that I couldn't manage that, so I put a thread through them, put both ends of the thread into a needle, slid the needle through an overlocked seam — the same one the thread loops had come from — and used the thread to pull the loops inside the seam.
It was surprisingly difficult to keep the loops straightened out long enough to put a thread through them.
Whatever, I now have silk tights to wear.
I found the missing pocket trim while sweeping the sewing room today, and it *was* within arm's reach of the ironing board.
The trunk it was hiding behind has been moved a few times since the twenty-eighth of May.
I also found that the picture of the patch on the entry for May 28 needs to be rotated one-eighty to stop the relief from reversing — it's lit from the bottom left.
I don't think I'll add that to my list of things to do.
The full-sized picture does not reverse — possibly because the patch itself is all that will fit on the screen, and you can see individual threads.
Putting the pockets on my demoted tights too low had a benefit: I don't have to feel around under my T-shirt to find them.
But the tights aren't the teensiest bit warm, so I'm wearing my old sweat pants today.
⁂
On closer inspection, the "chopstick" I stuck into the pencil sharpener is a dowel about the same length as a chopstick and a little smaller in diameter. Also, it is varnished.
⁂
raise snap on yellow jersey
Marking the place for the snap to be sewn to the shirt was easier than expected. After sewing on the half that went onto the pocket, I felt for the bump and marked it inside the shirt with a wash-out marker. Then I stuck a needle in and drew a cross to show where the needle came up, then lined up the holes in the snap with the arms of the cross. I got it in the right place the first try.
But I need to move the snap a smidgen to the right. The pocket is so deep that I've just been leaving the snap open.
I should have gone out for exercise and milk, but I couldn't face spending half an hour getting dressed for a fifteen-minute ride.
Hence:
broken seam, HCJ 7
I noticed the seam while rubbing stains with bar soap on laundry day, and made note of it. Another break opened up in the wash, and the first one got fuzzy. I repaired both by overcasting to the back, putting the needle through to the other side, and overcasting back to where I'd started. A back stitch or two at beginning and end secured the thread, ends hidden between layers of cloth.
Didn't do much Friday on account of having missed my nap on Thursday. Even most of this post was written tomorrow.
And I'm still dueless and dilatory — stayed up late and slept until ten.
I was thinking of beginning my new wallet, but the snaps on the black raw-silk shirt are *way* overdue, and can be taken care of quickly.
⁂
two snaps on black raw-silk shirt
Well, I got one snap sewn on before nap time.
I probably meant to write more about sewing the snaps on.
Time to move the wallet up from the back burner. Pity hypertext doesn't allow for hanging indent, and I'm going to have to change <br> to <p>.
new wallet. Coupon pocket should be a quarter inch deeper than other pockets, which will require it to be sewn a half inch below the ones pocket. Make the twenties and tens share a pocket.
That is, one pocket for large bills, one pocket for small bills, one pocket for coupons. Or maybe two; I sometimes save Marsh coupons now. In that case, we are back to the original design!
After some time of pulling out all the bills to put them into the right-side passport pocket of my jeans, then putting them back into the wallet, I have realized that one pocket for bills is all I need; one can sort the bills without dividers between the denominations. So we are back to the design described in the first paragraph, but two of the three pockets are for coupons.
I shall make a tutorial if I ever do this job. After getting caught in the rain twice in one week, I'm looking around for some canvas-weight nylon that I think I used to have.
Pencil sleeve at fold above bill pockets.
12 July 2017: Now that Marsh is dead, I need only one pocket for coupons, but I've taken to carrying my shopping lists in a separate pocket instead of putting them in with the coupons.
2 August 2018: need to make flap shorter so it doesn't get curled in the fold. I think I'll cut it the same, but make the coin-catcher deeper.
27 June 2019: picked out coin-catcher on worn-out wallet, sewed it back two and a half inches wide.
17 July 2019: The deeper coin catcher seems to be working well. No more curled fold, easier to dump coins on flap to pick out what I want.
12 August 2019: The shopping-list pocket doesn't need to be as deep as the others. This can be used to make more separation between the pockets.
I don't think I can find cordura anywhere, and I still have some of the black duck the first one was made of. It held up well enough that I can't remember when I made it, and I think it's gotten wet only once in all these years. And the most-important contents are waterproof.
Time to lay out the scraps and take a picture for the tutorial. Perhaps I should start a new file to keep notes in. Save copying stuff, and this file is nearing its capacity. Not to mention that I don't expect to finish before the end of the year. That should be file ROUGH057.HTM.
Decided to stick on the labels I made for the crochet-cotton box, ironing board was clear to open the backpack on. I'd have done this job sooner if I'd remembered that I'd moved everything that belongs in the lid pocket into the spare-stuff box to make the bag easier to open. A quire or so of junk paper was on top waiting for me to put it in.
The glue stick was dried up; I put some water in it, set it aside, and fetched the Elmer's glue.
Junk paper was in much demand, because *lots* of Elmer's seeps out the edges even after I realized that I need to sweep excess glue onto the junk paper after spreading glue on the label.
Fauchunately </leghorn>, I remembered that I have a "burnisher" made for rubbing down stuff I've just stuck. It was left over from when I was a newsletter editor and used lots of rub-on letters that had to be flattened after rubbing them on. The spring-loaded ball that rubs the letters off the plastic sheet has fallen out, but it was obsolete long before I lost it.
Crochet-cotton box labeled, I pulled out the "ribbon and embroidery hoop" bag intending to add the ribbons I've bought at Goodwill and laid on top of the backpack. They wouldn't all go, so I emptied the bag, sorted out an assortment of the prettiest colors to put back in, and opened the spare-stuff box to put away the leftovers.
Lo and behold, and this is the whole point of this entry, there was the pair of scissors that belong under the Necchi. I've been hunting for those for months!
Cool! While sorting the webbing out of the synthetic-ribbon box, I found that I have two leashes that can be dumped at the animal shelter. I vaguely recall trying to train one of our cats to walk on a red leash, but how I came by the other, a black leash suitable for walking a husky, I have no idea.
Then, while looking for a shoebox to put the webbing in, I realized that the flat box marked "empty" (but it contains a little white box not quite big enough for my snap collection) belongs in the walk-in closet with the shoe boxes.
I bought two pairs of "super snips" today. One because I thought there should be a pair of scissors in the embroidery-gig backpack, one because I'm sure I'll think of another use. All but two colors were gone, and I doubt that Lowery's will order in more.
I chose yellow. I think the other one was icky pink. I'm pretty sure it wasn't green, which I bought for the snack bag in the arm of the futon. Pictures on line show only three colors. Some show brown instead of yellow, red instead of icky pink, and bright green instead of mint green. I don't know whether that is dye lots or photography.
I haven't made any progress on the wallet, but my synthetic-tape box is much neater. I've kept out a red ribbon and a blue-teal ribbon to label the shingled pockets with. I'd prefer a bluer blue or a grass green, but not strongly enough to make a special trip to Lowery's.
Continued on the wallet diary.
I spent some coins from my pocket wallet yesterday, and see that I designed it wrong.
It all started when I used an old coin purse to collect the pencil, bobby pins, etc. that I wanted to carry in my pocket when I wore a dress. The purse got older and older, and one Sunday morning, I rebelled at taking it to church, found a scrap from the dress I was wearing that was twice as long and wide as the coin purse, sewed up two sides, dropped the contents of the coin purse into it, and folded it in half to keep the stuff from falling out.
Later iterations added a pocket on each side, then the latest has both pockets on the same side to make it easier to reach in for the coins. But when I'm searching for exact change, it's much easier to dump the coins out, but if I dump them on the counter, I have to gather up the leftovers and put them back, and if I keep them on the wallet, it's awkward to reach in with the upper part in the way. I should take a tip from my big wallet and make a coin-catcher lip.
I could retro-fit the existing wallet by opening up the french seams, picking off the pockets, and moving them up half the width of the folded pocket. Then after folding at the bottom of the pockets, I could fold the excess flap back to meet the short lip, and re-sew the french seams. Then the opening would be in the middle of the fold-down flap instead of at the top.
It would be easier, of course, to make an entirely-new wallet. I'll put that on my list of things to do someday.
Made a file to keep plans for the pocket wallet in.
And later I remembered that there is already a file about this wallet, but after inspecting it, I don't think it would be a good idea to append the re-design, so I put a pointer to the new file at the top of the old one. In the process, I discovered that the reformat of the file had never been uploaded. Gave me a turn when I viewed the Web copy, because I thought there was a lot of work I had to do to make it semi-presentable. Since it will be superseded reasonably soon, semi-presentable is good enough
After ironing two shirts, I tore off the pencil pocket and sewed the ends together; (more comments at the wallet blog. This may be the first time I've used the narrow side of my sleeve board. I'd unplugged the iron by then and plugging it back in is complicated, but it was still warm, and after pressing the seam, I folded it with the seam matching the center (which I had marked with a pinch) and left the iron sitting on it.
Cleaned the cat box, worked in the garden, boiled fruit to make fruitcakes, worked on the wallet a little.) Now it's nap time.
Nothing to do but sew! Somehow it has gotten to be 10:27 and I haven't touched my wallet yet.
Continue to Part One of 2020
Back to Part One of 2019
Back to Part One of 2018
Back to Part One of 2017
Back to Part One of 2016
Back to Part One of 2015
Back to Part One of 2014
Back to Table of Contents
Back to cover page, which has a list of my
other sites