Surprise: the long-missing Super Crisp interfacing is hanging in the closet exactly where it belongs, and was in the first place I looked for it. Then I selected a strip to put inside the hem of the pocket opening and — WHOOP WHOOP WHOOP — iron into place. I have a burned-out iron in the attic, but I don't feel like going up into a hot attic to hunt for it with a flashlight. Nor is the thought of heating it in a skillet all that appealing. I was thinking that Super Crisp is a little *too* crisp anyway. I cut two strips of the unbleached linen left from making my cycling knickers, sewed them to the pocket openings a scant quarter inch from the raw edge, then turned the raw edge over the linen and hand-basted it in place.
I've also turned the hem on one piece and hand-basted it. After my nap I'll turn and baste the other hem, and then that's about as far as I can go without going up to the attic after the iron. But there's an off-chance the electricity will be back on when I wake up.
While looking at the pockets I pressed the wrong turn-under out of, I realized that instead of turning it the other way and covering with twill tape, it would be easier to sew bias tape to it and turn it to the inside.
I really believe (grump!) that I should pick off the facings on the finished pockets and sew them on properly. It won't be much harder than it was before I sewed the bottoms of the pockets, and those rumples get less acceptable every day.
Washday. Picked the red bias tape off the up-arrow pedal-pushers' broadfall pockets in the evening.
Time intervening between this entry and the previous one is mostly accounted for by fireworks and picnics. Power came back on Wednesday night.
Pressed the tapes and pockets and hems yesterday. Spent most of my sewing time trying to gain access to the sewing room, and trying to bring order to the embroidery-gig backpack. It's more disordered than it was when I started — things fall out when I pick it up to shift it out of the way — but I do have what I think is a usable dashed-line guide.
Haven't tried it out yet, but I tore a sheet of tracing paper off the pad today to make some new blank design papers. I discovered that I'd gotten ambitious some time or the other and drawn gathering circles on all but one of the old ones, and I used that one proving that my first dot guide didn't work, and learning that the template is just in the way when tracing off a diagram.
I also need to make more backing papers, some of them plain white. When I offered the odd papers that had accumulated in one of the sour-Altoid tins to a student at the Day of Sharing, she selected a red one and turned it over to show the white back. Only one medallion was completed, but enough of the children took their embroidery home that I'm going to have to stamp some more designs.
I can retrofit the left-over stamped designs by making blue dots with a wash-out marker.
I've already done a little work on updating the embrogig Web page. Mostly just stashing new stuff in it.
One of the "gain access to the sewing room" chores was making a new pincushion to nail my pressing cloths to.
The old one had worked loose. After re-rolling and re-nailing it, I thought that two would be better, so I found a rectangular scrap cut from a heavy sock in the wool-scraps box, and nailed it to the ironing board with upholstery pins so that I could roll it very tightly. I chose to sew this one so that it wouldn't unwind in use, and looked for a pre-threaded needle. The only one with silk in it had 100+ silk, which requires three hands to handle. As a result of the tight winding of a very elastic fabric, it took two hands to hold the pincushion. It wasn't until after the 100+ got so snarled up that I broke it that I realized that I could also use upholstery pins to keep the wool rolled. Having no heads, they didn't snag on the thread. Except on the other side where the points stuck out.
After that, sewing went easily, but I had to anchor the broken end very thoroughly because 100+ is as bad about slipping out as a synthetic, and it was so short that I ended up re-threading the needle before each of the last few backstitches. Perhaps the slipping was the contrast between the very fine thread and the very coarse cloth.
Then when I went to nail it up, I found that the only good spot for it was occupied by my do-rag patterns, so I had to drive a new brad for those.
I used two discarded sewing-machine needles to nail the pincushion to the wall, because the finest nails are way too coarse. And too short besides!
Today I went riding, so all I did in the way of sewing was to look out a sheet of tracing paper and fold it in half. I'll tear it into suitable squares, dig out the drafting board, and draw circles on the squares. Real Soon Now.
I've sewn the tapes to the pockets — and, which took a lot more time, photographed the two stages of pinning. Ought to photograph the sewn tape, but the sun has come out and I no longer have that nice indirect light. And I'm eager to get on with sewing the hems in the pocket openings.
First I had to look out a wide piece of black twill tape — I have no inch-wide tape, but three-fourths should do the job — to cover the raw edges at the bottom of the pocket. I always fold that corner down, so it is way past time I cut the hem into the pattern, with a little jutty-out bit to make it straight when folded. It's the easiest alteration in the world: just use some of my cheap iron-on interfacing to tape a piece of paper to the edge, then fold along the hem line and trim off the added paper along the cutting line. So I reached for the pattern to do that Right Now, realized that I had two fronts to alter (since I usually make two pairs of pants), and the Injoo Kim pants had fallen off their brad and must be sorted out and re-hung before I start work. I settled for pinning a note to the spot. After all, I might get run over by a bus before I use that pattern again, and I do want to get on with the current set.
Pockets hemmed, pocket-openings hemmed and raw edges covered with twill tape, ready to permanent-baste the pockets to the pocket openings — save that I've just remembered that I meant to thread up the Necchi and zig-zag the bottoms of the pockets. The two rows of straight stitch now in will hold, but zig-zag is a bit nicer.
I cut the tracing paper in half until the pieces were reasonable for my embrogig designs. Then I put them into a labeled envelope.
I'll take some photographs after my nap. Maybe I'll put links to some of the pictures into this file too.
I checked: the backs are ready to sew to the fronts after the pockets are basted. And after I mark the casing location on them. I considered putting the casings on before sewing fronts to backs, with a gap for each seam as in the bicycle jersey, but it will look nicer to sew the casings on in one piece, with an appliqué under the gap for the knot. I think I'll appliqué a simple square, tipped up on its corner. Brief consideration given to contrasting fabric for the square. Scrap from same red linen as the casing will be nicer. And I can be sure I've got the right piece because there are bias edges on it where the tape was cut off.
Took some pictures of sewing tools intending to post links on Creative Machine Mailing List, discovered in the course of stashing them in BLOG_XIV (the folder for illos for this half of 2014 Sewing) that I'd been shamefully neglecting the backups onto Drive E and JOYXP. For the XP backup, I copied the entire website while reading funnies on the other computer. For Drive E, I copied only the missing pieces, but really ought to delete all ultimate-unedit files and do a copy everything Real Soon Now.
And now it's naptime. But the wash is done and hung. Storms due in late afternoon; I'd better bring in the whites before lying down.
I not only cropped and scaled the three pictures, I made a nice little index page: http://roughsewing.home.comcast.net/~roughsewing/BLOG_XIV/GADGETS.HTM
It doesn't validate, but it does the job.
On the other hand, I've lost the Creative Machine post the pictures were meant to be an answer to.
Took a few more pictures today, of the pedal pushers in progress. Haven't uploaded them yet to see how good they are. Wind was terrible; despite an ample selection of boiled rocks left over from my Fourth of July party (they are somewhat less sterile now!), I won't be surprised if none come out.
I have the pockets of the up-arrow pants "permanent" basted, and one front sewn to one back. I plan to finish that flat-fell seam before sewing the other one. Moment of terror during the seaming, when I realized that while trimming out the wad at the bottom of the pocket opening I'd cut the raw-edge covering shorter than the linen stiffener, but I was right the first time: as long as the tapes etc. extend past the "permanent" basting, all will be covered by the final seam.
I think that this is the first time I've made broadfall pants with flat-fell seams instead of mock-fell seams. Which means that there was no way for the basting to end up inside the seam, hence the quotes around "permanent" above. I didn't bother lengthening the stitch because this polyester thread pulls out with disquieting ease.
After thinking for a while, I decided to baste half an inch from the raw edges, which in theory will cause the basting to end up neatly centered between the two rows of top stitching.
I was somewhat alarmed to see that the black twill tape looks downright green against the blacker black of the linen-cotton blend, then I remembered that it is inside the pocket and won't show.
But I *must* re-cut the pattern before using it again! I do have a note pinned to it.
When I began the topstitching, I noticed that the raw edges jog a little, and the markings for the casing jog by the same amount. So my stitching was off, but my marking was spot on. Considering that I stitched carefully and my marking was a little ad hoc, that seems odd.
It isn't true that one shouldn't press before topstitching a flat-felled seam. One presses the seam as it lies, to settle the first row of stitching and confirm the quarter-inch fold.
So I sewed the inseam, and now it's time to press it as it lies, and refresh the creases in the back of the other leg, and I decided to call it a day. Don't even feel like cropping and scaling photographs.
On second thought, the next time I use the pattern, it will probably be with heavy fabric, so all I'll want at the pocket-opening hem is a seam allowance to attach a facing of thinner stuff.
At my previous session, I sewed the first line of topstitching at the side seam, got it wonky at the lump of the pocket, and picked that part out.
This morning I pressed it and re-stitched it and it's better, but not good. There's a reason I usually sew this pattern with mock-fell seams!
Side seam finished, inseam finished. I find that the trick to top-stitching a tube is to figure out which end needs to be sewn first, then put the other end behind the presser foot and pull the seam forward under the foot until I find the beginning, then arrange that all rumples are out of the way, stitch an inch, arrange, stitch an inch. Since I'm also arranging that the seam underneath is lying properly. and finger-pressing its crease, this is hardly any more trouble than topstitching a flat piece.
Gave brief thought to appliquéing the casing at this point, reflected that I was in flat-felling mode and the legs are hardly any harder to appliqué after being sewn together, reflected that nap time was approaching, and closed up the machine.
Today and yesterday spent on embroidery-gig supplies. Following was added to my notes for revising the embrogig page:
Cut out a whole bunch of cover-the-back papers yesterday and put them into a sour-Altoids box. I had had no idea that I had so many colors of paper! At least six colors of typing paper, but only one color of cover stock. I was minded at first to use only the bright yellow of my construction paper, but cut one each from the dull and faded-looking colors — including a charcoal gray intended to be black even though I have no idea how a child will write on it. On the other hand, the fading marker *did* show.
I suspect that I'd have done a better job if I'd cut them one at a time under the un-nerving gaze of an idle child; one gets tired of being very, very careful very very fast. Not to mention that one needs a lot of spares when doing them in advance; I cut three of most colors, and it took most of the morning. I seriously need some sort of die for this job. I think some re-enactor's supply houses sell pinking dies for making raw-edged frills. (Elegant clothing wasn't washed in the days before dry cleaning; they just made very, very sure they didn't get it dirty.)
Today I put the junk paper into a labeled 9 x 12 envelope to make it easier to put the backpack back together next time.
Yesterday I marked two 9 1/2 x 6 1/2 envelopes for the new designs and the left-over tracing papers; I left the deprecated designs in their flat plastic bag. All three went into the flat-rate envelope with the colored papers, designs to trace, check list, etc.
After I cut a new strip of osnaburg, I think I'll be ready to put the backpack back on the shelf.
Brought the step-stool in this evening and brought the osnaburg down. I found that I have two door curtains, eight window curtains, and, as near as I can tell without unfolding everything, no scraps. Hope I remember that I have door curtains next Fourth of July, when I want to block the view into the walk-in closet and the laundry room. This year I hung one of my long dresses in the doorway of the closet.
I cut two five-inch strips off the bottom of one of the window curtains and divided each into nine parts by snipping and starting to draw threads. The first one wasn't divided as equally as I would like; I measured four and seven-eighths with a ruler for the second, and the seventh snip was just ten inches from the end of the forty-four inches, so I divided those two by folding.
Fractals: I wanted to get my embroidery-gig backpack organized and put out of the way so I could get on with making my pedal pushers. But first I have to stamp some designs. But first I have to clear off the ironing board. On the board is a pants leg with a carefully-pressed crease that will come undone if I rumple it up somewhere else. So I sewed a seam in my pedal pushers to get them out of the way of the backpack that I wanted to get out of the way of the pedal pushers.
Put the backpack away, then it was time to rest up for my eye exam.
Added "Patch my only pair of raggy old jeans" to to-do list.
I have two pairs of raggy old jeans, it turns out — but the pair I have on is really raggy; each time I put it on might be the last. And it needs a couple of eyes sewed on, though I'm not sure it's worth the effort.
I went for a bike ride in my pedal pushers yesterday — with safety pins where the hooks and eyes belong. The are a bit too long to call pedal pushers — high-water pants?
I started out wanting to make a fancy hem piped with red, then decided to make the drawstring casing a matching red, then decided that two bands of red would be one too many (not to mention that there is no point to hem tape on a sheeting-weight hem), then when it was time to install the casing, I realized that now that I can walk, I won't be wearing the pedal pushers under skirts, and therefore won't need to hike them up, and left off the other red band too. Which leaves the red facings on the pockets rather pointless, but they don't show anyhow.
I think that I'll make the other pair into long pants. I'll put in a red-linen band to justify piecing the legs.
I basted black-on-black over the marks that show where the casing goes, just in case.
I've figured out how to piece the legs of the other pedal pushers: I shall assemble the pants, cut a cross-grain strip of red linen one inch wide, fold a quarter inch of one end to the wrong side, pin it to the leg right sides together with the leg sticking out an eighth of an inch, and stitch the width of the toe from the raw edge of the red linen. Then I'll cut off the excess strip, hand-sew the ends together, and press as for a mock-fell seam, with the red linen creased, the black leg flat, and all raw edges behind the red linen. (The seam here will carefully not match either of the seams in the leg. Perhaps center back, as the spot that takes less wear. But I may want to reserve that spot for the seam in the leg extension.)
Then I'll press a quarter inch to the right side of the leg extension (and a quarter inch to the wrong side at the other end, in preparation for the hem) and begin as if to make a pre-graded flat fell seam, but I'll press that first round of stitching as it lies, then turn up the seam allowance to cover the stitching of the first seam. I'll probably hand-baste the fold to the single layer as close to the stitching as I can, so that I can see what I'm doing while I top-stitch along the mock-fell seam from the right side to secure the free edge of the seam allowance. This should make a small tuck at the bottom of the red stripe. Then I'll press that tuck flat and edge-stitch it to give the impression of a stripe appliquéd to the pants.
It will be nicely finished on both sides, and not a lot thicker than it would be if I really had appliquéd a stripe to whole cloth.
Pressed creases in the patches for my herringbone pants, ironed a shirt, uploaded the pictures in the camera, wrote labels for them in their ed.dir files. I must have done something more with the morning; I didn't get down for my nap until two o'clock.
I did move another bra onto the "in progress" hook. I should probably bind the neck of the bra I'm wearing when I repair the other two "curry" bras. Also moved my "taxicab" jersey to the in-progress hook. I want to cut off and replace the casing for the elastic on the back pockets before I wear it again. I got the curry jersey out from the back of the closet; the collar is frayed and elastic shows on the most-used back pocket, but it's wearable.
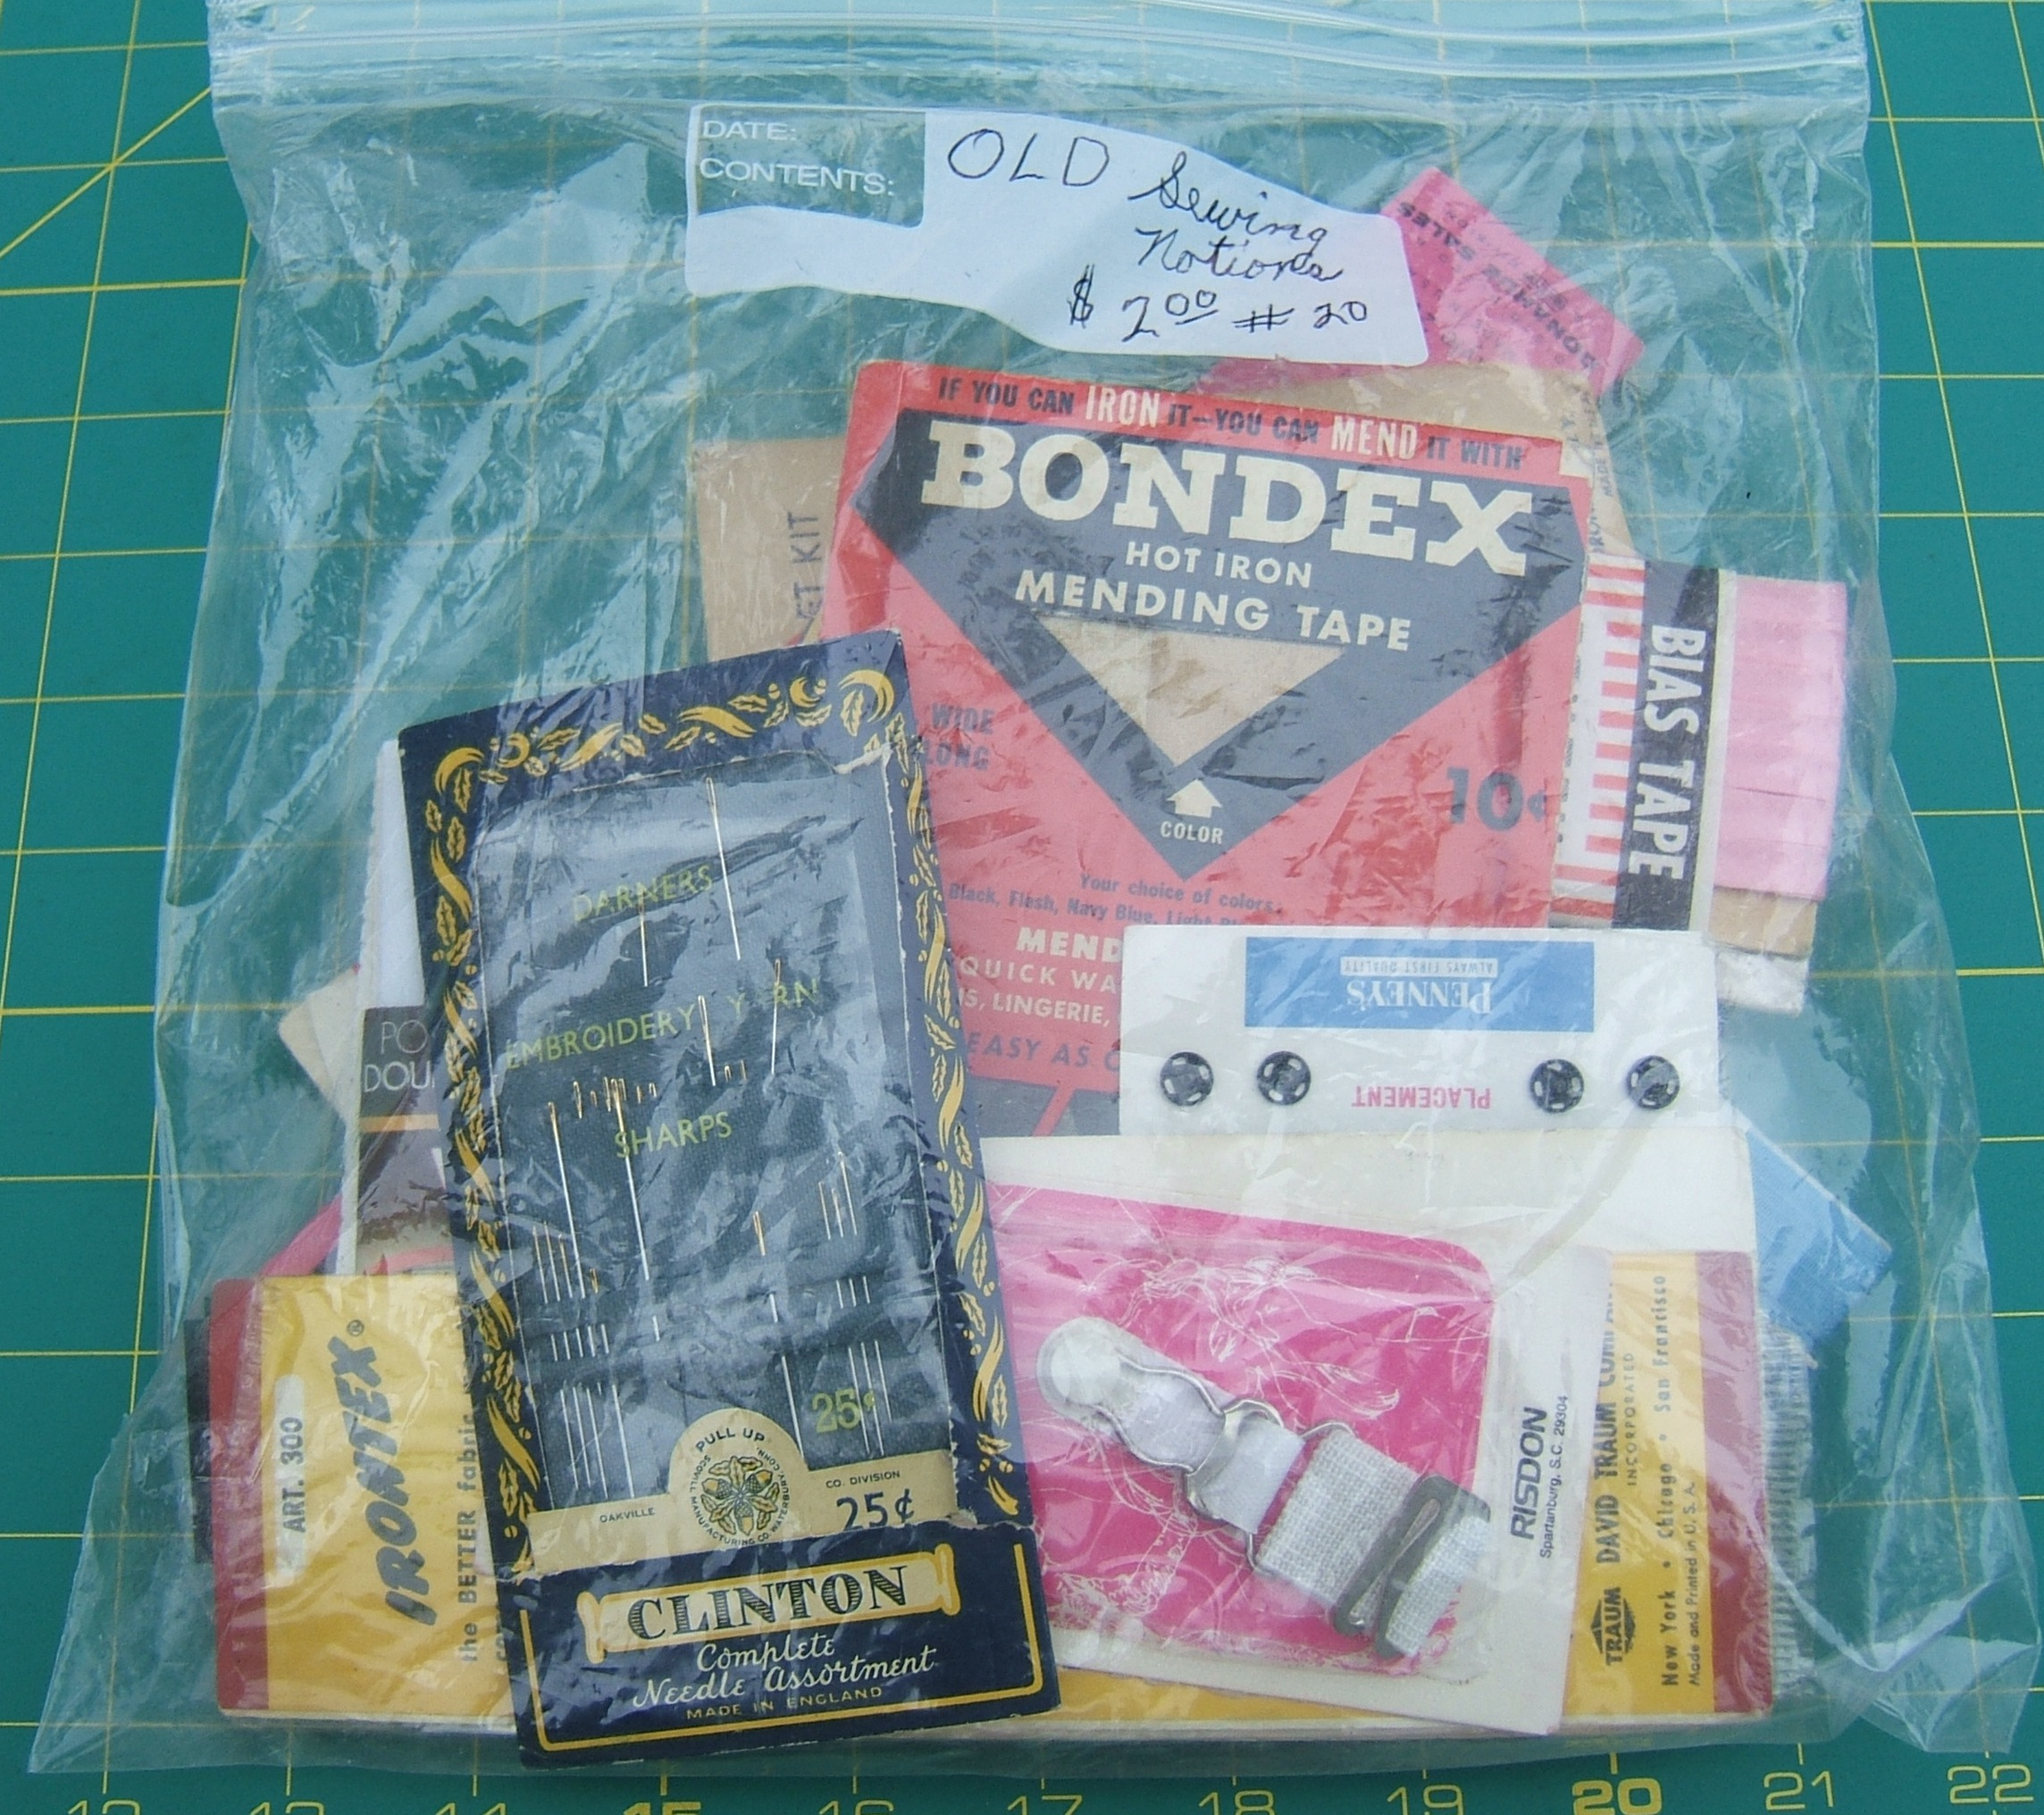
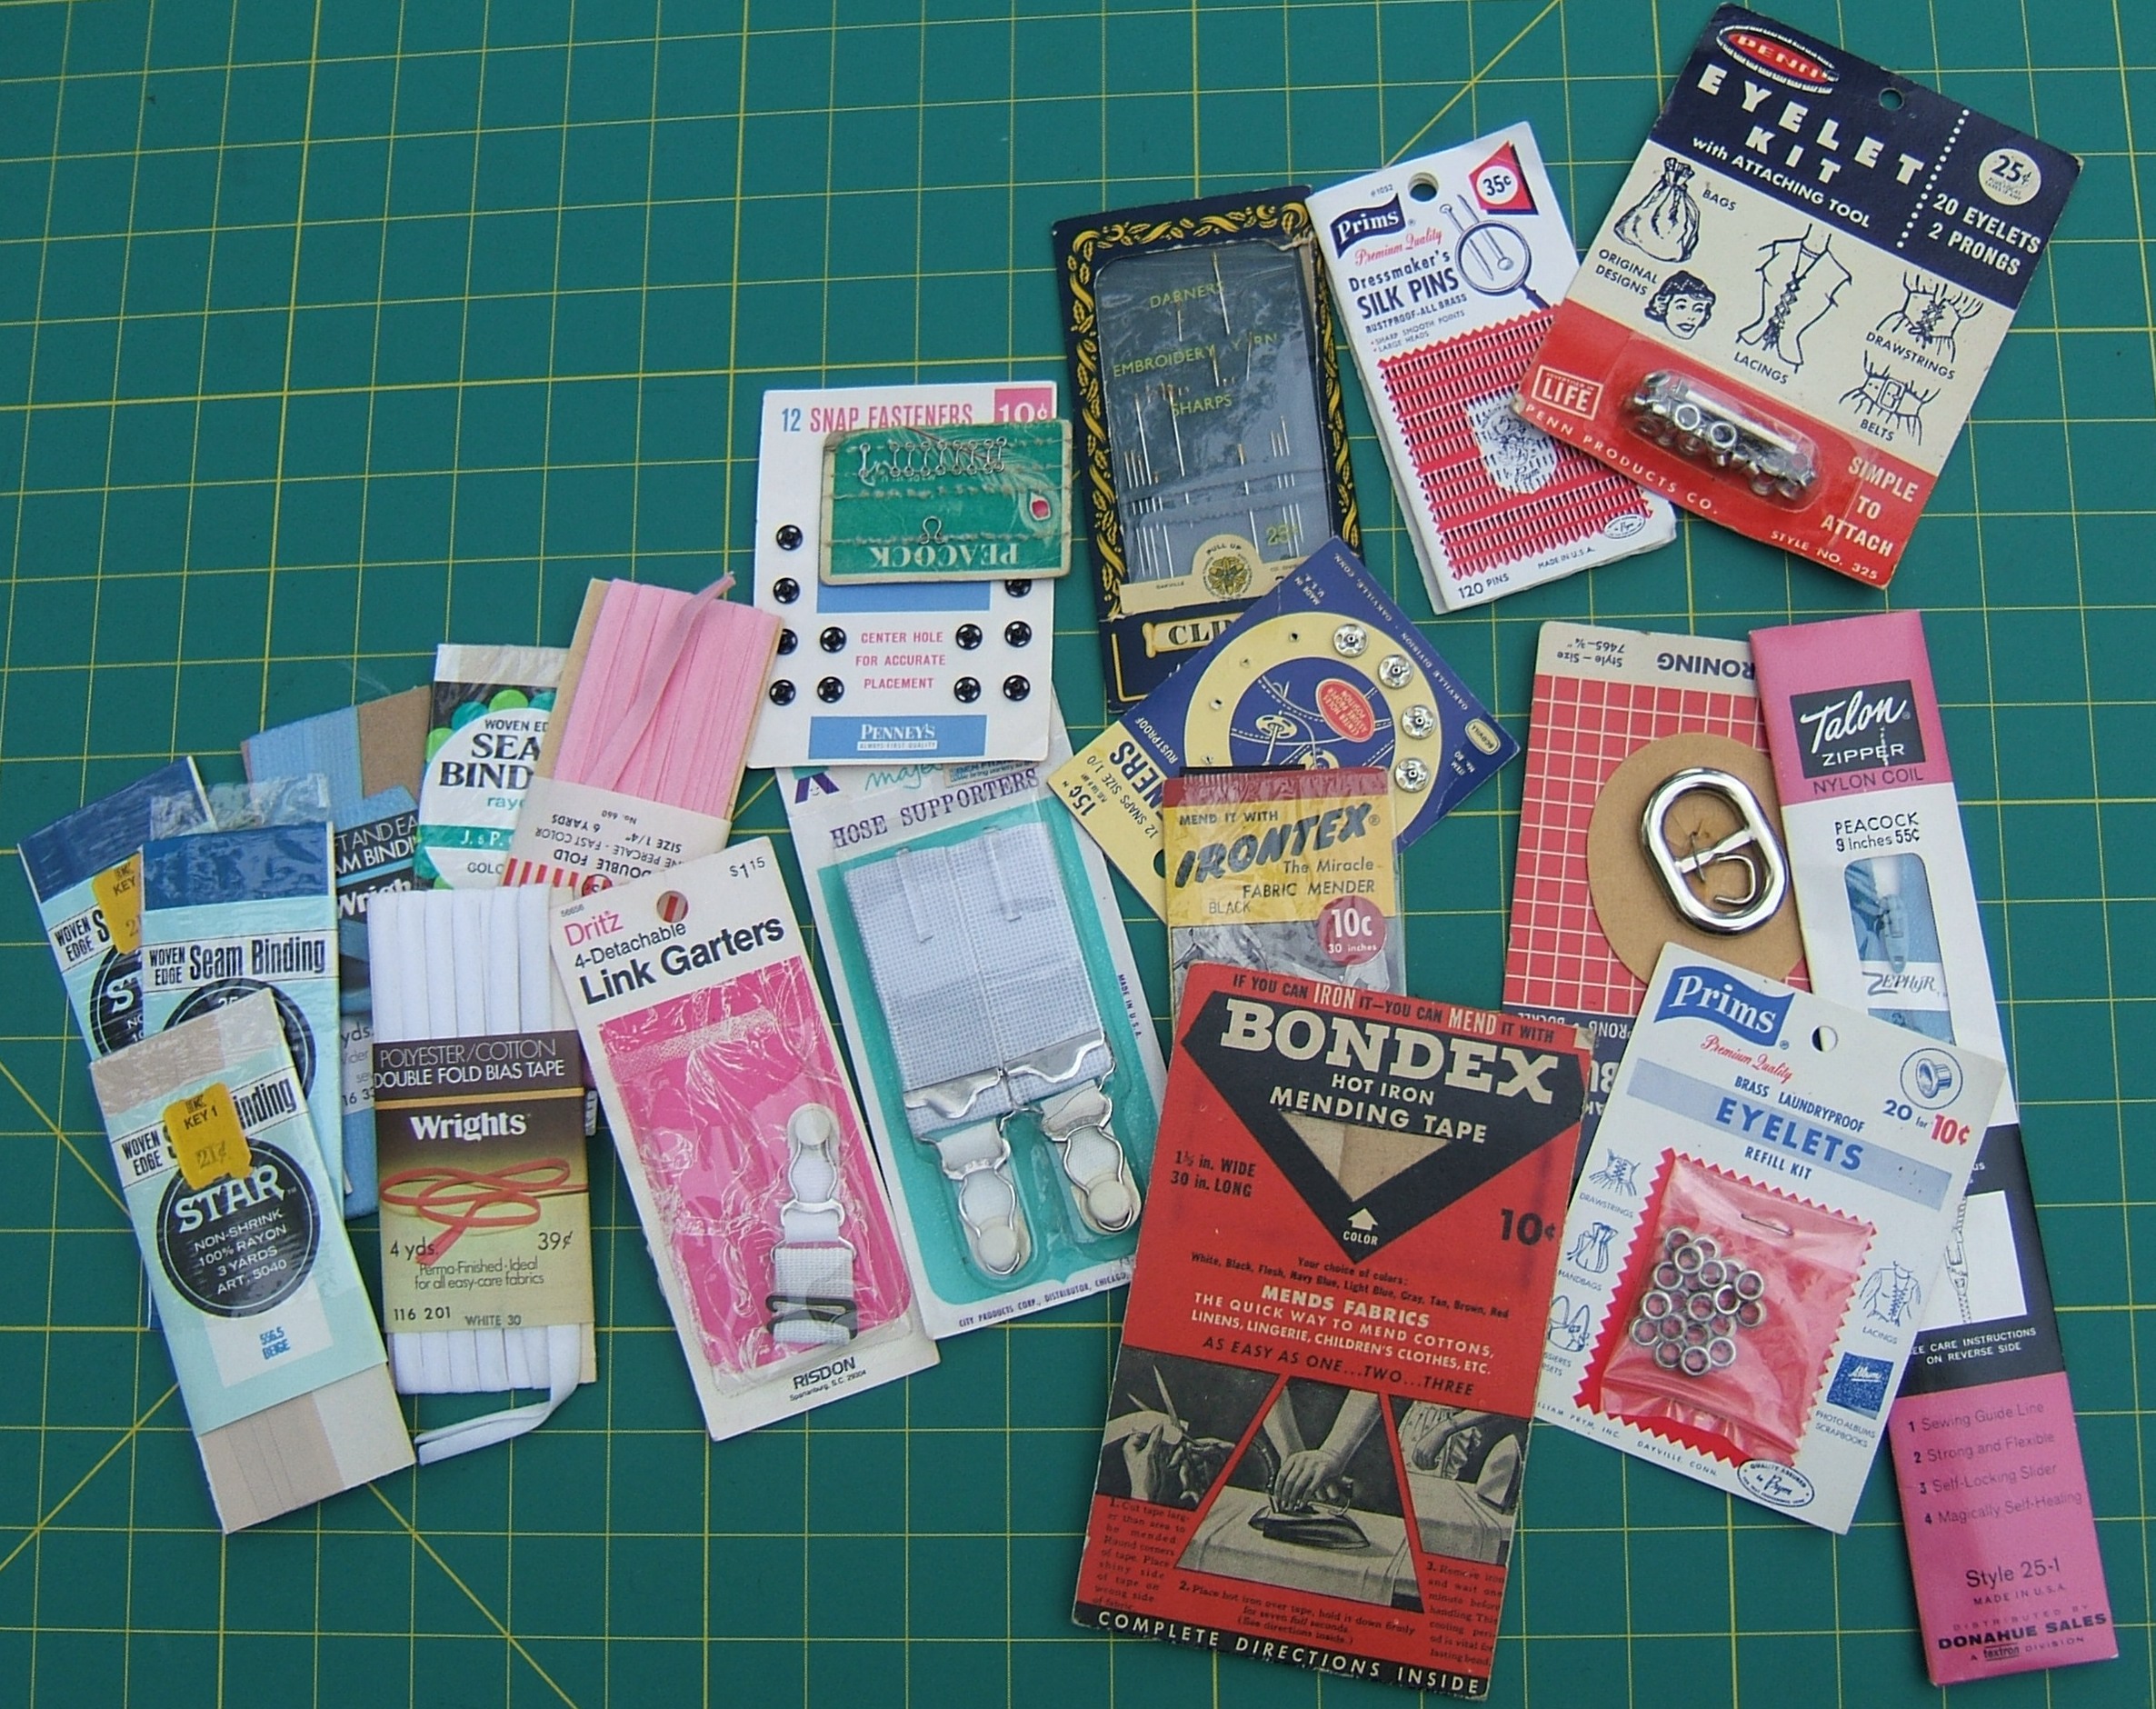
After supper I photographed what I bought at the
flea market last Saturday:
Could have taken a better picture if it hadn't been so windy. Something shifted and hid the loose needle that was in the bag, for instance.
patch herringbone jeans At last!
Even though I caught fabric underneath and had to rip a couple of inches, sewing the patches on was anticlimactic after hand-mitering the corners of the patches and hand-basting the patches to the jeans. Even on a rough-and-ready patch, lumpy corners are a bad idea, and there is no way pins will hold while a patch is rumpled and crumpled to get it under the presser foot.
Got all that done today despite it being washday.
I had a dental appointment yesterday. To which I wore one of my old pairs of black knickers; the last time I wore my gray ones, I marked them for shortening and haven't done it yet. For some reason, having excess blousing below the knee makes the knickers rub on my knees. I pinned in a inch-and-a-half tuck; I've no idea how it got to be three inches longer than the older pairs. Last April's entries in this diary give no clue.
I'll baste the hem in and wear them before cutting anything. Could go out and rip out the old hems before the light fades. Pretty dim already, since it's overcast.
Ripped the hems out on the nineteenth, but today I didn't get any farther than taking the safety pin out so I could wash the knickers. Must also stitch the fold-under for the hem edge so it won't ravel. Better baste in a mark at the hem fold so I'll know where to measure the three inches from, too. Or just write here that the hem was half an inch wide. The elastic kept it from getting a sharp, ineradicable crease the way hems usually do.
I found a postcard, this morning I scanned it intending to put it on ~joybeeson, and then lost the whole morning to scanning, cropping, and linking half a dozen more pages of How to be Pretty though Plain.
And this time I lost the whole morning to actually putting the postcard on ~joybeeson, and re-scanned the side I'd scanned upside down. In the process I figured out what I'd done to make the scanner put out a pre-cropped J-peg when I made the first scan, which will save a lot of time in the future.
I did stitch the fold-under later in the day, and put the knickers in the laundry basket. I'd been intending to wet and spin them to take the elastic-crumples out, but they have a lot of visible dirt that such a procedure might set.
And after wasting most of the morning, I mended a broken seam I had noticed while folding the underpants I washed last Tuesday. Then I made a start toward clearing the ironing board and finding the parts of the second pair of pedal pushers by finding a new home for the junk paper that I'd been keeping on top of the scanner while it didn't work*, putting away a substantial part of the loot from the flea market, and putting away the floss and safety pins I bought at Walmart on the eighteenth.
*(DH discovered that it wasn't plugged in! That is, a connector on the power cord was loose.)
I threw the seam binding into the box of cotton tapes; I think I'm going to have to get the "synthetic" box down and re-label it to include rayon. Also take "iron-on tape" off the label, since I now keep that in the interfacing box.
ED.DIR says that this picture was last fiddled with on August 29.
I should have taken it with the needle pointing down; sticking up out of the fabric, it's rather "huh, whazzat?". But there are lots more eyes to sew on; I can take another. The next three I sewed were a bit wonky, so I laid the work aside and didn't get back to it until tonight. I sewed on one more eye, it was wonky, and I was bored.
Spent most of today playing with maps. Google suggested a route I hadn't thought of — a zig onto a road I hadn't noticed. Also put a bottle of tea into the freezer for tomorrow's ride. I don't expect to get home fit to sew.
I just moved "all-linen hat" down on the priority list. I forgot to take a hat to the tomato festival, and the sun was unbearable. Luckily one craft booth had two hats for sale, and the first one I tried on was my size. I thought three dollars was incredibly cheap long before I noticed that the embroidery was done by hand. The shell is cotton at best and the lining — yes, at that price the hat is fully lined! — feels like nylon, but it looks nice and is quite adequate when I'm not sweating.
I folded up the worn-out all-linen hat and put it in my bicycle's tool kit in case this happens again. I had a store-bought red cotton hat in the tool kit that I lost. Not to mention the lovely roll kit documented in 2013SEW1.HTM and all the tools therein. I can't replace the film-can sewing kit since film cans no longer exist. But I have a calling-card sewing kit in my wallet,
And I see that I haven't written a description of the wallet-size sewing kit.
Diabetic test-strip containers are about the size of film cans.
I was too tired to write yesterday, so you have missed much amusing forthing and backing occasioned by forgetting to hem the pocket openings of the fronts and the elusiveness of the scraps from cutting these pedal pushers. When I found them (in the box marked "pant-weight linens"), I decided not to face the openings after all, and today I basted hems in and selected a piece of one-inch black tape to cover the raw edges.
I interfaced the hems with strips of gray linen left over from the first pair of linen pants I ever made. Only pitiful snippets remain; those scraps have been quite useful — not to mention that I patched the pants several times before giving up on them; pure linen pants are very comfortable — particularly when you spill an awning of rain on yourself, or the captain of the pontoon you are riding dives into a wave.
I wonder whether I'll ever find a use for the two basted watch pockets I found among the scraps? I use a different style of watch pocket now.
Hey, I made those pants before I added a pair of watch pockets to my pattern — The watch pocket of the original pattern grew and migrated to become passport pockets, then later I added the watch pocket back, then I started making two because I always sewed it on the wrong side — so why did I make watch pockets of that fabric?
I sewed the watch pockets to the broadfall pockets yesterday, then when I went to baste them to the fronts, found that the fronts had not been hemmed. Today, I decided to fold up the treadle for the night and discovered, when I moved stuff to the ironing board, that I hadn't faced the pocket openings of the broadfall pockets! And I'm supposed to close the bottoms before basting them to the fronts too.
One can get into a muddle when one lets a project lie for weeks.
There's a bit of daylight left. Perhaps I should run out to the garage and sew one more eye to the completed pair of pedal pushers.
I'm pretty sure I didn't.
Yesterday I sewed the basted hems on the pants fronts, just to be able to say the project was still in progress. In the afternoon, I bought ten yards of one-inch black all-cotton twill tape. Today I boiled it, dried it on a rack, rolled it up, put it into a zipper bag with a label, and put it away. I used a piece — two pieces — of such tape to cover the raw edges of the hems, and that left me with fifteen inches.
While I was at Lowery's, I looked for wool flannel. I didn't find any, but I found some very nice bright-yellow cotton jersey; I passed it up because I no longer make my summer jerseys out of jersey, but in retrospect, I may never again see cotton knit in plain bright yellow; I should go back and buy a T-shirt's worth for the stash. Plus enough for pockets, of course. Three yards should be worlds, since I'd probably make it short sleeved.
Drat. I didn't take note of how wide it was, so can't decide exactly how much before going back. Could calculate on the assumption of sixty inches, as that is very common.
On the way back from the fabric shop, I found a pocket tape measure at the pawn shop.
I was looking for wool flannel because on one of my bike rides I was thinking about the coming winter, and realized that I could make a jacket-style jersey to wear over other jerseys by using my linen-jersey pattern, and give up my futile search for washable wool jersey.
Then I thought further, and realized that a jersey that opens all the way down needn't have a yoke; I can very easily modify the pattern I used for my raw-silk overshirt. I probably made the linen-jersey pattern by modifying that pattern, so I can use the same pocket patterns, and use the jersey pattern to mark where to put the drawstring. I'll probably want to make it a little looser — even if the silk shirt is loose enough, the wool will be thicker and grabbier.
A drawstring in a shirt meant to wear over a variable number of other shirts is a very good idea!
In the meanwhile, I've been wearing my remaining cotton jersey a lot, and the most-frequently-used pocket is wearing out. So I was fretting over whether I could get back before the stuff is sold when I noticed a piece of yellow cotton jersey on the top shelf of the sewing-room closet.
Pout.
The whole day for sewing! So it's after lunch time and all I've managed is to cut a pre-marked strip of bias and clear off enough ironing board that I can press a crease into it after my nap.
That leaves one two-inch strip of bias the full width of the red linen in my linen-tapes box. And there will be some left of the one-inch strip I cut off it to face the curved edge of the broadfall pockets with.
I really need to mend my wool cycling jersey; it's going to be needed Real Soon. I've worn it once this fall, got it sweaty, and soaked it in a bucket of water, which caused the exposed edges of the underlining in the front to curl under; pity I didn't turn the thing inside out and see that the top-stitching was failing before it got this far. Well, I could have taken it off without turning it inside out this time, and left things to get even worse. There are a lot of places where the topstitching is just starting to give way.
I did press the crease that afternoon, pin facing to one pocket, and start to pin the other.
The fiddling around that morning included inspecting my black bra, and seeing that what it needed was a patch cut from the worn-thin linen knickers I mean to make into spectacle-cleaning rags, but I've forgotten where in the clutter those are. (Just checked the to-be-done hook again.)
Tuesday wasn't all that futile; I also tricked the washing machine into letting me hand-wash a chiffon nightie and robe set. There are so many ways computers in a washing machine could make work easier — why did the designers choose to use them to give the user less information, less control, and a lot more work?
On Thursday, on the other hand, all I accomplished was to finish pinning the bias facings and stitch them. And I located the white silk thread for mending the wool jersey.
(Wednesday was a quarter-century ride.)
Sewed the bias on, pressed it as it lay to conform it to the pocket, then pressed it standing up like the side of a cake pan, to get a crease in it for folding to the inside. Folded and pinned it, stitched an eighth of an inch from the fold, turned it over and edge-stitched along the crease I pressed in the previous entry, came out looking pretty good. No red on the front, a uniform edge of black on the back, and I'm not ashamed of the sharply-contrasting stitching that shows on the inside.
Then I ran three rows of straight stitch on the bottoms of the pockets, moved the thread to the Necchi, and zig-zagged over the raw edge and again just inside the first zig-zag. One of these second lines interlocked with the first, the other was a thread away from its first line of stitching. I don't know what I did different. Still a secure bottom to the pocket. I found that the line of straight stitching close to the edge made it stiff, so that the zig-zag was much neater.
May or may not progress tomorrow. I've got a newsletter to send in the morning, and I'm having a new tooth installed in the afternoon.
Living in the future: they e-mailed my impressions to the lab!
Tuesday: basted pockets to fronts, sewed one side seam.
This morning: Pressed side seam as it lies to prepare it for top-stitching, re-pressed all creases, pinned the other side seam.
Who says I can't start a job and finish it on the same day?
Well, I started it yesterday when DH's new pants came in the mail and I stuck a pin in to show how much to shorten them.
He wanted four inches off, and I wanted to fully-line the hem in case they need to be let out after washing. They are Carhart, so it's safe to alter them before washing, but I'm not entirely rash.
I started by marking a line two inches from the current hem and cutting it off. Then I used the same setting on my hem gauge to mark another dashed line — with the dashes farther apart — and folded the cut edge down to meet it. At this point I noticed that I'd put all the right-angle pins in on the inside, which would require delicacy to fold the hem again, so I went around and switched them to the outside, so the points of any pins that extended beyond the fold could stick out into the air.
I folded on the cut edge and pulled out and re-inserted the pins all around. Then I pulled out those that weren't right next to a seam and stuck them back parallel to the fold.
Then I realized that I'd stuck them in with the head toward the approaching needle. Oh well, said the fox, I wanted to let him try them on before I did something hard to take out anyway, and hand-basted the hem in place.
Tried on, almost, but not quite, too long.
I sewed the hem with the black polyester already on the White for the slacks-in-progress. I really should buy a spool of medium-gray polyester thread.
Sewed the side seam that I had pinned just to be able to say the project wasn't halted. It's been lying around for so long that I'm going to have to press both seams as they lie before top-stitching, as the first one is unfolding.
Rainy days make me dueless and dilatory even when I don't have to go out in it; sunny days make me say "In October, I can't waste a day like this indoors."
Today I pressed and top-stitched the side seams, then used a drop-dispenser bottle to lay a line of undiluted bottle starch inside the fold of the inseam. I think that that will dissuade it from coming un-arranged while I'm top-stitching that seam. I didn't have much trouble top-stitching the side seams, but I suspect that I'd be disappointed if I could see inside them.
The inseams are still damp, which is a splendid excuse to spend the evening reading usenet and a novel posted on Baen's Bar. Never mind that I have both a blow-dryer and an iron.
I'm hand-washing a bra, being down to two that don't need repair.
Today I trimmed the worn neck hem off one of my three orange bras, pinned a strip of bias tape to it, hand-sewed the ends of the tape together, pressed the fold that I starched yesterday and sewed the inseams in my linen-cotton pedal pushers (the ones that I plan to turn into slacks with a clever pieced flat-fell seam), changed the thread on the White, and sewed the tape to the bra. I've yet to press it and top-stitch the other side.
I sewed the tape to the inside, planning for the part turned to the right side to cover the stitching. Not that there's honestly an inside and outside to a pull-over bra; I often don't know which way I've put it on. It even sort of works if I put it on backward — but I always pull it off and start over when I do that.
Starching the folds of the inseams worked so well that I didn't honestly need to press the seams as they lay before top stitching, but I pressed again anyway.
The light bulb over the ironing board isn't bright enough to pin black-on-black, but if I change it for a brighter one, the shade won't dim it enough that I can bear it when using the computers.
There has got to be a place in this room where I can put another lamp. Somewhere. Perhaps someone makes a bulb that I can plug directly into the power strip.
It took me only a few seconds of fumbling around to remember that when top-stitching a tube, you turn the side you want facing up to the inside, put the tube behind the needle with the end of the seam facing you, and pull the seam toward you under the foot until you reach the beginning. The upper part of the tube rumples up behind the machine, ready to straighten out as you stitch. The only slight difficulty came of rumples sometimes blocking the light, so that I had to shift the way I was holding the fabric.
Between loads of wash, I finished repairing the orange bra, took off the red bra I was wearing and threw it into the wash, sew scraps of bias tape end-to-end, and started repairing the next bra.
While binding the first neck, I thought that this was a good-looking edge finish, and I ought to use it on my new bras. But when I put it on, it pooched out in front. Not nearly as conspicuously as it did when I was using bias facing, but it's definitely loose. Not at all noticeable on an old shabby bra, but not quite acceptable on a brand new save-it-for-Sunday bra.
This time I sewed the ends of the binding by machine — I'd sat at the machine to do the pinning, partly for the sake of the light and partly because that was where my chair was. (I save houseroom by rolling one secretary chair to each of the two computers and each of the two sewing machines. Except I swivel, rather than roll, to change computers.) — and I'd just had practice piecing the scraps of bias together.
Another thing I did today was find the "curry" scraps and move them to the top of the linen-scraps box. I haven't unfolded them yet, but there are worlds aplenty, and I'm pretty sure at least one has a true-bias edge.
While pinning the bias to the second neck, I realized that I'd trimmed the shoulder seams on the wrong side because that was where it was easier to undo the flat-felled seams, but I could have cut deeper if I'd trimmed on the right side, because the binding is nearly twice as wide on the right side.
I pinned the tape, which had a quarter inch pressed under on one side when taken from the linen-tape box, to the wrong side of the neck, then stitched as narrowly as I reliably could — more than an eighth of an inch, less than a quarter, guided on the toe of the presser foot — pressed as it lay, pressed a crease into the tape, turned the work over and pressed the tape from the right side, which flattened the tape, removed any creases or rumples that got into the part of the bra that was hidden while I was pressing the crease into the tape, and confirmed the fold along the free edge.
Then I pinned "in the ditch" all around, licking my fingers frequently to be able to smooth the raw edges into the fold I was creating. (And to think that in Rough Sewing I inveigh against the filthy habit of licking thread! But nobody will touch this bra but me. I suppose that professional dressmakers keep finger tack for such occasions.)
And now even though it's dark out, I think I'll move the pins to the right side, then roll this chair into the other room, open the White, and stitch along the folded edge to finish the job. When I re-pinned the other bra, I frequently put a pin back on the magnet; it doesn't seem to take as many pins when the fabric is already where you want it.
When I sew this orange fabric, I can push the button on the headlamp strapped to the White just once, to light up only two of the LEDs. When sewing the black pants, I have to push it twice for four bulbs, and sometimes push it three times and light up all eight.
I need four bulbs when there's no light from the window and a tomcat helps by standing on the machine on the side next to the lamp.
At least he doesn't bat at the needle, as I hear some cats do. He is partial to helping me with paper patterns, but I hardly ever cut out on the floor these days.
First bra on my body, second bra in the closet, third one on to-do hook waiting its turn. I sorted the curry linen scraps this morning and found a triangle that could be trimmed a bit and made into a triangle bandage, were it not that I have a large surplus of linen scarves. They are so neat and so easy to make!
I see that I need to edit "Flat Things", and completely re-write the section on bra handkerchiefs.
Yesterday I made a muslin bag to hold the spices in a pot of corned beef. I always use a much-washed white rag, and on the day before, I boil it and drape it over the saucepan to dry. I don't like the idea of dyes, sizing, detergent, and so forth cooking into my food.
Today I picked a silk casing off a worn-out pair of Capilene tights. Though worn into holes they are still warm under my bicycle pants — back then, hand-knitted alpaca tights, now cheap sweat pants pinned at the ankles.
Late in the twentieth century, I picked off the stretched-out elastic on the tights and replaced it with quarter-inch elastic in a casing I made from a three-inch strip cut off the bottom of a worn-out silk T-shirt. When I wore the tights on Wednesday (over a new pair of silk tights and under a recent pair of sweat pants), I found that the casing was so worn that it barely held up the pants — substantial parts of the elastic were bare entirely.
I appear to have sewn the casing very thoroughly, but a seam ripper and a new razor blade in a "mini blade scraper" handle finally did the job. And Roomba just cleaned the living room! I think I managed to keep nearly all of the lint on the walk-off mat, which I then took outside and whapped on the picnic table.
Froogle says that the scraper costs $0.66. I think I paid more like fifty cents at Ace, and it's been worth a lot more than that. I've had it for years, but today is the first time I noticed that if you get the light just right, the words "caution: sharp edge" are embossed in the plastic.
The handle enables me to hold the fabric and the razor blade with the same hand, but what I like best is that you can put the blade in backward, leaving the rounded back exposed, when you are through using it.
I'm planning to use the same elastic in the new casing, which always gives me a living-in-the-future thrill. I remember when it was wise to work a buttonhole into a casing, to make it easy to pull out an expired elastic and put in a new one.
Now to choose a fabric for the new casing. The tights are synthetic, but I don't have any synthetic I want next to my skin. Most of my wools are too thick and I'm saving the thin one to make a suit. Plant fibers are contra-indicated in winter clothing. So that leaves silk. That same worn-out T-shirt and two newer silk T-shirts are in the silk-scraps box, together with a wide selection of suitable woven silks. The casing edge of the tights isn't all that stretchy, so I'm leaning toward the red crepe, which has a little give. But even the twill and dupioni would do; all I need to do is to make sure the band is easy to pull over my hips.
I also pressed the triangle of linen, and hope to mark it for cutting into tape after my nap. I intend to cut enough to do the red bra too, since it has faded enough that the tape left over from making it won't do. Brownish orange on faded orange looked good; red on pink would make it look even more faded than it is. I think brownish orange on rose would look deliberate.
Besides, "curry" doesn't contrast with my skin when seen through a thin shirt.
Since I wear this dress only on Sunday, it will be around for a long time. It would be worth my while to sew a watch pocket inside the right pocket and a cell-phone pocket inside the left pocket.
I must have marked the linen after my nap; I'm pretty sure I didn't do it yesterday. There is a strip of two-inch bias tape on the ironing board waiting to be folded in half, pressed, and cut down the crease. I can do that between loads of wash tomorrow.
The dining table still looks neater than it did before I took all the salt shakers, candy dishes, and so forth off it to make room to mark the linen. I pulled it out from the wall far enough to raise the leaf, then discovered that I hadn't pulled it out far enough to lower the leaf again. To get it down, one must press both catches at once, which is possible only when one is standing between them. The designer of that table didn't want people dumping their food on the floor.
I didn't do much of anything between loads of wash.
I'm getting an idea for the cell-phone pocket that would require me to take the patch pocket off and then sew it back on. Perhaps I should just topstitch an extra-wide pencil pocket. In other words, divide the patch pocket into two unequal parts, the narrower one for my cell phone and the wider one for my "pocket bag" (mini wallet).
Make a fitted pocket for my cell phone? After what happened when I was halfway through sewing D-rings to all my pants to anchor the chain of my pocket watch to? (But I think I've seen cell phones of that exact size for sale.)
Learned something useful: when the camera switches itself off after every shot, the batteries need charging.
I tried to take a simple picture of my drop-dispenser starch bottle to illustrate "Tools", got three shots. I thought I'd taken more than that, but there were only three in the camera. One shot had the top cut off & I deleted it. The other two had an unsatisfactory background; I marked them "bad background" and set out to make another set, at which point the camera started acting weird. The back-up batteries were dead — I don't use the camera much and DH doesn't use it at all — so all four are on the charger and I'll have to wait until this afternoon to see whether I got good pictures.
The sky was nicely overcast, too. Perfect for close-up photographs.
The camera is Drive G. The camera is Drive G. The camera is Drive G. Think I can remember that for next time? It's rather nifty that I can plug the camera into JOY98, and Ztree will see it as just another drive, so I can move the pictures anywhere I want them. But I have to tell Ztree which drive to log.
I think I'll go create a directory to stash illustrations for RUFFTEXT in. Or, rather, a directory for the Tools file, in case I also make illustrations for other files.
I've given up on documenting the construction of the black pedal pushers. Too many obscure photographs, too many missing photographs. Can I find a use for the good shots?
Despite getting up late and fooling around, I marked and cut the bias before nap time. But I'm feeling a bit too dopey to press the quarter-inch turns in even though the iron is still hot.
To mark bias for cutting in half: press, dry iron, with cut edges matching. Cover the tape with a long, narrow press cloth, press again. Dampen press cloth with a spray bottle, iron until dry. Remove press cloth, iron folded tape on both sides to be sure it's quite dry. Press the fold open. If it was properly pressed, it will try to snap shut. Turn tape over and press from the mountain side. This will make it flat enough to cut, but leave a clear crease on the valley side.
Use magnifying glasses, a rotary cutter, and a mat small enough that you have to keep shifting the cutting point to directly under your nose.
I finger-pressed the crease before napping — I can do that when dopey. After napping, I sewed one tape to the curry bra and trimmed the hem off the red bra, intending to sew that one before pressing the curry binding for the second round of stitching.
When I trimmed the hem off the curry bra, I cut as close to the zig-zag holding the hem as I could, and got a few little white Vs to pluck off. The hem on the red bra was wider, so I tried to cut right through the middle of the zig-zag, and that left me with a lot of little red Vs to pluck and stencil brush off. Didn't finish until after supper, and now I feel like playing with the computer.
I was annoyed when DH piled all the rugs in the room onto the treadle sewing machine, but the Roomba had long been finished and on the charger before I got around to pressing the bras.
I'd sewn bias tape to the right side of the curry bra. Today I pressed the seam as it lay to take out the easing ripples, pressed open the seam joining the ends, and re-pressed the turn-under that had been opened by the seam.
Then I pressed around the neck from the right side, pushing just far enough onto the tape to crease it, then turned it over and pressed from the wrong side to flatten the seam.
After that I dampened and ironed the rumpled cut edge of the red bra.
During both of these operations, I could have used a wider sleeve board. I've made a note on my shopping list, and also noted that I should inquire about a new pair of straight operating scissors: my old ones are dull, and I'd like to have a pair beside the ironing board in addition to the pair in the drawer of the treadle.
It might could be that the old ones are worth sharpening; must inquire. DuckDucked: first hit was a package of two for six dollars. But the second was one pair for fifteen dollars. I've no idea what quality my old scissors are.
So I fetched them: bit loose in the joint, and the groove in the screw is so shallow that I can't turn it. This is definitely a "replace".
Meanwhile, it's time to move this chair to the sewing machine.
Another bra in the closet! Today I pressed and top-stitched the tape that I sewed to the red bra on Saturday. I'd done the pinning and sewing so neatly that I couldn't tell where I'd been during the "press it as it lies" stage, so I kept going until I got back to the splice.
I think this was partly because I put the pins in the stitching line, and that worked because I remembered a trick that I'd forgotten until DH bought a bottle of glycerin so he could experiment with making toothpaste. (The experiment worked, he says.)
Before starting, I dispensed the smallest-possible droplet of glycerin and rubbed it into the pads of my fingers and thumbs. On Saturday, it was a bit too much and I blotted it on my arms. Today, it was almost too little, but worked just fine: when I scoonched the fabric, it scoonched, instead of my fingers sliding smoothly while the fabric stayed where it was.
So I folded the tape over the raw edge nice and uniform, pinned in the stitching line, looked at the back to make sure the free edge would be caught everywhere, and sewed carefully close to the fold on the right side. Instead of trying to stitch-in-the-ditch — which wouldn't work on this fabric unless one did it by hand — I tried to stitch a uniform very small distance from the fold. That worked very well, though I twirled the handwheel a lot at first. The distance from the fold on the back isn't as uniform as I would like, but on the inside, and on a garment without a lot of wear left in it, good enough.
When I was dressing for church yesterday, a new pair of black slippers moved to the top of my priority list. I still don't have any suitable fabric, but I could underline my flimsy black cotton knit with my scraps of that nice thick "banana" wool jersey. My plans got more and more elaborate: cut the underlining smaller than the black to keep bulk out of seams, quilt it to one of the layers to keep it in register, lay the layer I plan to quilt it to on a smooth surface and saturate it with undiluted starch . . .
Today, I realized that I have a pair of black fleece pants that have worn through in the saddle area and aren't worth patching. The good parts should make a first-rate pair of slippers. I'm still going to underline the soles with the thick wool.
Any chance I can get it done by next Sunday? It's predicted to be colder than yesterday. I got by yesterday by wearing wool knee socks.
I managed to fiddle away most of the day, but in the evening, inspired by the prospect of a bike ride tomorrow, I repaired the capilene tights. I doubt that the repair will hold, because I forgot to change to a knit needle before beginning work. But it will last through the winter.
I got the silk-scraps box down and selected the same red T-shirt I'd used the first time, partly because the bottom was already cut square. I cut two three-inch rings, undid two of the seams, and spliced into one long strip. (Had about half a foot left over — how did I ever squeeze into that T-shirt?)
Even though they were quite short, ripping the overlocked seams was a pain. I did refrain from expending more than a token amount of time on trying to figure out how to unzip them; on multi-thread seams, that can be difficult verging on impossible even when you know which end of the seam to work on.
I joined the strips with mock-fell seams, which was quite silly: there is very little strain on such a seam, and I had to fight the tendency of the seam to press itself open. But I'm a stubborn cuss, and I mock-felled the second splice despite having a pair of tights pinned to it.
Joined the strip to the tights with a mock-felled seam, which does make sense. I tried, on both rounds of stitching, to keep the fabric stretched to reduce thread popping. (I was using straight stitch on the treadle; I'd better do something with the Necchi Real Soon Now so the oil doesn't gum up.) (So I got up and gave the handwheel a few twirls.)
Then I hand-basted a quarter-inch turn on the free edge of the strip. Knits don't crease well and silk doesn't crease well, so I didn't bother even trying to press the crease.
Used my seam gage with the middle slot against the raw edge of the capilene to make chalk marks all around, then pinned the free edge to the tights. To my surprise, enclosing the ring of elastic in this fold was almost no trouble at all. The elastic is only a few inches shorter than the casing, but one would expect it to wander about and get caught in the stitching.
I stitched first a toe width from the fold, then right on the fold, and now I'm wearing them. (Tried them on to see whether there was an oops, and it's close enough to bedtime not to bother changing back.)
Next I've got to get on with permanent-basting the underling in the popped seams of my thick wool jersey. December is thundering down on us, and my thin wool jersey isn't going to be adequate a lot longer.
Then there's the slippers to wear to church next Sunday. I'm planning to make a tutorial; that may slow things up a lot. Not to mention that I wasted today, and tomorrow and Friday are predicted to be halfway decent days to get outdoor exercise.
Added "make wallet" to list — to record a note about change in pockets; current one is still working fine. Except that one pocket is too shallow.
I did use the Necchi yesterday — to sew a piece of twill tape into a loop for hanging the baseball bat on a hook so the Roomba can sweep under it.
That was after I sorted out the patterns for my
new slippers, photographed them, and started a
project diary.
Photographed my Villa Olive slippers and added a picture to the project blog. Now I think I'll go add a link to ROUGH.HTM.
I think the preceding entry was posted after midnight on the seventh.
I cut out the slippers today, including the banana-wool midsoles. The banana wool is thinner than I remember it. Thinner than the jersey made from it hanging on the to-do hook. May have something to do with how the jersey fits so tight.
Now I think I have time to edit the photographs and write comments before bedtime. (Especially if I do that before logging in to Usenet.)
Well, I did write it up tonight. Then I put the patterns for the midsoles back in the envelope and pinned the midsoles to the innersoles to keep track of them. First job tomorrow will be to permanent-baste the innersoles and midsoles together. With cotton thread, I think. I'm using polyester for the construction seams, but the permanent basting will rub on my feet if I wear the slippers without socks.
I must browse Lowery's fleece for fabric to make a nicer pair. Will half a yard do? Time to lay the pattern out on the cutting mat again.
Finished the slippers, and took a lot of pictures for the slipper blog. I don't get to strike "make black slippers" off my list, because I still need a wool pair, but I moved it down to "back burner".
What next? I'd like it to be a jacket-style wool jersey, but yellow wool flannel seems to be as hard to find as yellow wool jersey. As, neither fabric is to be had in any color.
Studied list, moved "make wallet" to back-burner list. Added "mend banana-wool jersey" to top of list.
Stuck a few pins into the banana-wool jersey that needs mending, then made links to some of the pictures I edited yesterday. Also copied a link framework several times; I think the number of frameworks left is equal to the number Of edited-but-not-linked photographs left.
Hand-mending my banana-wool jersey would be perfect work for between loads of wash; I confidently reached for the banana-wool jersey mending kit -- a sandwich bag that contains, among other things, all my white silk threads.
And it wasn't in any of the places I might conceivably have put it. So I got the last un-opened spool of white 100+ out of the box my last order from Superior Threads came in.
Then when I was folding up the work to knock off for lunch, I felt something in the pocket.
The seams failed on the inside, and got well advanced before I happened to turn the jersey inside out and noticed that the flat-felling was coming undone. The jersey had been washed after the seams came undone -- probably more than once -- and the raw edges were permanently curled.
So this morning I overcast the turn-unders to the raw edges they were supposed to meet. Before doing that, I permanent-basted one edge of the lining down. (The jersey is double in front because cyclists meet wind only from the front.) When I've basted the other edge of the lining un-curled, I can change to stout thread and re-stitch the flat felling.
I hope I get the job done by Thursday.
When I got the first side-seam finished, I thought "Hey, I can wear this shirt tomorrow! Turned to the other side seam, and discovered that I'd basted the curl out of only part of the lining edge. So I stitched around one of the underarms instead, since I was using artificial light by then, and the needle was already threaded for non-basting work.
I considered opening the #50 white silk thread that was in the banana-repair kit, but decided that the thread salvaged when I picked the elastic out of my previous pair of silk long johns was a tad stouter.
I am so glad that my current silk long johns work as purchased! Loosening the waist of the pair that's now in my box of silk scraps and rags was a lot of work.
Wednesday, and the Roomba has access to this room, so the ammo box I stand on when plugging or unplugging the iron is on the ironing board. Last Wednesday, I thought it might as well be doing some good, and set it on the soles of my slippers-to-be. Some of the soles stuck out, so later on I covered them with the piece of plywood I set the iron on, and set the ammo box on the plywood. Those soles were nice and flat when it came time to pin them to the uppers.
Now off to put a few stitches into my banana-wool jersey.
That's wool dyed a color called "banana", by the way. It was the closest to yellow that I could find at the time. My summer jerseys are "curry" and "taxicab" orange. For both the wool jersey and the linen jersey I need now, I'm holding out for bright yellow, but I don't know how long. So far I haven't found suitable fabric in any color. I'm seriously thinking about making the summer jersey white, since Fabricstore.com now softens every other color. Except maybe "natural". But the linen I bought there last time is too sheer, and I suspect that the next weight up is too heavy. Pity I didn't save a copy of the -- dashes to scrap box: I did save the invoice! It's IL020.
And there are some promising colors of IL019, but every last one has been "softened". There *must* be another place to buy linen.
A little DuckDuckGo time and $36.95 later, I have two yards of Yellow Wool Twill Jacketing on the way from Fashion Fabrics Club. I *think* I've read favorable comments about FFC on Usenet.
Hope it doesn't shrink too much; I calculate that two yards of sixty-inch fabric will be just enough without allowing for the double front.
I must try on my brown wool jacket over my cycling jersey to see whether the pattern is loose enough.
Meanwhile, back at mending the jersey I intend to wear under it . . .
Jersey mended in time; too tight to wear over as many undershirts as I needed today. Note: when drafting jacket pattern, make sure the back is wider than the back of the nylon jacket I wore today.
Remembered after hitting the road that gaiters won't hold my slick ripstop windpants. Stuck pins in to make wings, as when riding in jeans. Tried to put the gaiter over the pinned windpants on right foot, pinned windpants over the gaiter on the left. Windpants on outside worked better. Looked funnier, though. I wonder whether I could put several rows of elastic around the ankles of the windpants. Perhaps best to stick with what works.
Did get some sewing done: DH asked for black fabric to cover a webcam; I found a hanger of dis-assembled bull-denim jeans. The legs weren't wide enough, so I sewed two together. More trouble than expected; the thread started skinning back, I cut it to remove the bad place, and I like to never managed to re- thread the needle; for a while there I was considering the possibility that the eye didn't have a hole in it. Finally magnifying glasses, beeswax, and frequent snipping did the job.
The jersey is too tight to wear, period. I'd better mend my Jones Cyclewear wool jersey.
I drafted patterns for the back and yoke of my new cycling jacket. I walked the yoke pattern along the back pattern and was consternated to see that the yoke was half an inch longer -- when there's a difference, it's supposed to be the other way around! Then I realized that I'd walked the cutting line; a quarter inch slants out from the seam line at each end, so all is correct.
I found that the pattern I used for the black raw-silk shirt and my brown wool jacket had the shoulder seam shifted to the front, and chose to use this pattern, rather than the pattern I'd drafted the linen jersey from. With no yoke in front, it's better not to have the potentially-leaky shoulder seam on top of the shoulder.
I cut a piece of newsprint, folded it in half, and drew a line a quarter inch from the fold. Then I put the model pattern against the pencil mark. This makes both the back and the neck a half inch wider. Since I'll be wearing bulky scarves when I wear the jacket, I thought a wider neck was in order. Then I traced around the pattern and added a quarter inch to the side seam. This makes both the back and the sleeve half an inch wider. Half an inch will be plenty for the sleeve, since both the brown wool and the raw silk can be work over other shirts.
Then I transferred markings from the linen-jersey back pattern. That pattern has a little shaved off the side seam at the waist, but I concluded that the drawstring around the waist obviates the need for a double-pointed dart. The markings were for the waist, the bottom of the pocket, the seam of the pocket, and the stitching line between the three pockets. All this with carbon paper underneath and inside the fold, of course. Most of the time; some marks I had to repeat. When I cleared the mess away, I found a sheet of carbon paper draped over the rung of a chair -- I thought I started with more carbon paper than I was using!
I added a notch at the point where the two straight lines that compose the seam between the back and the yoke meet, and marked the corresponding point on the yoke after I'd made it. (That was when I had the false alarm with respect to seam lines that didn't match.)
No changes in the yoke save for adding a half inch to the neck width the same way I did it for the back. And adding a notch.
I just gave brief consideration to leaving the front as-is. But I don't want to risk having it stretched over what's under it when it's on the windward side.
I've decided to use the pattern to make a windbreaker before cutting the wool. So where are my two pieces of yellow nylon taffeta? The box marked "pure synthetic" is on the bottom of a pile on the top shelf, so I don't think I'll look for it tonight.
The separating zipper I bought for this project is not in the box marked "zippers". There are two yellow neck zippers, probably bought for making cotton-knit jerseys -- which I've been making with T-shirt style necks for lo these many years.
I should come home from church totally spent tomorrow.
Took the synthetic box down this morning and found about three yards of yellow nylon taffeta. I was disappointed that the scrap from making my yellow nylon poncho wasn't also in there, but I don't need it for the current project. The separating zipper I bought for the windbreaker project also wasn't in there; I later remembered pinning it to a Jones Cyclewear jersey I meant to refurbish, but haven't found that project yet.
Set up the card table that I bought yesterday and laid the patterns for the overjersey on it. That was as far as I got. Perhaps I'll cut off a piece of newsprint before taking my nap.
Didn't cut off the newsprint until this morning.
It's lucky that I decided that it was time for a slice of warmed-over pizza and a nap just when it was time to cut out the front I had just designed -- I forgot to add a quarter inch to the side seam. I'm not widening the front in the middle, because I can leave a little unzipped when I have a bunch of stuff wound around my neck.
I copied the pattern I used for the front of the black-silk shirt and the brown-wool shirt, then added marks copied from my linen jersey. There is just barely space for the front pockets below the forward shoulder seam.
After my nap, I tried to get a picture of the front-in-progress, but it gets dark awful early now (and earlier every day!) and flash pictures seldom come out well. Pity the patio door isn't just a tad wider -- there was, at the time, enough light outside.
I have a new card table, so I don't always have to clear off the eating table to work on a pattern -- and I found an old tablecloth to lay over it so I don't have to put everything away when I knock off for Thanksgiving. (The cat likes to claw and wrinkle paper that he's lying on, and he loves having a card table set up near the glass door.
I fiddled and poked until I managed to get the box of interfacing off the high shelf -- I must get around to moving my archive copies of Threads to that shelf!
And the deprecated interfacing that I use for mending patterns is in it. It's a gauze-like woven.
Today, the sleeve. First, get all the surplus patterns back on the nail. I had torn the hanging hole out of the pattern that goes next to the wall; while I had the iron hot, I put re-inforcing patches on all the patterns. Except those that already had them, and one with a gummed reinforcement -- but I mended a tear in that one.
The desk calendar isn't as big as I'd hoped it was, so I cut another piece off the roll of newsprint. Probably time to start looking to catch the "The Paper" office open and buy a new roll end. Put the big cutting mat on the card table, the newsprint on the mat, the old sleeve pattern on the newsprint, the cat on the sleeve pattern -- it's time for lunch anyway.
Never got back to the sleeve (did cover it with an old tablecloth), but I uploaded the pictures that were in the camera. Two blind-aimed pictures of the newly-drafted front, the first one better. I think I'll scale the better one and put it near the comment that the front pockets almost clash with the forward shoulder seam.
It gets dark so fearfully early that I may not take many pictures of this project. Though the flash seems to have worked on this one; it's bad aim that makes it a poor picture.
When I got up from my nap, a package was on my typing/sewing chair: two yards of yellow jacketing. I was planning to put it into the washing machine as soon as it arrived, since it's wool, but jacketing is worsted wool: there are a lot of ravels on the cut edge. So I'll have to zig-zag it first. No rush, since I want to make the windbreaker first, before cutting the more-expensive wool.
Just turned off the light: the yellow wool shows up about as well as the off-white stuff it is lying on.
Check drawer: I do have nylon thread to sew the windbreaker with. And it's a shade of green not too far off from yellow. All I need to buy is a zipper. Lucky, since nobody I have access to sells nylon thread.
somehow find wool to make loose cycling jersey.
Maybe I ought not to strike that until the wool is actually delivered.
It was delivered on Saturday. Haven't zig- zagged the ends yet. Since it's wool, I'd been planning to wash it without overcasting, but jacketing is worsted, and it appears to ravel like cotton.
So washday and no yellow wool in the washer.
It was a mistake to wash that doily, which was merely dusty. Some of the strands broke even though I sewed it inside a pillowcase, and I pinned it out unevenly. I'll leave it on the pinning board (improvised from the carton my new card table came in) for a few days, because it was nearly dry when I pinned it out.
I'm finally moving the collection of Threads Magazine to the top shelf so I can put some of the boxes lower down. It helps a lot that DH bought a stepladder that works just like a step-stool, except that you have something to hang onto to keep your balance, and there's a shelf to put stuff I take off the shelves on so that I don't have to climb up and down precariously clutching.
Just discovered that I have two copies of #14, knitted gloves. I think that strip of gray flannel marks a missing issue. (Yes, #34.)
Just un-buried my steam iron. I'd forgotten I had one. That can't go on the top shelf; I might want to steam something someday. But the antique iron I'd been using as a bookend, the other antique iron, the vintage toy iron (really plugs in and gets slightly warm!) and all my sewing books followed the magazines.
Unexpected benefit: the top shelf is enough taller that there are only two piles of Threads -- makes room for the iron collection.
On closer inspection, the selection of books to move up into the magazine section wasn't that neat. I may bring some of them down again. Particularly since I may need to move some of the taller books up.
The shelf the magazines were on is a couple of inches shorter than the shelf the books are on, but only two of the books that didn't take part in the bookalanche appear to need the height.
Back to work: I think the order goes, from left to right, garments, embroidery, lace, compendiums, knitting. The compendiums and the unclassifiable can move up to the magazine shelf. And The Illustrated Hassle-Free Make Your Own Clothes Book can move down to "garments", since I don't have a history section.
Ooh! I've got a copy of The New Dressmaker, The Butterick Publishing Company, 1921!
I do have a history section; all the garment books are vintage, except for two that were written for re-enactors.
Now for the general-sewing books.
I need one more general-sewing book -- or a garment book -- to keep the embroidery-design books from clashing with the bracket that supports the shelf above. Good excuse to drop by the place on Buffalo Street? But they appear to have gotten rid of the basement full of books.
I'd forgotten that I have a bundle of knitters' graph paper. Logical to file it with the knitting books, but it won't fit on the shorter shelf, so I took it into the other room and put it with the assorted papers.
What's this? The two shelves are the same length, and I took out three over-high compendiums, a spinning leaflet I plan to give away with my spindles, and an unreliable brick (the one that failed to prevent the bookalanche), yet the books just barely fit.
Whatever, the job is done, and when I want the box of linen scraps off my ironing board, I won't have to drag in a stepladder.
My yellow gloves are nearly worn out, so I worked bar tacks on the backs of my back-up gloves to mark them "right" and "left", so that each glove will collect dirt on only one side. The new gloves are warmer than the old ones. Could be because the old ones have worn thin, but I think these gloves were thicker to start with.
After that I zig-zagged the ends of my yellow jacketing, then remembered that in wool I should draw threads before washing. The threads drew with alarming ease where they hadn't been caught in or weakened by the zig- zagging. Now it's in the washer, but I want to take a nap. Pity my washer has no "fill up and wait for further instructions" setting.
What the? I told it to rinse and spin, and now it's filling up again. Ah, well, once it's full, I can push "pause" -- the only button that has any effect of any kind once it has embarked on one of its programs -- and take my nap.
That part worked, but it rinsed yet again when I tried to fill it with hot water. I cancelled that, and had to let it "drain and spin" two or three times before it got over pouting at having been canceled. Now it's *finally* filling with hot water. Don't ever buy a computer that doesn't have a keyboard!!
I measured the jacketing before washing. It was sixty inches wide, as advertised, but closer to eight feet than two yards. Maybe I can get a double front out of this after all.
If it doesn't shrink too much in the hot water, and if it isn't ruined altogether.
The laundry room smells of hot wool.
Haven't measured it yet. It isn't as fuzzy as wool washed in hot water usually gets, but the beautiful shine is gone.
I "repaired" the lower hole in my jersey pocket by adding a lobster-claw clasp to my key chain. Twice on today's ride I found my pocket knife hanging out through that hole, restrained only by the lobster claw. I guess I'll have to darn it even though that jersey is worn fragile all over. But on inspection, the holes in the pocket are essentially runners; I can zap them up with baseball stitch. It should hold until I get the new jersey made.
Just deleted "out of bedroom curtains" from "make black-out curtains"; there isn't enough of the left-over black-out fabric to make a new curtain. Plenty to make a set of camera covers, though.
I thought I had a yard of black velvet and offered it up to make blackout curtains for the Webcams. When I got it out of the closet, it proved to be about two yards -- ample to make a skirt. But I'll never go somewhere I could wear a black velvet skirt, and black velvet is high maintenance. Not to mention that I don't have and don't want a sequinned blouse to go with it.
Just had a thought: it's supposed to be black velvet sewn to white blackout fabric -- but that doesn't have to mean sewn around all four edges! I can simply sew them together at the top, perhaps once at the edge and once farther in to make a flat place to tape it up by. A header, so to speak. No worry about differential stretching!
Finally laid the black velvet out this morning -- it's two yards nine inches. But it's also so speckled with lint that I don't at all regret giving up the thought of making a skirt out of it. One can brush a camera curtain thoroughly before taping it to the window and forget about it. A skirt would require me to carry a clothes brush in my pocket.
Not to mention that a flat two-foot square is a lot easier to brush than a skirt.
Now off to grit my teeth and make that first snip. Maybe the washing machine will want attention and postpone it!
I have decided to allow for a hem -- or, rather, a "clean finish" -- all around.
A sewing glossary I found on the Web has a weird definition of "clean finish": any sort of finish when it's applied to a seam allowance. What I mean by "clean finish" is turn under a quarter inch (more or less according the thickness of the fabric), top stitch not too far from the fold, leave it at that. Since a raw edge is exposed, this ordinarily can be used only on seam allowances, but the camera curtains will never be washed.
What I ended up with was a turned-once hem, zig- zagged down.
I sewed the hemmed velvet to the blackout fabric (which is white) this morning. I thought I'd save punching holes in the blackout fabric by doing without pins, and ended up taking out a foot of stitches. And, well duh!, this isn't a film fabric that is weakened by pin holes, it's a coated fabric that leaks at pin holes, and the stitching is in the part that attaches to the window, not the part that blocks light.
When I got my Velcro down yesterday, I found that I have one roll of sew-on loopside and one roll of stickyback loopside. So I peeled the old black denim pants off the gaffer tape on one window and put the curtain up with the tape.
The next curtain will be much neater. Cutting the velvet twenty-five and a half inches square for blackout twenty-four inches wide was about right, and twenty-three and a half is the correct length. But the velvet hangs out below the blackout substantially even though the seam takes three times the width taken up by the hem. But that's better than having the white blackout shine through, so I'll keep that measurement.
I sewed the velvet fuzzy side to the slick side of the blackout, then wrapped it around the edge of the blackout so that it looks like a binding and stitched a toe's width from the fold of the velvet to hold it in place. I did that because I didn't have any sew-on hookside Velcro, but I think I'll do it on the one I make after buying Velcro too; the Velcro will be easier to attach with the velvet held firmly, and needle holes don't matter up here in the attaching place.
Awkly scrickle. I finished drafting the new sleeve, hung up the sleeve I'd traced around, realized that I'd want a new nail for the new pattern -- I'm out of wall space!
I suppose that I can hang it on the south wall, over the bra patterns. <checks> I need to sort out the bra patterns and put the ones in current use on the lower nail. Come to think of it, I think that those are in the linen-scraps box.
Still can't remember where I put the box of Velcro. The new Velcro DH bought is in the lower right drawer of the treadle sewing machine.
Grump. The back pocket is too wide to fit on the desk calendar, so I have to haul the newsprint down again.
Which led me to notice that there isn't much newsprint left at all; it's past time to start trying to catch the "The Paper" office open again. When the roll is heavy, it gives one the impression that there are many yards of paper on it, but the cardboard core was designed to support a roll of paper that has to be moved with a forklift.
Found the Velcro -- sitting on the sewing machine in plain sight.
And DH put up the camera curtain I'd made him.
As I expected, it is impossible to photograph black velvet from the other side of the glass.
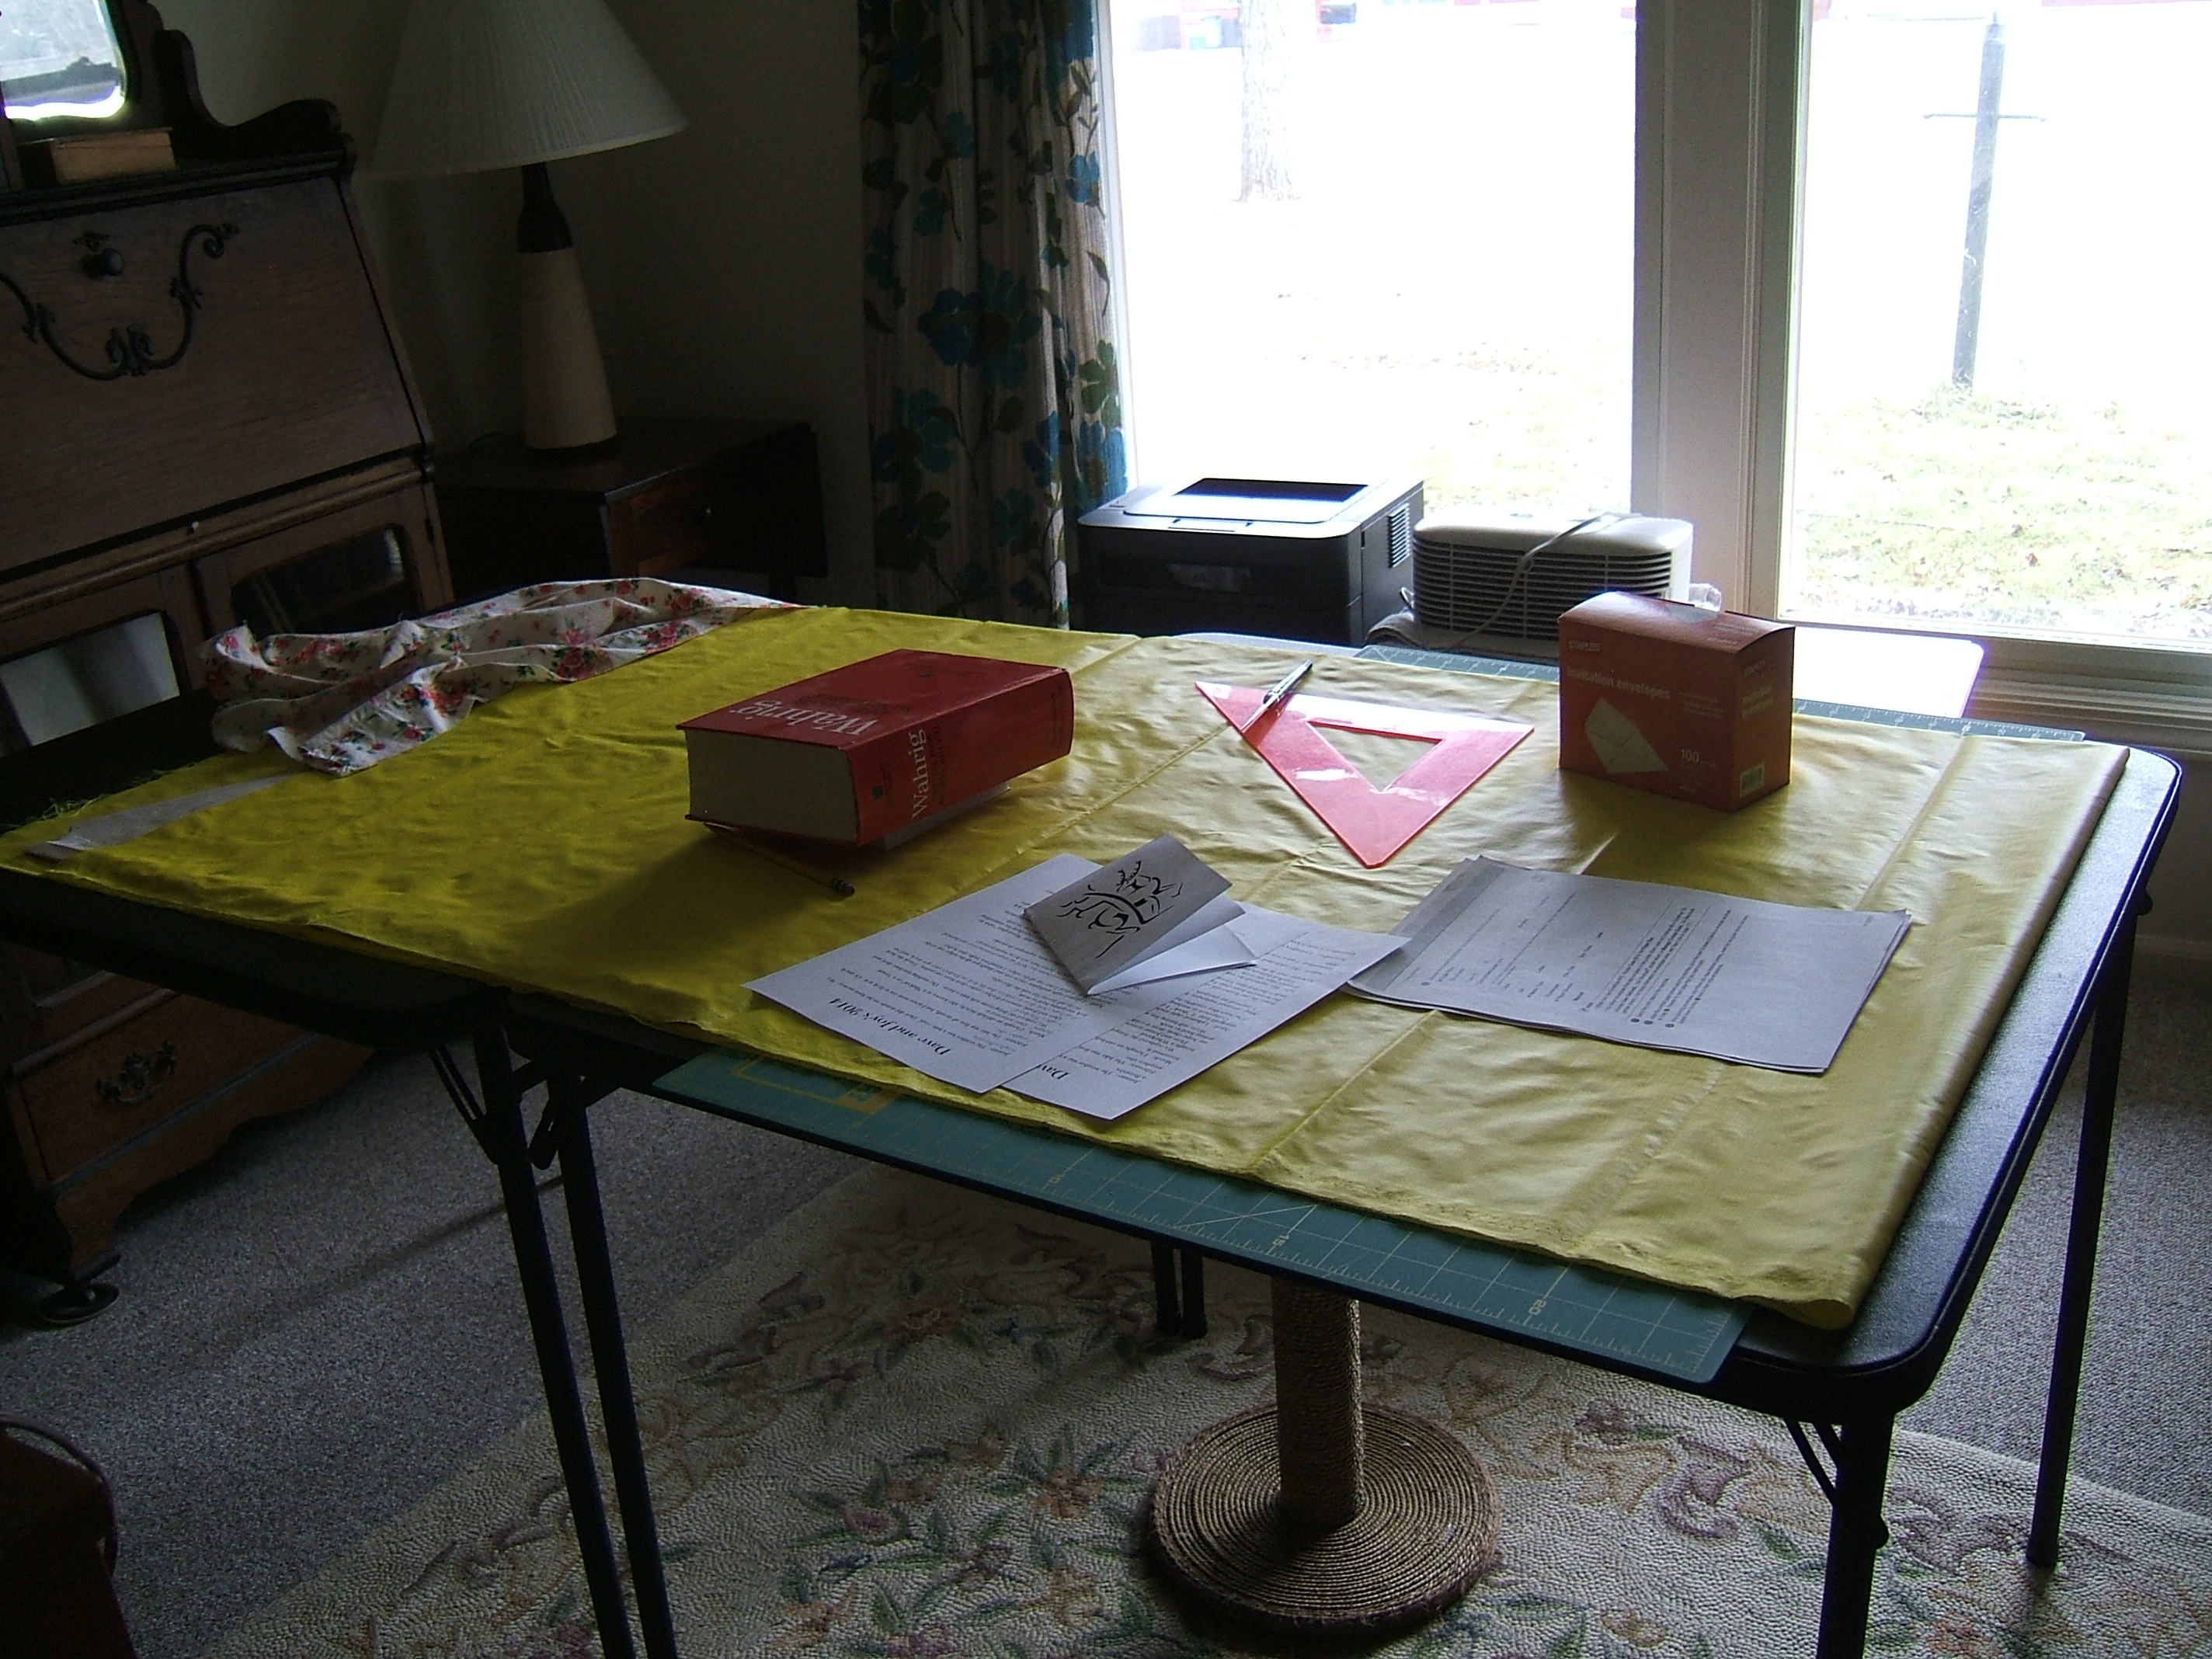
The windbreaker project had to go on hold, but the two card tables are in the parlor, so I didn't have to take them down, and the half of the fabric that I don't plan to cut folded neatly over the patterns, so the cat can't rearrange them. But the card tables were next to the printer, so they became my work surface for assembling Christmas cards. "Wahrig" (the coffee table of dictionaries is also near) is serving as a weight to flatten freshly-folded cards. A mis-folded card lies on two proofs of the Christmas letter (which went out without the URL of the 2014 Beeson Banner on it, &%#@!); near them are a print-out of the instructions for printing envelopes and a box of envelopes. The red triangle was used for drafting the overjersey pattern, and the stick lying on it is a burnisher I used to fold the cards. The red-and-white rag is the dust cover of the printer.
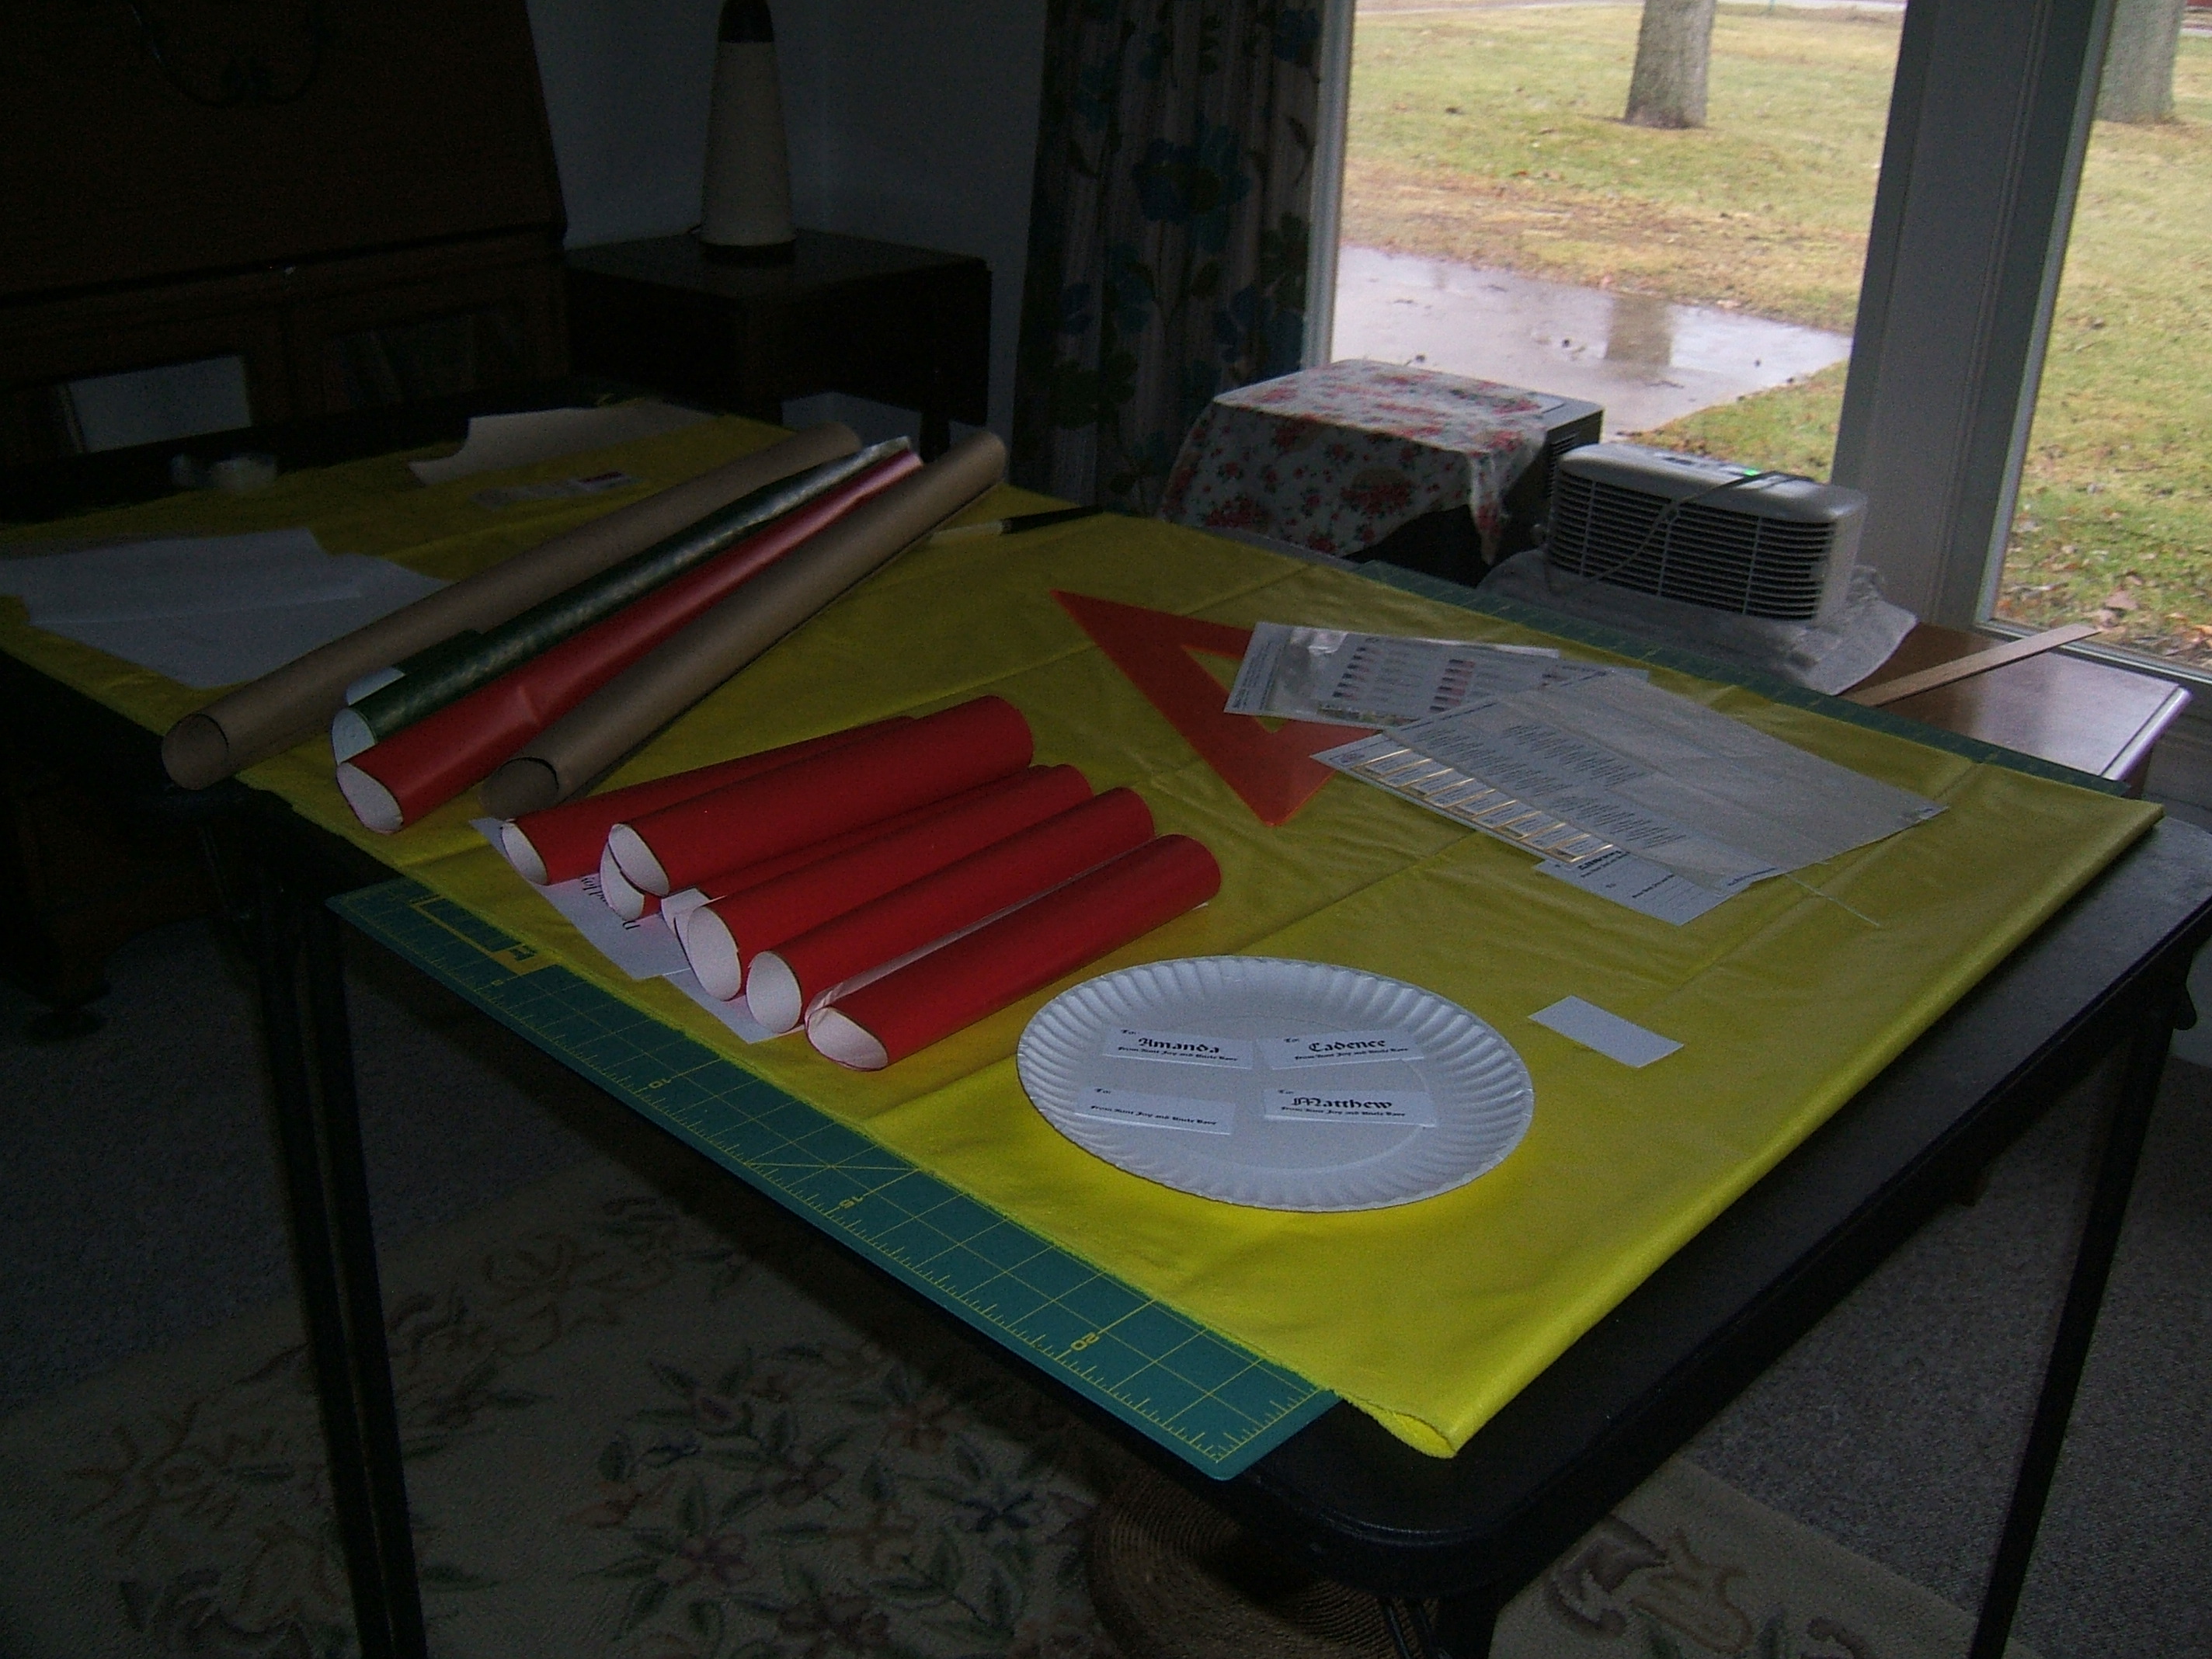
The cards have been sent, but now the tables are a staging area for the gift-wrapping supplies.
Re-reading everything with an eye to closing out the file, I found the place where I couldn't find any raw osnaburg for the embroidery-gig pack. That was because it's all in a box marked "embroidery gig" among the boxes of scraps on the shelves. At least, I presume so -- I found the box while moving magazines and books to the top shelf, but didn't open it.
And I can't open it now, because I don't see it on the shelves. There are two boxes with labels that don't show, but both are where I need the stepladder to get at them.
Managed to see the labels; neither is the embrogig box, and it didn't turn up during today's pick-up-so-the-Roomba-can-clean convulsion. I must have put it Someplace More Convenient. I'm pretty sure it's a smaller- than-average suitcase-style box, made of glossy cardboard with green on it.
hand-stitch frayed spot on orange
bra
One thing that did turn up in the clearing was a poncho shirt that needed a tear darned. Since the tear was at the corner of the neck (it's a purchased shirt; my necks don't have corners), I couldn't put it on a hanger on the to-do hook, and there was a threaded needle stuck into it, so I darned it and put it into the closet.
Then I was in hand-sewing mode, so I did the bra too. The job turned out to be bigger than I had thought, as usually happens with mending. I should have done it by machine, but I was well into it by the time I figured that out.
That and putting the stuff back pretty much filled up my two-hour morning.
Now it's naptime and my leg board is still on the bed. I doubt that I can move it to the ironing board without waking the cat and making him jump off.
Aha! the pants off-cuts are on the ends of two cantilevered boxes; there has to be a heavy box behind that box!
The stepladder is in the room, but I'd have to close the ironing board and move a stack of unsorted papers to use it, and it is nap time. Sorry, cat.
black-out curtains for cameras
pedal pushers made of black linen-cotton
add handkerchief pockets to all sweat pants
bias-line the red ramie
cut out red ramie bras
re-repair re-make rocking-chair cushion
Mend hem on old silk scarf
sew snaps on raw-silk shirt
pedal pushers made of linen-cotton shirting
black bras
black cotton briefs
linen briefs
old black-linen knickers → spectacle-cleaning
rags
evaluate both pairs white hemp jeans
patch seat of black linen jeans
more pillowcases
scan illos for Shuttle Solitaire
sort books and boxes on sewing-room floor
Darn writing mitts
sort and repair warm clothing
remember where lobster-claw mittens are
darn Dave's watch cap
repair closet rug
darn heavy wool socks before washing them
※ back burner
shorten knickers
put patch pockets over side seams of cotton-lined linen
gown
all-linen hat
hem madras pillow cases
make black slippers
new curtain for bedroom
new wallet. Coupon pocket should be a quarter
inch deeper than other pockets, which will require
it to be sewn a half inch below the ones pocket.
※ fantasy
portable desk
propeller gilligan hat
patchwork cover for White to replace pillow sham
Continueto 2015
Back to Part One of 2014
Back to Rough Sewing
Back to the writing page
Back to the links page