My spouse got bored during the first week of March, 2012, and translated this file into HTML Strict. If you want to read a version that validates, click here.
15 February 2019: all my pages validate now (except those that I haven't gotten around to), but in Transitional.
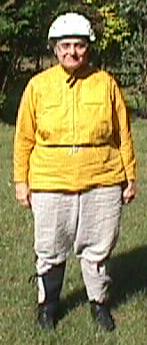
When Phoenix Textiles had a great bargain on three colors of linen, I bought five yards each of "curry" and "lipstick", because pure linen is bound to come in handy sooner or later.
While looking at the curry linen, I remembered that I needed something cool to wear on the bike in hot weather, and I no longer ride so fast that I need to worry about wind-flapping — a woven "jersey" would do nicely, and with linen, I could make the sleeves long and minimize the area that has to be covered with sunscreen.
Calling curry "yellow" is stretching it — curry is a shade of brown from a cycling point of view — but during the parts of the year when I want to wear linen, sunset is long after I come home and veg out on Usenet. Visibility isn't going to be much of a problem.
I already had a smock pattern that would do nicely, with suitable pockets added, and some way to tighten the sleeves at the wrists, but I didn't want a cycling shirt to open all the way down the front. On the other hand, it had to open part of the way down the center front to let me put it on.
It happened that for reasons now forgotten, I'd drawn a horizontal line across the smock-front pattern two and a half inches below the bust point. When tracing the smock-front pattern to make the jersey-front pattern, I continued the upper leg of the dart to this line, then used a french curve to round the corner, making a somewhat bib-shaped yoke.
Much to my surprise, it was quite easy to sew the undulating edge of the lower front to the convex edge of the yoke, even though one of my notch marks had rubbed off before I got around to pinning them together. This may be because there was only a quarter inch allowance on the curvier edge.
In order to make a pre-graded flat-felled seam between the yoke and the rest of the front, I added three-quarters of an inch of seam allowance to the yoke, and only a quarter of an inch to the lower front. To sew the seam, I turned a quarter inch of the yoke to the right side, after suitably trimming the upper layer of the yoke. Even though linen presses very well, I basted the quarter-inch turn to make sure it didn't flop open during subsequent operations. Then I matched the raw edge of the lower front to the raw edge of the yoke with right sides together, and sewed a half-inch seam. When pressed to one side, this made a very neat flat-felled seam.
I did not wish to emphasize this seam with white top-stitching. I expect the color of the fabric to change with washing, so it's no use trying to match it with sewing thread. I used warp threads that I pulled out of a scrap to run two rows of top-stitching by hand.
The first thread, which I tried to use unwaxed, drifted apart after making a few inches of stitching. After that, I pulled each thread over my cake of beeswax before using it, and found these ravellings as easy to use as any fine sewing thread. I usually use ravellings double, and hope that the thin spots on one strand line up with thick spots on the other, but these worked just fine single. I wonder why it's taken for granted that linen sewing thread must be slubby and uneven — and very expensive — when such a smooth and even thread can be woven into such a cheap fabric.
To avoid a lump in the flat-felled seam, I left the button overlap off the yoke pattern. (I also cut the button-lap off the mandarin collar.) Each of the two front-yoke pieces was cut with the center-front line on the fold, making a fully-lined yoke.
To strengthen and stiffen the edges where the fasteners would be sewn, I basted a strip of the same linen to the wrong side of the center-front line of each half of the yoke. I was careful that the part of this strip that lay on the side that would become the lining was narrower than the part on the side that would become the right side.
I didn't want a zipper next to my skin. After a couple of weeks of mulling the problem over, I settled on cotton hook-and-eye tape. To save lumpiness in the flat-fell seam, I ended the tape an inch above the seam line, covered the raw edges with a piece of twill tape, and overhanded the two folds of the yoke-halves together from the tape to the seam. This led to one of many "well, duh!" moments: I could have put in only the six or eight inches of hook-and-eye tape needed to make a comfortable opening, and then I could have slip-stitched the rest of the center-front seam, which would have made the jersey front lighter and more graceful.
(But I'm not just about to rip it out and do it over! I probably won't even use the lessons learned from this jersey to make another, since it will be even cooler if I put it on while it's still wet from washing.)
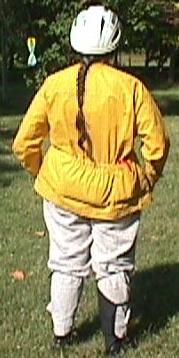
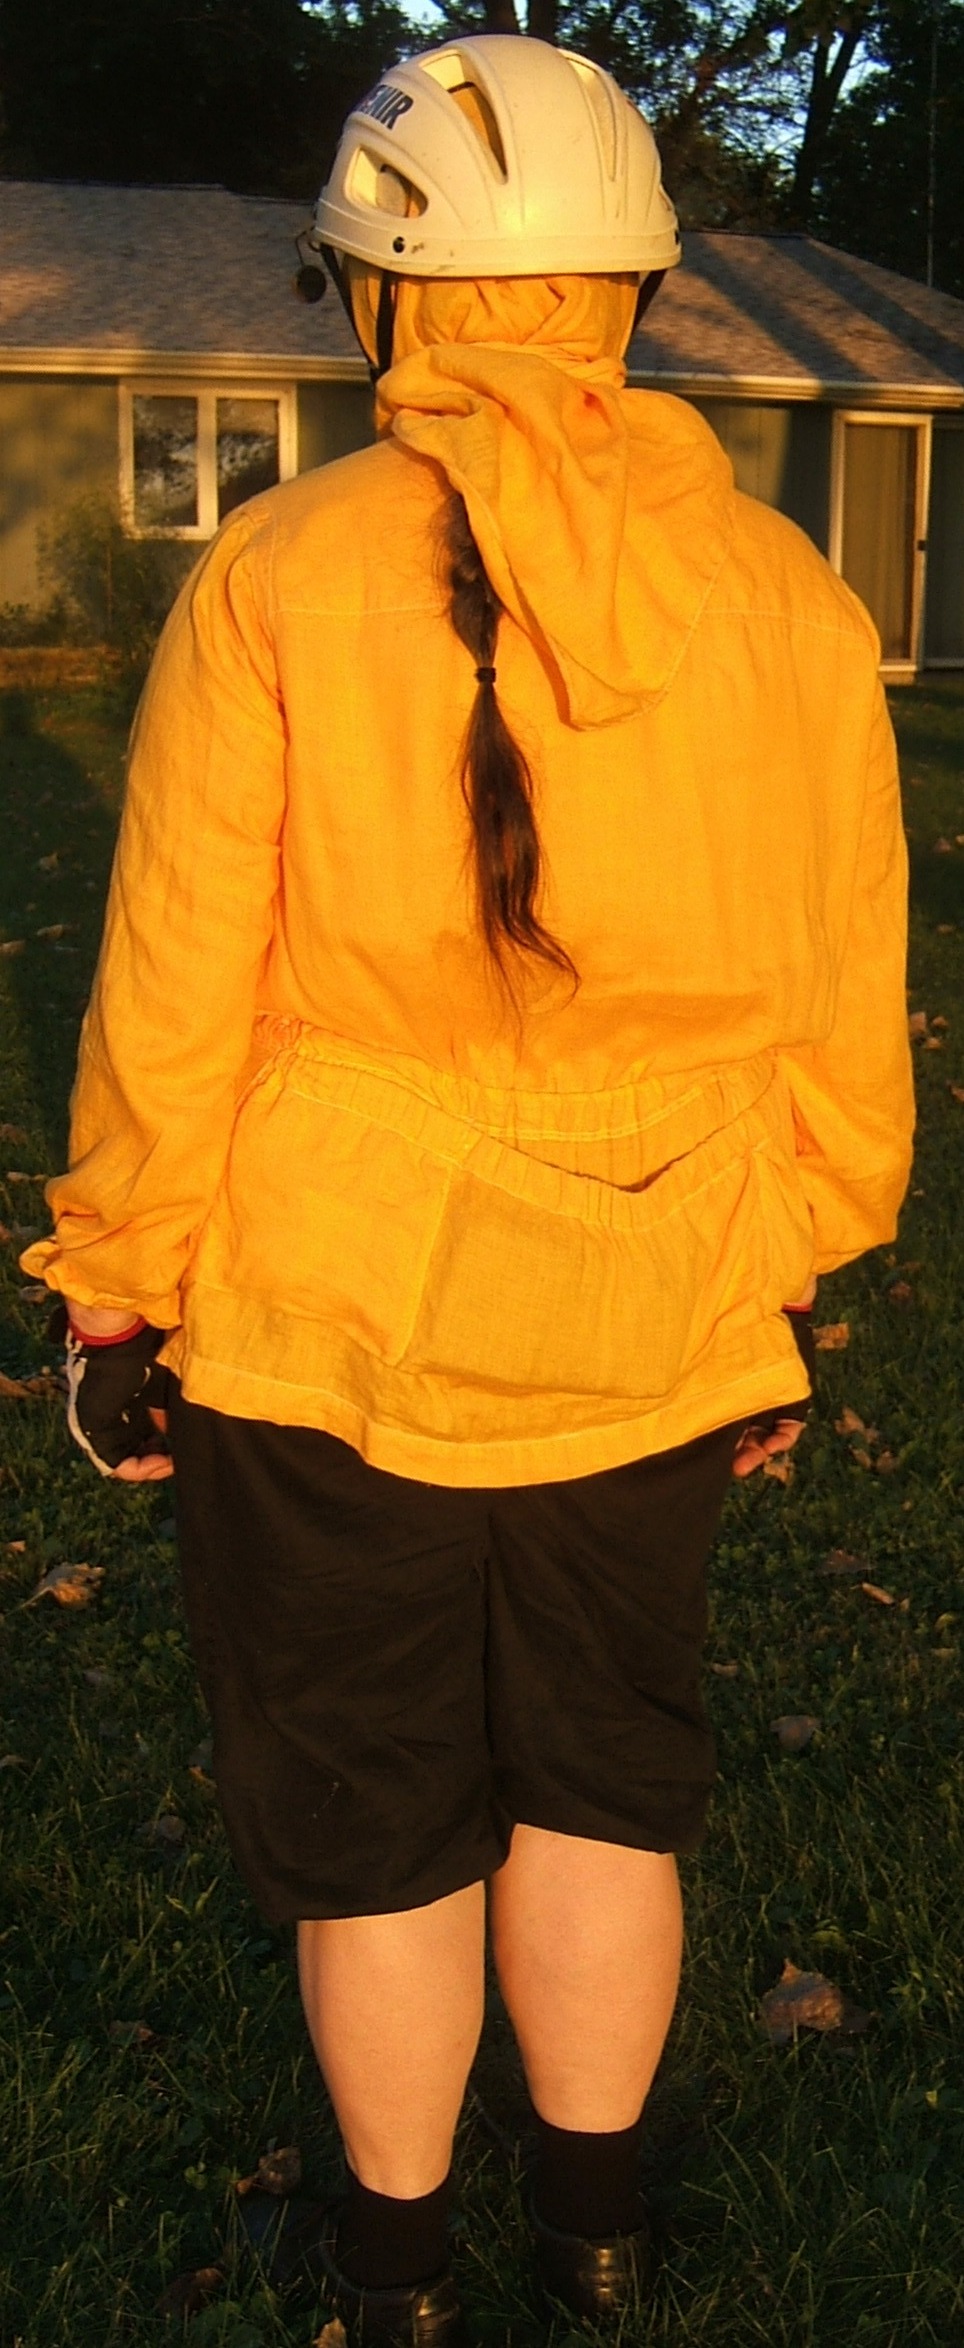
The back yoke is the usual shirt-back yoke, except that it ends at the shoulder seam instead of wrapping to the front as the yoke of a man's shirt would. Because the front is also a fully-lined yoke, instead of installing it in the usual shirt-yoke manner, I turned the bottom seam allowance on the yoke-lining under, and basted the crease. I sewed the back yoke to the front yoke and the back-yoke lining to the front-yoke lining in four shoulder seams.
I then pinned the lower back to the back yoke right sides together, with the raw edge of the back a quarter inch from the raw edge of the yoke, and sewed a 5/8" seam. The 5/8 on the yoke and the 3/8 on the back add up to the sum of the half-inch allowances marked on the pattern. The seam is an eighth of an inch higher than it would be if the back yoke were sewn the usual way, but the fit will be exactly the same. Raising the seam made it quite certain that the folded edge of the yoke lining would cover the stitching. With a full half inch of seam allowance folded under, I could top-stitch the seam from the outside and be sure of enclosing the raw edge. With each allowance a different width to start with, I didn't have to grade the allowances. Best of all, I didn't have to stuff that big lower back with attached belt casing and three huge pockets inside that narrow little yoke!
The drawstring needs to be at waist level — and so do the tops of the back pockets. After considerable thought, I made the drawstring casing an inch wide and appliquéd it with its upper edge a quarter inch above the waist, and worked the bar tacks ending the pocket divisions a quarter inch below the top of the elastic. This left me nearly half an inch to thread the drawstring, and made a triple thickness of cloth under the bar tacks.
[It turned out, when I wore it, that a properly-supported pocket doesn't need to be quite that high: it would be easier to use if it were an inch below the waist — and that would have considerably simplified construction. Of course, I still need to have the bar tacks through the drawstring casing.]
If I had it to do again, I think I would make the upper edge of the drawstring casing a loose fold, like the bottom edge of the back pockets.
I made the casing in three pieces, two gaps to clear the side seams, and one for the knot at center front. This allowed me to sew the casing to the back and front while they were still flat.
I made the back pockets pretty much the same way I make them on interlock jerseys: A straight strip of the back pattern, plus a hem allowance at the top and an extra inch at the bottom. But instead of zig-zagging the raw edge of the pocket to the back, I allowed an extra quarter inch, folded it under, and top stitched twice, making it look like a flat-felled seam.
More on that seam anon; before sewing it, I must hem the top of the pocket. I made a hem an inch wide, to hold 3/4" elastic. To make the side seams thinner, I lap-seamed an inch and a half of 1" cotton twill tape to each end of the elastic. (I don't have any 3/4" twill tape, so I scroonched one-inch tape.) After putting the elastic into the hem, I zig-zagged near each end of the casing to keep the elastic in place. Then I nailed the casing to my ironing board with T-pins stuck through the casing and the twill tape at each end. With the casing stretched to its full length, I basted a bar tack at each of the pocket divisions to keep the elastic evenly divided among the three pockets. [I left this basting in place, working the bar tacks that finished the pocket-division stitching over it, for which I had reason to be grateful later on.]
Now I'm ready to sew the pocket to the lower-back piece. I really must get my hands on a drawing program, because this is a bit hard to get across in words. The bottom of the pocket is sewn with the right side of the pocket against the right side of the back, and with the raw or turned-under edge of the pocket against a line drawn one inch above the place where I want the bottom of the pocket. Then I turn the pocket up, its wrong side against the back, with the top of the pocket lying along the waist line and the raw edges at the side seams matching.
The front pockets are patch pockets a bit larger than the pockets on a man's shirt, and set as high as possible. Originally, I installed them with the tops level with the lowest point of the seam line of the neck opening. This turned out to be higher than was possible — it was difficult to reach into them — so I picked them off and re-installed them an inch lower. (Appliquéing pockets to a completed garment is a bit of a pain.)
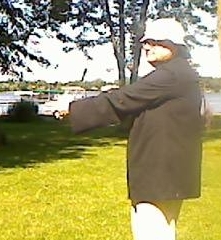
I should have placed the widest part of the protector halfway between the ankle tie and the below-the-knee tie, instead of at the fattest part of my leg. This has not been enough of a nuisance to inspire me to make another, but I had to sew on an extra pair of ties to compensate for putting the middle pair too high.
I have a Custom Fitments pants protector made with Velcro straps instead of ties, and there is no reason that you couldn't use D-rings or other kinds of buckles. I prefer ties because it is so easy to adjust the tightness just right. The row of bow knots is rather dramatic, as if I thought I were portraying some hazy concept of a Viking warrior — but there is no way someone dressed in yellow and black is going to fade into the woodwork, and people stop staring as soon as you stop acting self- conscious.
In winter I wear hand-knit wool gaiters, like the tops of stockings, to confine my slacks or bridge a gap between tights and shoes. One could make gaiters of woven fabric, with elastic in channels to confine your leg wear. Heavy fabric such as Cordura is laced up the outside of your leg by way of grommets installed in two tucks in the gaiter. Since I don't wear that kind, you're on your own. (Hint: one can buy them ready made from sporting-goods stores.)
Lowering the pocket turned out to be much easier than I expected. I didn't consider, when planning the job, that lowering the pocket would make it narrower than the part it was being sewn to, but I remembered that and realized what to do about it simultaneously.
First I picked out enough of the side seams to release the pocket, picked out the pocket-division stitches, and picked out the stitches holding the bottom of the pocket to the back of the jersey. Then I repaired the side seams by sewing them as lap seams, using the original creases. I did this job by hand, using running stitches, because I knew that I'd be sewing the pocket on top of this seam, and didn't want to make the area too stiff. This was, perhaps, a somewhat paranoid precaution. (I had not yet realized that I was moving the pocket down to a wider part of the jersey, so that the stitching would not exactly overlap.)
Now to transfer some of the strain on the pockets to the drawstring casing. I had intended to use patches made from scraps of the curry linen, but after thinking about how the turned-under edge of the patch would lie on top of the turned-under edge of the drawstring casing, I selected a white cotton quarter-inch twill tape, because my 3/8" tape is too soft and loosely woven. I cut two pieces each a bit longer than the marks left by the pocket-division stitching, which got the reinforcements well down inside the pocket, but avoided all risk of having them encounter the stitching at the bottom of the pocket.
Then I opened the bottom seam of the drawstring casing at each place where it crossed the pocket-division stitching, poked the end of the twill tape inside, then pulled it out, drew a water-erasable mark half an inch from the end of each tape so I could tell how far I was pushing it in, and started over.
I repaired each gap by back-stitching by hand through the original holes, with a bit of twill tape shoved in up to its little blue mark and neatly centered over the stitch marks of the pocket division. Since there are two rows of stitching at the bottom of the drawstring casing, this holds the tape firmly even though it's so narrow that very few of the stitches hit it.
Then I pinned the tape over the stitch marks, which I could see through the tape by holding the jersey up to the light. It would have been sensible to edge-stitch the tape by machine and hide the ends of the threads with a needle, but the heat was sapping my mental energy even though I was inside and not sweating, so I sewed the tapes down with teeny-tiny back stitches. (I can't meditate while operating the sewing machine.)
Now I marked a dotted line half an inch above the top of the hem with my handy-dandy water-erasable marker — how *ever* did we ever get any work done before these wonderful pens were invented! — and used a ruler to extend the stitch-marks to this line. The pocket, from its previous installation, was turned to the right side at the bottom and to the wrong side along the sides. (Before repairing the side seams, I had touched up these creases with the iron.) I matched the stitch-marks, turned the last inch of the turn-under at the sides a bit deeper to make sure it would be covered by the edge lying over it, and stitched the bottom of the pocket to this line. Before making the second row of stitching that would have concealed the raw edge of the pocket, I bethought me that in making the pocket as low as possible, I might have made it a bit *too* low.
(At this point there was a bit of a hiatus, since I did this before attaching the tapes as described above. When writing the description, I remembered it in logical order, and left it that way because it makes more sense.)
So I stuck a pin at the top of each proposed stitching line, put a loaded wallet in what would be the middle pocket, put the jersey on, and verified that the wallet does not bump my butt. Then I very, very carefully pinned both lines of pocket-division stitch marks to the exact center of the two pieces of tape, and turned the work over to verify that the pins were exactly halfway between the stitches that held down the edges of the tape.
By good luck I was interrupted at this point, and had time to remember the missing row of stitches at the bottom of the pocket. The second pinning was easier than the first, because I had discovered that when the work was stretched out on my ironing board (which has a brilliant light above it because I use it for jobs like this more often than I use it for ironing), I could see the tape through the pocket without holding it up to the light.
I straight-stitched from one stitch above the fold at the bottom of the pocket to beyond the basted bar tack at the top. At the bottom, I pulled the needle thread to the inside, tied the two threads together, and trimmed them to about a quarter inch. At the top, the stitching was left entirely raw, in the hope that undue force would pull out the stitches instead of tearing the fabric. To resist due forces, I hand-worked a three-stitch bar tack with a soft, single-ply linen thread.
I stitched the sides of the pockets as for a patch pocket, making smooth U turns at both the top and the bottom. (See plain-text files for a description of my method of attaching patch pockets.) This stitching partly overlapped the side seams, more at the bottom than at the top because the shirt tapers more near the waist.
Since I could take my jersey off without taking out the pins at the wrist, I thought I might sew in pleats or darts to narrow the wrist. After deciding how many darts to make and marking the places to put them, but before pinning them in to make sure they were the correct width, I got to worrying about the lumpiness of a pleated hem, and thinking it would be better to pleat or gather the sleeve into a narrow cuff.
At which point, I decided that a little linen-covered elastic isn't all that objectionable after all. I cut a stitch in the hem of each sleeve and slipped a piece of cord elastic inside it.
This points up the wisdom of testing the fit of a pattern by making something that you actually wear before cutting expensive fabric, rather than (or in addition to) fitting it in muslin and then taking the muslin apart to use as a pattern.
The elastic wrists worked out very well. The wrist is a bit loose when my arms are hanging at my sides, but when I reach forward to hold the handlebars, the sleeves pull up to a place where the elastic is tight enough to keep bugs out, but not tight enough to mark my arm. A linen band would be nicer, but considerably more trouble than threading elastic through an existing hem. Not to mention that the first piece of elastic I put in was too short. Pulling it out and cutting a new piece of elastic was a lot easier than picking off a mis-measured linen band!

Upon reading the last paragraph of the previous discussion, I realised that I could make a linen band, try it on, and then sew it to the sleeve. On the other hand, I want to make the new sleeves a bit longer than the old ones, because sun exposure is more of a problem than it was when I was younger, which may put the end of the sleeve down where a tight-enough band won't slip over my hand. On the third hand, the band itself will make the sleeve a tad longer . . .
It naptime now. I'll remember what I sat down here to write later.
So as I mull over the new shirt I plan to make this winter, I've been planning to include a pencil pocket, reflecting that if the pencil sinks so far down in the pocket that it's hard to get out, I can stick a pin partway down to create a temporary bottom.
Yesterday I experienced the well-known moment of "well, duh!" and stitched three-fourths of an inch from one side of the shopping-list pocket on my old shirt. During this operation, I had reason to be glad I'd made the front opening absurdly long.
Since I might want this stitching out, I secured the threads only by leaving a quarter inch dangling on the inside, and by beginning below the pocket and ending half an inch above it.
A golf pencil shoved in experimentally went in easily, but wouldn't go down without being pushed, so three-fourths is just right. It also proved easy to push the pencil up from the bottom — when I'm not wearing the shirt. Proof will come next Saturday, when I go riding again.
My first thought was to take the collar off and use it as a pattern to cut a new collar one inch longer — I've been leaving the top hook unfastened all these years — but then I noticed that the casing of the elastic of the back pocket is also wearing through, and not just where I clip my Halt.
This, too, is easily removed and replaced, and the rest of the linen is just getting nicely broken in — but I decided to make a new jersey before I take the old one apart.
Then started a search for linen. Safety-yellow linen seems to be strangely unpopular. Eventually I came across a linen of suitable weight with the promising color name "taxicab". On the web site, satisfied customers described it as "sunny yellow."
There was an extra charge for a "softened" treatment that I emphatically don't want even though I don't know just what it is, but I'd been hunting for a long time before I found it. Since I need a new credit-card number for every on-line transaction, I decided to risk buying it without first sending for a swatch.
The charge, my accounting program says, came through on August 29th, so it must have arrived soon thereafter. Turned out to be a lot closer to International Orange than to Safety Yellow, but I *still* don't go out after dark in hot weather, and orange is more visible than yellow in bright sunshine. (I know from experience that you can see an orange shirt from a mile away.) On the other hand, yellow is the only color that shows through fog and rain. I did check the "taxicab" after dark; it's orange enough to turn khaki at sunset. (It does show up better than olive drab.)
My diary says that I washed the linen and put it through a hot dryer on Labor Day. Since then, nothing has happened except pondering. Even though I can wear long-sleeved linen surprisingly far into fall — it keeps one warm when it's quite, quite dry — the old shirt will hold out for the rest of the season. Making the new one won't get urgent until late winter.
The bottom seam of the back pocket
I had a small inspiration yesterday. When I made the first woven jersey, I copied the way I attach the back pockets in jersey jerseys. It would be easier and neater to copy the way I make flat-felled seams.
The first time, I pressed a quarter inch to the outside of the pocket, drew a line across the back an inch above where the bottom of the pocket should fall, pinned the pocket to the back right sides together with the pocket hanging down, and top-stitched twice.
This time I shall leave an inch and a quarter of seam allowance on the bottom of the pocket, draw a line three-quarters of an inch above where the bottom should be, pin the raw edge to this line with the inside of the pocket to the outside of the back and the pocket hanging toward the top of the jersey. Then stitch a quarter inch from the raw edge, fold the pocket down, and top-stitch twice.
Running an extra line of stitching is easier than pressing in a narrow crease, makes the seam stronger, and holds the fold exactly against the fabric so that there is no mini-tuck to catch stuff or accumulate dirt.
Neither durability nor stuff catching on the fold has been a problem with the old jersey, but it's the principle of the thing. And saving labor is always a plus.
Sleeve Ends
When I put on my old jersey to go to the Farmers' Market this morning, I noticed that when I stand with my arms at my sides, the elastic comes exactly to my wrists. (It strikes mid-forearm in riding position.) And I noticed that it is much too loose to keep bugs out when it hangs that low. I seriously don't want to put in a sleeve placket — once a wasp has flown up one's sleeve, one gets paranoid about blocking access.
More pondering is required.
Pencil Pocket
I took my pencil out of my pocket and put it back several times while touring the market. It does settle to the bottom of the pocket, but came out easily after I started to push on the top of the pocket with my thumb while pushing on the eraser end of the pencil with my fingers.
Putting it back was harder; The thin edge of the narrow pocket was difficult to feel, and my front pockets are so high that I can't see their tops. I had to resort to feeling for the pocket with one hand while pushing the pencil into it with the other. But I think practice will obviate this difficulty, and it's already easier than trying to dig the pencil out from under the spare napkins. (I carry paper table napkins instead of nose tissue, as they don't go to lint in my pocket.)
I'm very glad that I recorded my thoughts last fall!
A new impediment to progress: I've come across http://www.fashion-incubator.com/archive/sleeve_cap_ease_is_bogus/, which suggests a style of sleeve more suited to cycling than the shirt sleeve I've been using.
To beta or not to beta — it could be midsummer before I get a cheap-fabric version of the sleeve sewn up and tested, but I don't like to cut a change as drastic as this in irreplaceable linen.
But I have yet another project that uses the same armholes, and I won't get around to sewing its sleeves until the higher-priority jersey is done.
So all I need is something cheap that's a bit thinner and softer than my $0.88/yard muslin. Won't need a lot of it, because I can cut the test sleeve short.
Tonight I copied the pattern I used for the sleeve
of the black raw-silk shirt and modified it with
frequent reference to a jpg that I'd saved to my
desktop. (I'm leaving out some of the false
starts and mistakes to make myself look
better the description easier to read.)
I modified the back of the sleeve cap first. In the old version of the pattern, the armscye seam met the underarm seam at right angles. Adding fabric to the back of the cap must inevitably make this angle obtuse. I selected a point on the seamline a snitch closer to the corner than to the highest point, marked a point one inch outside the seamline, and drew a straight line through this point and the intersection of the seams. Because the old seamline was curved, significantly more than an inch was added halfway between, declining rapidly to zero as the line approached the intersection. A free-hand swoop blended this line into the old seamline.
Next I attempted to measure the new angle with the protractor part of a battered all-in-one drafting tool I bought in a dime store for a high-school course in math yea many years ago.
The small, cheap tool couldn't measure with the desired precision, but I found that I could draw a line on the transparent plastic with a #2 pencil. Then a small struggle to draw a line at the same angle through the intersection of the stitching lines — it seems that it's much easier to put the protractor down in a way that mirrors the angle instead of copying it.
This line gave me a start on the whoopty-swoosh of the front correction. I drew a line parallel to the grain line halfway between the center and the corner, and free-hand swooped a curve tangent to this line and the original seam line. Then I used the toy french curve to draw a curve tangent to this curve and the line through the intersection.
Sketched in cutting lines half an inch outside of the new seam line and cut the pattern out.
Looks good — and as I referred to it while writing in order to remember what I'd done, I realized that I'd seen this shape before — in antique patterns that I probably saw on the Vintage Sewing website. In my brash ignorance, I'd assumed that the nineteenth-century designers had shifted the seam to the back of the arm!
One more wee problem: according to the name of the blog entry that gave me this idea, the whole point is to remove the ease in the sleeve cap. This alteration has significantly increased the amount of ease. At some later date I might want to make the sleeve narrower, but for the current project, which will sometimes be worn over other shirts, it will be better to lower the cap instead. This will be a simple matter of making a T-shaped incision and overlapping the top of the cap by the width of the unwanted ease, but I think I first want to see how the current version makes up.
Found a scrap of poly-cotton that appears to have once been a curtain and cut out as much of the sleeve as would fit. I think I recall making a muslin out of this piece before; don't recall ever having black curtains with red roses.
The trouble with these throw-away projects is that you have to be as careful with grain, accurate cutting, and marking as with the real thing. But basted plain seams will do nicely.
Sleeve seems to work, so I copied the sleeve pattern — one must always leave oneself a way to reset, so the first draft will be preserved indefinitely. I need a new nail in my pattern-storage wall; this isn't my only intermediate copy of a pattern.
It was easy to find all the pattern pieces that I used to make the curry jersey in 2002. Yea Rah!
Well, I didn't bother to look for the pattern for the front pockets. I have accumulated so many patch pockets that I sorted them out of all my patterns and gave them a nail of their own so I wouldn't have to remember which pattern a given pocket had been used with last.
The jersey patterns all have seam allowances, of course, so it wasn't easy to walk the armhole along the sleeve cap to find out how much ease to remove. But with a little creasing and a lot of registration marks, I got the job done. Then I measured the gap between the two shoulder-seam marks.
Seven and a half inches. SEVEN and a half inches. Whoosh and butter so high!
I'd already decided the sleeve should be narrower, but not that much narrower, and you really can't get much ease out by lowering the cap.
But that's all for today, I've got other plans for tomorrow, and the next day is Sunday. Perhaps by Monday something obvious will come to mind.
I think maybe I'll stick by my original plan for lowering the sleeve cap (she says "sleeve head"; very similar metaphors here): make one or more T-shaped incisions and overlap to remove the excess ease, which will, of course also remove height.
Perhaps I should take the pattern now and glue a thread along the seam line — all instructions for pivoting this way say to cut to the line from both sides leaving a thread of paper as a hinge; the people who say that must have very steady hands and very strong paper. I just slash through and re-match the points I cut apart when I pivot, then slap a bit of removable correction tape on them. (Staples is calling correction tape something else, now that typewriters are extinct. "Cover-up tape" perhaps.)
The blog gives a rule of thumb for what I'm shooting for: between half an inch and an inch and a half of ease.
The "T" incisions I'm speaking of have very long serifs. I think of them as Ts because one could fold in a dart where the third slash goes.
I should borrow DH's camera and try to take pictures of the procedure.
The tomcat is waiting patiently, and pointedly not staring at me. It's still a quarter of an hour until treat time.
But adding a gusset in the same alteration as removing ease is a sure-fire way to get confused. I am pleating the pattern.
I should have taken photographs of each step in the procedure, but, being dilatory, I didn't dare to postpone the project until DH came back to tell me how to turn on his camera. It wouldn't turn on for him, either; eventually we remembered that he had taken the batteries out because the camera drains them when it isn't in use. Then it turned on, but wouldn't respond to the "take picture" button. It didn't take quite as long to figure out that it refuses to record if the date and time aren't set. DH spent about five minutes attempting that; I finally cut him off saying that I didn't care that the time said "a.m." when it was really "p.m.". So finally I took one humongous picture and then took the batteries out again. Comedy of errors getting the picture (and two out-of-focus rejects) out of the camera onto his computer, then from his computer onto mine.
Someday I'll prune the picture with Gimp and put it in this document instead of linking to it.
Good news: I must have measured to the old shoulder seam instead of to the current shoulder seam; the ease was "only" six inches.
First I folded the pattern in half along the grain line, then I drew a line one inch from the fold, then I unfolded the pattern, folded the crease over to meet the line, and correction-taped the resulting half-inch pleat. I trimmed off the tab resulting from the pleat, which in retrospect was pointless, and could have been counter-productive. Moral: don't make cuts before you need to.
I sliced this piece in half along the edge of the pleat, then replaced the front piece, rotating it down as far as I could without putting a kink in the seam line. This was surprisingly far.
I replaced the back piece, overlapping the front to blend the seam lines. This left a triangular hole in the pattern; I considered patching it with a scrap of paper, then said "well, duh" and unfolded the pleat in the back piece. It covered the hole nicely.
I repeated the entire procedure, except that I untaped the cut-this-piece-in-half slash instead of cutting a new one. This time the front piece couldn't rotate as much.
Overlapping on the same slash both times makes it easy to verify that I have removed nearly three inches of ease. This leaves the cap-shape quite flat. Not too flat to be a work-shirt sleeve, but this method of ease-removal has gone just about as far as it can go.
Time to pin it to the remnant of floral polyester. I used a lot of pins because of the fragile state of the pattern.
Then I fetched the camera, dropped in the batteries, called up the menu, and clicked "OK" as soon as I saw the date-and-time setting menu. This causes my pictures to be marked as having been taken sometime in 2004, but WHO CARES!!
Snapped a whole bunch from different angles in the hope of getting a good one, removed them from the camera onto DH's desktop, gave up trying to open Windows Explorer after hitting "scroll lock" and then putting it back caused everything to disappear. (I learned later that hitting scroll lock twice switches the monitor to a different computer.)
Here is one of the raw pictures.
Haven't basted the side seam yet, but the situation may be Go.
And a good thing — the last time I wore the curry jersey, a square of elastic was exposed where I clip my Halt, and when I inspected the frayed collar, I found a small tear staring in the outside layer of the front yoke near the intersection of the shoulder seam and the neck seam. Can't think what causes wear at this point.
But I still have no fear when putting small objects into my pockets — the fold-bottom construction is definitely worth repeating!
On the other hand, the patch pockets in front are also holding up well. But (odd number of hands, here) front pockets aren't subject to as much wear as the back pockets — and the handkerchiefs and sweets bulging over the stitching of these pockets looks terrible; I think maybe I'll try making them fold-bottom too.
So this morning — after sleeping late — I stripped the eating table, took down the "taxicab" linen, and realized that the wrinkles left by the washer and dryer would affect the accuracy of my cutting. I can't plug in the iron and continue to pretend that I've forgotten about the four shirts that need ironing, two of them pullovers. There goes the morning, and I've *really* got to find a replacement for my Oil-O-Pump, which is failing to spray fine the way it once did, and gaining less and less air pressure per stroke.
The linen is so pretty when freshly ironed that it's a shame that the finished garment will never be ironed — but millions of tiny wrinkles are the only way to go in a linen work shirt: given even a hint of opportunity, smooth shiny linen grabs onto and showcases sharp creases.
Now it be naptime, and the rest of the day is planned.
The state my beautifully-ironed linen got into last night while I was drawing threads to straighten the ends supports my contention that the finished garment should never be ironed. Lucky, that — a pullover shirt with fluffy don't-crease pockets and elastic around the wrists would be a bear to iron.
Not to mention three fluffy don't-crease casings.
Yes, I have to make the permanent copy before cutting — aside from the difficulty of storing something held together with removable tape, the alterations left the notches in the wrong places. And I do want to make the sleeve a bit longer.
If I don't get around to cutting out today, at least the sewing room is cleaner and more organized. I'm now hanging collars and sleeves on nails of their own, like the pockets.
The dime dropped and I took a red-orange gel pen and wrote "ARCHIVE" in large letters on the sleeve pattern I'll never use but might want to refer to. Then I hung it on a nail in an inconvenient spot behind the printer, and will add other archive patterns as I find them.
Just learned that it's possible to drive a teeny copper brad if you hold it with pliers.
Rather difficult when the paper table on the printer blocks all but the lightest taps with the hammer. Finally realized that I could hold the pliers in my right hand, and get a good swat at the nail with the hammer in my left hand. Still didn't manage to drive it firmly — at that point, there's no stud behind the paneling to keep it from bouncing away from the hammer — but these patterns won't be hung up or taken down very often.
So I decided to make the copy two inches longer anyway — it's easier to cut some off than to add some. Then I tried on the black silk, which was cut two inches longer than the sleeve pattern I started with to allow for a faced ruffle at the wrist, and decided that the sleeve length was about right.
The black silk still has the prototype sleeve basted in; perhaps I should have my picture taken while wearing it.
The latter is winning, which is a pity — I'd planned out a neat series of pictures showing how a single line of stitching must begin or end with the divider of the pencil pocket.
Perhaps I could draw it on paper instead of fabric, and scan it.
I appear not to have taken any notes about the casings for the drawstring. I must remedy that — I hope to wear out this jersey too. Fairly easy to recover by measuring the old ones, and there may be some clues on this page.
Three yards is so much fabric that I've marked a triangle scarf off one end. Haven't cut it, just in case, but it looks as though it's going to fit.
One thin linen scarf is enough, since it's supposed to keep me cool and therefore can be put right back on after washing. Similar statement in the description of the curry jersey, but I don't think I ever have. If I'm sweaty enough to undress into the washer, I'm not going back out before the clothes have had time to dry. And linen dries fast.
But my old green scarf is now off-white yellow and thinner than it used to be; best to be prepared. There appears to be plenty of curry linen to make a scarf, but curry looks dirty next to taxicab.
And, by the way, hurrah for the laser level, which made drawing the diagonal of a forty-inch square quick and easy.
Just then my spouse came home with a plate of buffalo wings. He was willing to wait until suppertime; I wasn't. I hastily cleared the table and cut up some celery, and we ate sitting across from each other at a table for eight.
This morning was cycling to the Farmer's Market day. I completely forgot that I'd meant to stop at Lowery's and buy some hook-and-eye tape; I'm going to want it very soon after I finish cutting out. Might help if I wrote "hook-and-eye tape" on my shopping list!
Finished my nap and various chores and fritterings and found that it was an hour and fifteen minutes before time to close the table and put food on it. So I fetched back my stuff — most of which was actually where it belonged — and cut out the front yoke. Somewhat to my surprise, the corner of the scarf stuck only an inch into the area reserved for the yoke, so I was able to treat the pentagon I cut off as if it were a rectangle.
I need two copies of the front yoke and have only half a pattern, so I cut a thread-straight strip the width of the fabric, very fussily folded and pinned it, and put the fold line of the pattern on two pinned-together folds. Used the larger cutting mat for the first time — I'd been using the smaller one, since I prefer it for cutting along drawn threads. (I bought it specifically for drawn threads, since I was afraid I'd wear out the corner of the big one, but it has turned out that a surprising number of things will fit onto it, and, of course, the smaller mat is the one to carry to meetings.)
Then I had half an hour left, but the fabric is now in pieces that I can spread out on the table without putting the leaves in, so I closed the table and put the tablecloth back on.
I like this fabric more and more as I work with it; even the color is starting to look good to me. I'll never consider the review that called it "sunny yellow" accurate — unless something happens in the laundry — but it is a sunny shade of orange.
Tomorrow I've got to get on with marking them. I didn't mark while cutting because I wanted to cut as much as I could before time to close the table.
Yesterday, while wearing a dress with an unbecoming scoop neck, I reflected that if I took the patterns for the yokes and collar of this jersey and cut the outside edges in scallops, I could make a very nice — not dickey; perhaps it's a bertha? A thingy to dress up plain dresses and hide unbecoming necklines. Pity I don't harbor an embroidery machine, but this is the first time I've thought up a use for one in I don't remember when, and there's lace in my trimmings box. I've got white linen . . . which would look dreadful with the dress in question.
After visualizing various colors and patterns, including the same fabric the dress was made from, I popped the idea back into my mental scrap box.
I think my next step will be to apply the drawstring casings, then make the back pocket.
Actually my next step will be to read this whole file to see what I did the last time. I doubt that reading everything will be enough inspiration to make me organize this mess. Organizing an essay is a bunch of work.
Grump: I wore my old jersey yesterday, but forgot that I'd meant to baste the lower part of the opening closed to see whether I'm planning to leave a sufficiently-long opening. Seven to nine inches is standard, but standard is a fabric that stretches.
Reading already bears fruit: I forgot to cut interfacing for the front yoke. (Better write a note on the pattern.) Fortunately, there are worlds of scraps.
And I find an explanation of how I used the line that marks the waist to place the casing. Another note to add to the pattern.
While examining the old jersey, I said "??? Did I make this casing double? I wrote that the bar tacks at the tops of the pocket-dividers go through three layers of fabric, so yes. And I see that doing so avoided having a seam allowance at the top of the casing. The fold-top construction I plan to use will automatically enclose the seam allowance, so this is no longer a concern.
I will appliqué something — possibly a piece of the selvage that I cut off — to the inside of the back where the bar tacks go to restore the three layers. The pocket stitching held up quite well, and never offered to tear the fabric. Never mind that the bar tacks now go through twill tape (see 2005 revision of jersey).
Upon inspecting the inside of the jersey, I see that the bar tacks take only a tiny nip of the linen. Perhaps the tape transfers the weight of the pockets to the casing, so that no strain is felt in the fabric.
This means that my re-inforcement must go a considerable height above the bar tacks.
And it must go on before I attach the casings, but the pockets go on after the casings.
Put the jersey on without breaking even one of the bar tacks, and rode off to return Cyclecraft to Interlibrary Loan, and request that my library buy a copy of its own. To my surprise, they were surprised that I thought I could pay for it. (In justice, I ought to pay not only for the book, but for the time spent ordering, accessioning, etc.)
Stopped at Lowery's on the way back and [duh!] hook-and-eye tape is sold in eighth-yard increments. I bought nine inches.
Boiling is the quickest and easiest way to shrink itty bitty notions — and the only way to shrink stuff with raw edges. I'm fairly certain that the tape isn't cotton, so I didn't bring it to a full boil, but turned it off as soon as it got to a bubble that swirling the pan didn't erase, and put the lid on for ten minutes or so.
I was somewhat concerned about the white paint on the metal parts, but it appears to be unharmed.
Or maybe I'll draw threads for cutting my old linen shirt into spectacle-cleaning rags.
Also hand-basted the interfacing of the collar to the wrong side of one of the collar pieces. I used a warp thread I saved when cutting off the selvages so that I can leave the basting in. Used it double first, which is silly since there will be no strain on these stitches. Used it single for the second needleful to see how it went. It went well, but any subsequent hand stitching will be weight bearing.
Absent-mindedly cut off as much thread as I would have if it were cotton and I could put the needle in the middle instead of at one end, but it didn't snarl much. And one uses thread quickly when basting even though I kept the stitches on the outside as short as I could and this naturally shortened the inner stitches below the quarter inch I was aiming at. (I wonder whether that happens to everybody who tries to stitch short, long, short, long.)
DH shot a movie of me in the black silk shirt with the prototype sleeve. I'm hoping to edit some frames out of it to post here.
What a long entry to say "I didn't do much today"!
I'd like to get the job done before the celebrations, but that's only four days, I have a appointment with my doctor on Wednesday, and I have to shop at least twice and make snacks.
Movie didn't work, so DH set his webcam to make a jpg per second, and I think I've got some shots that show how the new sleeve compares to the pattern I started with. Haven't edited them yet.
Doesn't mean I have a new rag for my back pocket this afternoon — I didn't wash the shirt before cutting it, so all the squares are in the laundry bag.
Must get around to editing the pictures so I can set the other sleeve into the silk shirt. No hurry for a warm shirt, but it would be nice to do the last few seams before switching the threads on the treadle. The jersey is to be sewn entirely with DMC Cordonnet, except for the hand work, which I'll do with ravellings.
Took an even dozen spectacle-cleaning rags off the line, folded them neatly, and put them in my handkerchief drawer.
One shot per second makes an awful lot of pictures to sort out.
Last weekend was party, party, party. The middle party was at my house.
I do have 3/4" tape to taper the ends with. It's softer and thicker than I would like, but will do. I'll look at the twill tapes when I buy the elastic — if I remember.
I hemmed all three pockets this morning (I'm counting the three in the back as one pocket, since they have only one hem). As when overcasting the spectacle rags, I took a ridiculous long time because of having to pick out places where my stitching fell over the edge. But now I know what is wrong: you have to keep your hand in!
And the solution is easy: act more like a beginner — work slowly and pay very close attention. Shouldn't take as long to get the skill back as it took to acquire it in the first place.
I hope.
I also sewed the collar together. Instead of drafting a pattern half an inch longer, I cut by a pattern that called for half-inch seams and sewed quarter-inch seams: a quarter inch added at each end.
The narrow allowance was much easier to turn. Only one pleat formed, and I was able to massage that out after un-turning that section and pinching the pleat-crease flat.
Since it was linen, I made all creases by pinching with my fingers — or by opening the seam and pulling. I do plan to hot-press the collar before attaching it.
The neck-hole of the shirt will have to be trimmed a bit to make it half an inch longer too. I'll leave that to the last minute.
I measured the location of the front pockets and copied it onto the pattern — an easier job than I expected.
But how do I transfer these markings onto the fabric? Marking a pocket location on two layers is an easy matter of making four tailor's tacks — usually two, but I also needed to copy a matching line at the bottom for the fold-bottom.
This matching line is half an inch above the bottom of the pocket: I allowed one inch of allowance — urk: I allowed an extra inch on a pattern that already had a quarter inch of allowance. Oops!
Anyhow, match the raw edge to a line half an inch above the bottom, stitch a quarter inch above that, so the stitching is three-fourths of an inch above the pocket bottom and the seam leaves three-fourths of an inch of the allowance, all works out. (Except for that extra quarter for wrong cutting, but I'll just fold the hem up to where the top is supposed to be, and let the pocket be an eighth of an inch deeper than planned.
So I copied the markings onto all four layers, using a tracing wheel and dustpaper and a wash-out marker and a needle and basting thread and scissors, all the while muttering "next time I'll make a complete pattern for this yoke!" And all the while, the fabric is still slithering around like satin.
Then when I was all finished, I realized that it would have been much less confusing to mark only the top and bottom layers — I ONLY HAVE TWO POCKETS!!!!!
I'd be pounding my head on my desk if I had a desk.
This is not my week to be brilliant. I very carefully cut two pieces of selvage exactly the right length to make the stitching of the drawstring casing and the pocket bottoms cover the ends.
Then I got ready to appliqué them to the inside of the jersey — but the casing and pockets go on the outside!
Very briefly considered sewing them to the outside, but reinforcements need to protect the inside. I reflected that if I'd used twill tape, I would have left the ends raw, and sewed them to the wrong side.
By the stitch'n-line saves whine method. (Gotta be a better pun in that concept.) Laid the selvage with the raw edge near the line it was to cover, sewed a quarter inch from the edge, folded it over and creased with my thumbnail, top-stitched the fold and the selvage edge as if it were a flat-felled seam. Lies as flat as if I'd used an iron.
I think I'd better take a nap before I make any more decisions.

The sleeve isn't perfect yet
But already better than the pattern it was designed from.
I see that the next time I try this trick, I need to stand a lot closer to the camera. (And think out my poses ahead of time, so that I won't have so *many* shots to sort through.)
Pressed a few creases today. Made three pleats in the collar's seam allowance, and had to put water on two of them. But all eased flat — can't do that with a half-inch allowance.
I'm putting the interfacing in anyway.
I started attaching the casings yesterday. Earlier, I measured the old jersey against the pattern and found that the top of the casing was exactly on the line marking the waist. Then I read this file and found that I'd applied it a quarter inch above the line. Presuming that the fabric stretched a bit between 2002 and now, I'm going with a quarter inch higher.
I laid the casing wrong sides together with the raw edge on the waist line. Then I sewed with the toe of the presser foot just covering the raw edge.
I folded the casing up and pressed it with my thumbnail as it approached the needle — stretching a bit before beginning operations, with the casing in one hand and the pattern piece in the other, helped to locate the crease — and sewed close to the crease, as if making a flat-fell seam. Then I stitched a third time, with the toe of the presser foot running along the crease, keeping the crease just visible. This made the third stitching half a millimeter wider than the first, and fully enclosed the raw edge.
Now I'm about to draw a line which, when the casing is folded down to meet it, will cause the casing to fold a quarter inch above the waist line. I'd better make it a scant quarter inch, as fabric stretches.
And this morning, Saturday, was Farmer's Market day. Got there too late to buy tomatoes, but got half a dozen ears of corn and a quart of tiny apricots so freestone that they rattle when shaken. Did a little sewing after naptime, with interruptions. Ran out of thread and those big spools last so long that I wasn't sure that I'd remember how to wind it. They came with 800 yards of "size 00" thread on them; I doubt that hand-winding 100/6 thread puts on that many yards, but it does make a sizable dent in a twenty-gram ball.
Of course, the corollary of "takes a long time to use up" is "takes a long time to wind".
The hand drill was right where I thought it was, and already prepared to hold a spool. The thread ran smoothly from the ball in the pinfeed label box through a convenient hole in a lever at the back of the Necchi Lycia, into the thread path, around the tension device, and out through the smooth hole in the take-up lever. But turning the crank got old fast.
The monotony was broken halfway through. I felt the thread hang up and turned around to see a tomcat attached. Oh, yeah — the first step in winding thread is "shut the sewing-room door".
With the treadle threaded again, I did a beautiful job of stitching exactly on the blue line to separate the handkerchief compartment of my back pocket from the wallet compartment. Then I contemplated working the bar tack that anchors the pocket to the bottom quarter-inch of the drawstring casing where the turn-under makes an extra layer — and realized that I'd done a lousy job of pinning that division. The top of the pocket missed the drawstring casing entirely.
I'd hardly started picking the stitches out when my spouse noted that it was time to start warming hot dogs in canned chili and steaming fresh corn.
I did finish the correction after our after-supper walk. T'war a leisurely walk; it's muggy out there.
Also collected the scraps and put them into the linen-scraps box. The scrap with the true-bias edge (from cutting the scarf) is just large enough to cut the front or the back of a bra. If I recall correctly, there are now black, green, and orange scraps big enough to make half a bra.
Current status: the lower back has casing and pocket, lacks bar tacks, but is ready to be sewn to the yoke. When sewing the pocket on, I matched the raw edge to a line meant for a folded edge, which made the fold a quarter inch higher, and, therefore, made the pocket a quarter inch shallower. Then I folded the top to a line five-eighths of an inch below the waistline marked on the pattern, which made the pocket — ah, *half* of five-eighths of an inch deeper, not all of five-eighths of an inch deeper. So the bottom of the pocket falling only a teensy bit lower than the bottom-of-the-pocket line *does* add up.
The lower front has its casings and is ready to sew to the yoke. The front pockets are made and ready to sew to the front yoke. The hook-and-eye tape is shrunk and ready to sew to the front yoke. The sleeves are pressed for a flat-felled seam and ready to attach, The back yoke has the seam allowance on the lining turned up and pressed and it's ready to attach.
The collar is made and ready to attach. It's half an inch longer than the collar on the curry jersey, so the neck hole will have to be trimmed away by half an inch divided by two pi — a quarter inch divided by a tad over three — the neck hole will have to be trimmed by . . . not very much.
But the neck hole has a half-inch seam allowance, and the collar only a quarter, so in addition to the above, it will have to be trimmed by a quarter of an inch. Since linen frays easily, I'll leave all this trimming to the very last minute. Odds are, I'll simply use an allowance that makes the collar fit. Complicating this: the neck hole must be eased onto the collar at the back to make up for the two quarter-inch darts that I didn't put in to allow for my dowager's hump.
The front yoke is ready to receive its attachments. I cut the interfacing five inches wide — that happened to be half the width of the most-convenient scrap — by the length of the yoke at center front. Then I pinned it on with the bottom of the interfacing at the seam line and a bit more than a quarter inch sticking up into the neck hole, to be trimmed away when I trim the seam allowance. Three inches of the interfacing line the right side of the yoke, and two inches are under the lining of the yoke. (The yoke, you will recall, was cut two pieces each with the center-front line on the fold.)
Then, using a single strand of ravelling I stitched along the fold line, then quilted the interfacing to the lining of the yoke, and didn't secure the part under the outside of the yoke at all. I figure it will be secured well enough when I sew on the pockets and the hook-and-eye tape.
To my surprise, the ravelling worked much better when I didn't wax it. When it was waxed, the fuzz the thread shed rolled up into little balls that spun themselves into tight rings that got stuck on slubs and efficiently prevented the thread from pulling through the fabric.
After quilting, I folded each side of the yoke in half and pressed in the crease.
I'm not sure how to deal with this.
I sewed the pockets and hook-and-eye tape to the front yoke today — this thing is starting to look like a shirt.
Started by carefully measuring and marking a line where the old seamline goes, and matched the top of the tape to it, trusting to the trimming to catch the end of the tape in the collar seam. Since the trimming will be Not Very Much, I may wish that I'd put the tape covering the mark, instead of touching the mark.
Basted the loops with the fold of the linen on the line of stitching that holds the loops on, so that a teeny bit of white shows on the right side, and basted the hooks a little away from the edge so that a teeny bit of orange shows on the wrong side.
Then I hooked the tapes together to see whether it overlapped enough but not too much. What th'? It was a good eighth of an inch off vertically, and I carefully laid the pieces together and marked both guide lines with one swoop of the ruler. (And the guide marks do line up.)
I picked off the tape I'd basted first, since that hadn't been done as well as the second, hooked the tapes together, and pinned the yoke to the tape from the right side. Basted again, careful not to disturb the vertical when I adjusted the horizontal, and this time everything worked.
I sewed the tape on in the intervals of attaching the pockets. I continued the stitching that attached the loops to the bottom, thinking that stitching that disappeared into a seam would look better than stitching that stopped in the middle.
But the hooks needed to be sewn from the bottom to the top, if I wanted to see what I was doing, and aiming for a precise point is an entirely different matter from keeping on as you are doing. Not to mention that this row of stitching is considerably farther from the edge than the other.
After much cogitation, I put my bamboo ruler against the edge of the tape, checked carefully that this slithery fabric stuck out from under the ruler uniformly, a quick swoosh with the wash-out pen, and the edge of the tape is blue and blue lines lead to it from above and below.
One side of each tape on the old jersey is sewn by hand. I figured I wouldn't be so fussy with this one, and just have two lines of bright white machine stitching running down my front on each side. Turns out that sewing the loops on involves stitching over metal wires, which is much easier by hand, and the hook side would require a zipper foot. I have a zipper foot on my other machine, and Lowery's can probably get me a zipper foot for the treadle — but a zipper foot wouldn't hold the edge of the tape down very well; all in all, easier to sew it by hand.
If that unwanted "softened" treatment takes four years off the life of this jersey, I'm going to be . . . very annoyed.
I wonder whether there is such a thing as a presser foot with one regular toe and one wire-narrow toe. One would need a pair of them, and I doubt that they'd earn their keep.
When I was contemplating that fancy stitching to attach the patch pocket and form the pencil pocket all in one line of stitching, I forgot that these aren't strictly patch pockets. Each side of the pocket is sewn separately, in a narrow oval consisting of two parallel rows of stitching with smooth U turns at top and bottom.
Then I thought it awkward that the side of the pocket gets the smooth U turn, but the pencil pocket divider will intercept any stress headed for it. I didn't want to make a wide divider. Inspiration struck, and I stitched just from the bottom of the pocket's hem to the place where the fold-bottom was attached. It's all to the good if small objects that somehow get into the pencil pocket can leak over into the main pocket where they can be retrieved, and this puts the end of the stitching in a spot where there are three layers of pocket. I secured the lower end by pulling both ends to the wrong side and tying them together.
The upper end is even more clever: The bar tack will go in a spot where the pocket is three layers thick, and the shirt front is also three layers thick — because I took the width my scrap happened to be, one side of the interfacing extends that far. And having the division end well below the top of the hem means that some of the stress on the top edge of the pocket can bypass the divider and go on to the stronger side stitching.
And I believe that it will be easier to feel for the right place to slip a pencil in.
Before the basting, drew a bunch of guidelines around the neck, one of them showing where to trim to make this a quarter-inch seam.
Pinned the collar to the front in a place that was sure to catch the tape in the seam, tapered toward but not quite to the quarter-inch line, checked that the sides were symmetrical, adjusted one slightly.
Matched center back marks, secured with a right-angle pin. The ease on each side of the pin looked about the same, so no further adjustments of the front were required. Pinned back of collar to the quarter-inch line, squishing in the ease. Since the yoke side will be down when I stitch, there's a chance that I won't have to cut stitches to release pleats.
The raw edges are the width of the marker line more than a quarter inch apart, so there is some increase of neck depth in back, more in front where it is more needed. Lookin' good: to the treadle!
Sigh, one pleat and a pucker even though I twirled the handwheel the whole way.
I groove on having a fairly-fast speed that is under my absolute control, by the way. An electric could be made to work the same way, but it wouldn't work very well because electric handwheels are smaller — and the risk of accidentally engaging the motor and breaking your finger off would be unacceptable.
Which leads to the thought of a crank that folds away inside a handwheel. This would remove the risk — you'd jerk your hand back instinctively if the crank started to move without being pushed, and if it did hit you, it would only bruise. And in addition to providing a low gear, the crank would come in handy when the lights are out. (Never happens longer than a few minutes these days, and anybody with a modern machine would have it on a UPS to avoid frying it with transients, but I still insist on keeping the candles where I can find them in the dark.) (And I keep a burned-out iron in the attic, just in case I want to heat one in a skillet.)
But it would be somewhere between hard and impossible to make a perfectly-balanced flywheel with a crank folded up in it, and there are things called "stepping motors" that allow a machine to operate very slowly without grunting to a stop. They lack the direct connection to your neural interface that a crank has, but practicing every day would produce the same effect.
Aftermarket cranks are possible — and, I think, actually available — but cranks that attach and detach swiftly when you alternate between electric and crank would have to be designed specifically for each purchaser's model of machine.
And I rather suspect that no-one would care to go into mass production for fear that one of the purchasers would be stupid enough to operate the machine on electricity with the crank attached.
I shouldn't type when it's past my nap time, should I?
I tried the yokes on after getting up, and the collar was quite comfortable with all hooks hooked.
On the other hand, the highest hook on this jersey is a trifle lower than the highest hook on the old one.
I sewed the shirt back to the back yoke as before: offset the raw edges by a quarter inch, sew a 5/8" seam: one 5/8" allowance and one 3/8" allowance add up to two 1/2" allowances. I've never sewn a 5/8" seam with the treadle before, so I had to rustle around a little marking the bed with removable correction tape.
I'd forgotten how curved both pieces were. Must be some pretty good-sized shoulder darts hidden in that seam.
I carefully patted the yoke lining in place and pinned from the wrong side with right-angle pins, then turned the work over and pinned in the seamline, pulling out the right-angle pins as I went. Top stitched a quarter inch from the seam, caught the seam allowance just fine. The "tuck" on the inside isn't nearly as neat and uniform as the mock tuck in the old jersey, but is is on the inside.
Now for the sleeves — oops! I forgot to put the gathering stitches in. Perhaps I can do without? Nope. There is less ease than the old pattern, but not that much less ease.
Had to re-thread the Necchi, since that's the machine my bobbin of gathering thread fits. Got a thread caught in the shuttle race in the process, so I had to take it apart and clean and oil it. No fluff in it, though.
I didn't stop to think which side I wanted the bobbin thread on, but it ended up on the wrong side (which is the correct side) accidentally. I left off the gathering thread in front, where I'd had to take it out when installing the prototype.
So all went well, except that just as I finished the last row of stitching, the machine jammed and the motor didn't stop humming when I took my foot off the controller. After a moment of consternation, I realized that I had to unplug the machine. Frantically pulled out every plug in the power strip only to realize that the machine was plugged directly into the wall. I yanked it out by the cord, since that was all I could reach.
Nothing seemed to be jamming the machine, but it stopped abruptly when I turned the handwheel in either direction. Pried off the needle plate, cleaned out some lint, no help. Took the shuttle race apart again, nothing wrong in there — but when I put it back together, the machine worked.
Except that nothing happens when I step on the foot control. The foot control rattles, which it isn't supposed to do, so I'm hoping that I haven't burned out the motor. It was very expensive to replace the last time, and that was when replacement motors were still available for this model.
Whatever. It's too late in the day to take it to the repairman — and I prefer to let non-functioning machines sit around for a while to give me time to realize that I've got the needle in backward or some such silly thing — and I don't need it for the current job.
So I attached one sleeve, and sewed in only one pleat, but the pleat will have to be pressed flat before I can re-sew the released stitches.
I ran out of bobbin thread just before the end of the seam. Those thin little bobbins don't hold very much thread. It doesn't help that I can't pull very hard while winding because my sewing-machine belt is a trifle loose, so that pulling hard can stop the spinning. I ought to cut an inch out of the belt, but getting that little splicing gadget in there the first time was such a trial that I don't want to repeat it. Next time I'll go all authentic and insist on a leather belt — they don't hold up as well as plastic belts, but those little C hooks are dead easy to install.
I was just starting to pin the other sleeve when my spouse suggested that we go for a walk. While walking, I realized that I had exactly enough time to change clothes, ride to the store, buy milk, and get back before sunset. And when I got back, it was time to torture the cat.
Medicating his ears doesn't upset him all that much now, because we and the cat have both learned how it's done. And he gets half a treat when we're finished.
But now it was after sunset and I was tired, so I closed the treadle. Forgot to put the cat's blanket back on it. (A spot that gets good natural light is also a good spot for birdwatching.)
Pressed both seams as they lay, which took out a lot of puckers that might have been sewn in, refreshed the turn-under for the flat-fell seam, and flattened the two spots where stitches had been released.
Hand-sewed the two half-inch gaps, then stitched close to the fold. Perfect job the first try, both sleeves! But while inspecting this seam, I realized that now that the front of the sleeve cap is concave, stitching down the flat fell would ruffle the fabric it's stitched to.
I think that what I'll do about that is to finish the back of the seam as planned: remove the remaining gathering thread, press the seam allowance flat, and stitch it down. Then I'll trim the front seam allowance just inside the crease and turn under half the remaining allowance while hand-basting the allowance down.
The collar is still too short, but the resulting V looks like a design decision.
How lightly I said "and then I could have slip-stitched the rest of the center-front seam" when describing the construction of the original jersey!
I got ripples in the sleeve seam, like the ripples in the seams of a pair of cheap jeans. I think I should have pinned the allowances in addition to pressing them into place — I didn't get ripples in the parts of the seams that I basted. Luckily, that's also the parts of the seams that I can see in the mirror when I'm wearing the jersey.
I think maybe I can finish this tomorrow and have it to wear on the Tour d' Warsaw, as I call my Saturday shopping expedition.
And I can add a stop at Lowery's to my itinerary. After I described the symptoms to my spouse, he said "it sounds like a broken switch", took the foot control apart, and found a broken switch. A piece of spring steel that bends back and forth to make the connection had bent one time too many.
Then he got on the Web and found that foot controls are, as I had thought, cheap. It will cost more to buy it through Lowery's than direct, but I'll have the advantage of the mechanic's expertise in selecting the right foot control. And I'd rather have him connect the new control to my old connectors than do it myself.
Then after sewing the first row, I pressed it again and also pinned the seam allowance in place, using right-angle pins at the notches to remind me that I needed to ease the fell at these points.
It seems to have worked. I don't see any ripples.
I hemmed the fell of this seam by hand, with ravellings, when making the old jersey. I'm less vain this time, even though changes in my figure put this line closer to running over the endowments than it used to.
And yes, I basted the turn-under. Or turn up, since it was turned to the right side. Basting is easier than pressing on a curved edge like this, because you don't get unintended pleats that you can burn your fingers removing.
First I trimmed from the outer layer a strip wide enough to keep the upper layer out of the fold, narrow enough that the turn-up would cover the raw edge.
Since I'm turning up a quarter inch, my first thought was to mark along a 3/8" measure, but doing so would leave all of the blue mark on the part I meant to keep. Wash-out pens are marvelous, but it's better not to make a mark than to take it out.
So I marked along the 1/4" arm of my little measuring gadget, and cut off the blue line, which cut off less than 3/8" and more than 5/16", which worked just fine.
I started having trouble before getting to the sleeve seam: oh, yeah, the body of this shirt is also a tube. But I got all the way to the wrist of the sleeve.
The second sleeve needed to be top-stitched the other way, so I backed into the sleeve as far as I could, then stitched out and down the body. Really wasn't all that much left to pick up and sew in the "wrong" direction.
But there is one more line of stitching to go on each sleeve, and I'm wondering what would have been wrong with making a french seam.
I also have three hems to make — two of them with elastic in — but the natural light is gone, I'm tired, and I'm behind on reading alt.sewing, rec.bikes.tech, and other newsgroups.
Not to mention that this is the time of day when I make silly mistakes. The curry jersey will hold together for one more ride.
Okay, it's not quite done — I have yet to make a strap and sew the half-inch D-ring I bought at Lowery's yesterday to the shoulder.
Stitched down the fells inside the sleeves in one pass each. Tedious, but not difficult: smooth an inch, stitch an inch, smooth an inch. I stitched both sleeves from hem to wrist, and found that hemming with the fold on the unfamiliar side worked better on the treadle that it does on the electric. I think that that's because the treadle's foot is symmetrical. Though the zig-zag foot I use for edge-stitching looks symmetrical, the needle is a hairsbreadth off center.
When sewing the hem, I fell off the fold so often and for such long stretches that I ended up sewing all the way around a second time and saying "I meant to do that".
So I reminded myself to act like a beginner and did much better while stitching the wrist casings.
Then, for the first time, wondered whether there was white cord elastic in the shoe box labeled "elastic". No sweat, I'm sure there's quarter-inch elastic. Ah, a baggie of white cord elastic! What are these two matching short pieces?
If you've read the preceding two thousand four hundred and sixty-two lines of this file, you remember that while making the first jersey, I cut elastic to fit my wrists, and it was too tight when the sleeves, as planned, pulled up onto my forearms. These is those, after all these years. And for the longer sleeves of the new jersey, they are just right.
The tape I selected for the drawstring has never been washed, so I cut it six inches longer than the old one. I'll trim it to the right length after the jersey has been washed a couple of times.
I was about to say "which will be real soon", but Weather Underground says that it isn't going to get hot until mid-afternoon, and I'm shopping in the morning.
Pulling up is more uncomfortable than pushing up
It would have gotten uncomfortable if left pushed up for a long time — particularly if I were exercising in the heat.
The elastic lost some snap-back in the intervening years.
My arms have withered in the intervening years.
Tried pulling on the sleeve — the elastic did feel tighter.
Recall that I decided to make the pencil pocket full length, and stick in a pin when I carry a golf pencil. When the time came to do it, I didn't want to stick that coarse old safety pin into my beautiful new jersey. (It's as mud fence as the old one, but it's beautiful to me.)
For the first time in a long time, I had a use for the trick of tying a knot in the very end of a thread. (Wrap the thread around your fingertip and roll it off, pinch the loop, and pull to close it.)
I knotted a thread, basted across the pencil pocket, worked a french knot, and pulled from the back to break the thread right at the knot. Voila! A thread woven across the pencil pocket, with a knot at each end: neat and secure and I can take it out with whatever tool comes to hand — my thumbnail if that's all I've got.
Turns out the new drawstring needs to be six inches longer than the old one: being twice as wide and also thicker, it takes more of it to tie a bow knot. Fortunately, it didn't shrink noticeably when I rinsed the sweat (and a lot of blue ink!) out after my ride. I suspect that I had gotten most of what I cut for the drawstring wet when pre-shrinking what I cut off the previous time.
I wonder whether one could knot the end of a thread by working a french knot in the air? Seems perfectly feasible, but I'm accustomed to the roll-off-the-fingertip method.
The old jersey, by the way, has been washed and
hung at the back of the closet in case of
emergency. The elastic casings at the
wrists forearms show wear, but
would have held together for some time.
The pink stains on the white hook-and-eye tape didn't come out with bleach, which proves that they weren't caused by the bacteria that infest our water whenever it's left stagnant for a time. Neither the color nor the location is consistent with the theory that the steel inside the tape has rusted. (Not to mention that the spots where the white paint has worn off haven't rusted.)
The yellow scarf has been retired to the scarf hanger. Those pink stains didn't come out either, but I'm pretty sure they are from mopping sweat off my face with my scarf after I let a child paint a red butterfly on me.
The sleeves of my new jersey are long enough that I could have made the hem wide enough to run two rows of elastic and a half-inch ruffle. That idea was trashed when I thought of a wasp getting caught under the ruffle, (I've been stung while riding only twice, and I'd prefer to keep it that way.) But I'm thinking of using the same pattern to cut sleeves for my linen jeans-tunic suit. (That's my version of salwar kameez.) A ruffled sleeve would go quite well on a fall suit.
(It's too hot to dress up without intending to go anywhere!)
Oops. While glancing a the previous entries, I see that I still haven't sewn the name tag on. Very important: if I'm run over by a truck, I want them to know who to call.
I've also taken out the basting on the pocket; don't recall whether I used my thumbnail. I ran out of golf pencils. And I could find only one pocket-length pencil; I tend to lose pencils before they wear down noticeably.
The D ring worked out better than expected; I was thinking only of not wearing a hole in the shirt by constantly sticking pins into it, but the D-ring makes it much easier to attach my watch to my shirt by feel.
I was thinking at first of putting a lobster claw or snap hook on the chain, and snapping it to a safety pin when wearing pockets that don't have D-rings. But the safety pin hangs from the D ring as neatly as a clasp would.
I'd still like a shorter chain.
But I've acquired a pocket-size transceiver. Might use the D-ring to make sure it doesn't fall out of the pocket.
I patched the jersey on May 29th, 2014. Probably time to start looking for non-sheer linen in bright yellow. Clear yellow is surprisingly hard to find.
Did find some clear yellow linen, began preparing to cut it today, progress detailed in my Sewing diary for 2019.
Moved the pocket-divider lines.
The reinforcement for the snap on the right pocket should be sewn to the inside of one of the layers of the front yoke before the yokes are sewn together.
I made it underlie the entire pocket to save trouble in getting it exactly under the snap.
Ooops. After reading the first entry in this file, I realize that I need to turn under the entire seam allowance of the back-yoke lining, not 3/8". At least I haven't pressed it yet.
The pocket trims are at least half an inch too wide.
I put gaps in the belt casing at the side seams just to make the shirt easier to assemble, but they come in handy when the drawstring gets a little out of line.
Easier to install the drawstring in the first place, too.
Before using this pattern again, I must examine the sleeve pattern and cover up the confusing notches on the sleeve head.
Note: after securing the elastic in the pocket casing, smooth the gathers off the non-stretch tape at the end, then BASTE, don't pin, to keep the gathers from moving back. Use matching thread, if possible, in case the basting is hard to get out.
Back to Rough Sewing
Back to the writing page
Back to the links page
Back to the cover page